How To Draw A Fish Easy
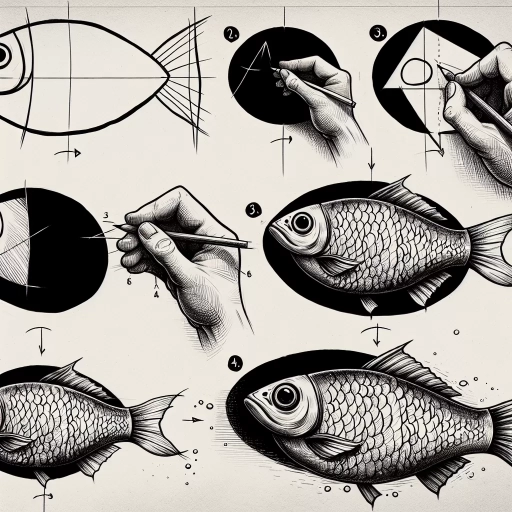
Drawing a fish can be a fun and creative activity, especially for kids and beginners. With a few simple steps, you can create a beautiful and realistic fish drawing. In this article, we will guide you through the process of drawing a fish, from the basic shape to the final details. To start, we will show you how to draw the basic shape of the fish, which is the foundation of your drawing. This will involve creating a curved body shape and adding a tail. Next, we will add fins and scales to the fish, which will give it a more realistic and textured look. Finally, we will finalize the details of the fish, including the eyes, mouth, and any other features you want to include. By following these steps, you can create a beautiful and realistic fish drawing. So, let's get started with Step 1: Drawing the Basic Shape of the Fish.
Step 1: Drawing the Basic Shape of the Fish
When drawing a fish, it's essential to start with the basics to ensure a realistic and visually appealing outcome. The first step in drawing a fish is to create the basic shape of the body, which involves drawing a simple oval for the body, followed by a smaller oval for the head, and finally adding a tail fin at the back. By breaking down the drawing process into these fundamental components, artists can establish a solid foundation for their artwork. To begin, start with a simple oval for the body, as this will provide the overall shape and proportions of the fish. This initial step will set the stage for the subsequent details, including the head and tail fin, which will be added in the following steps. By starting with a simple oval, artists can ensure a smooth and cohesive drawing process. Start with a simple oval for the body.
Start with a Simple Oval for the Body
Here is the paragraphy: Start with a simple oval for the body of the fish. This oval should be tall rather than wide, as most fish have a more vertical body shape. Make sure the oval is smooth and even, with no jagged edges or bumps. The oval should also be slightly flattened at the top and bottom, giving the fish a more streamlined appearance. Don't worry too much about the size of the oval, as you can always adjust it later. The key is to get the basic shape right, and then you can refine it as you go along. By starting with a simple oval, you'll be able to build a solid foundation for your fish drawing and ensure that it looks balanced and proportional.
Draw a Smaller Oval for the Head
To draw a smaller oval for the head, start by placing the oval above the center of the larger oval that makes up the body of the fish. The head oval should be positioned so that its bottom edge is aligned with the top edge of the body oval. Make sure the head oval is significantly smaller than the body oval, as this will help create a more realistic and proportionate fish shape. The head oval should be tall and narrow, rather than wide and flat, to give the fish a more streamlined appearance. As you draw the head oval, pay attention to its placement and proportions in relation to the body oval, as this will affect the overall balance and harmony of the fish's shape. By carefully drawing a smaller oval for the head, you'll be able to create a clear distinction between the head and body of the fish, and set the stage for adding more details and features in the next steps.
Add a Tail Fin at the Back
The tail fin, also known as the caudal fin, is a crucial part of a fish's anatomy, providing stability, balance, and propulsion through the water. To add a tail fin at the back of your fish, start by drawing a triangular shape with a rounded tip, making sure it is in proportion to the body of the fish. The tail fin should be slightly curved and tapered, with the base of the triangle being wider than the tip. The curve of the tail fin should follow the natural curve of the fish's body, creating a smooth and flowing line. Pay attention to the size and shape of the tail fin, as it can vary greatly depending on the species of fish you are drawing. Some fish, such as sharks and rays, have a more angular and rigid tail fin, while others, such as goldfish and guppies, have a more rounded and flexible tail fin. By carefully observing the shape and proportions of the tail fin, you can add a realistic and detailed touch to your fish drawing.
Step 2: Adding Fins and Scales to the Fish
Adding fins and scales to your fish drawing is a crucial step in bringing your aquatic creature to life. This step requires attention to detail and a understanding of the anatomy of a fish. To add fins and scales to your fish, you will need to draw a dorsal fin on top of the body, add a pectoral fin on each side, and sketch scales on the body using short, curved lines. By following these steps, you will be able to create a realistic and detailed fish drawing. Let's start by drawing a dorsal fin on top of the body, which will help to establish the overall shape and proportions of the fish.
Draw a Dorsal Fin on Top of the Body
Here is the paragraphy: Draw a dorsal fin on top of the body, positioned about one-third of the way down from the head. The dorsal fin should be triangular in shape, with the base of the triangle facing towards the head and the pointy end facing towards the tail. Make sure the fin is in proportion to the rest of the body, and that it's not too big or too small. You can also add a small notch at the base of the fin to give it a more realistic look. The dorsal fin is an important feature of a fish, as it helps to stabilize the body and provide balance while swimming. By adding this fin, you'll be giving your fish a more authentic and detailed appearance.
Add a Pectoral Fin on Each Side
To add a pectoral fin on each side of the fish, start by drawing a triangular shape with a rounded tip, making sure it's positioned slightly below the gill slits. The pectoral fin should be angled downwards, with the base of the triangle attached to the body of the fish. The size of the pectoral fin will depend on the type of fish you're drawing, but as a general rule, it should be roughly one-quarter to one-third the size of the dorsal fin. Once you've drawn the triangular shape, add a gentle curve to the edge of the fin, giving it a smooth, flowing appearance. Repeat the same process on the other side of the fish, making sure the pectoral fins are symmetrical and evenly spaced. As you add the pectoral fins, pay attention to the overall balance and proportions of the fish, ensuring that they complement the dorsal fin and the rest of the body. With the pectoral fins in place, your fish is starting to take shape, and you can begin to see the distinctive characteristics of the species you're drawing.
Sketch Scales on the Body Using Short, Curved Lines
When drawing scales on the body of a fish, it's essential to use short, curved lines to create a realistic and textured appearance. Start by sketching a series of curved lines that follow the natural contours of the fish's body, making sure to vary the length and spacing of the lines to create a sense of movement and flow. The curved lines should be more pronounced towards the tail and gradually decrease in size and curvature towards the head. This will help to create a sense of depth and dimensionality on the fish's body. As you add more scales, pay attention to the direction of the lines, making sure they follow the natural flow of the fish's body. You can also add some subtle variations in the thickness and texture of the lines to create a more realistic and organic appearance. By using short, curved lines to draw the scales, you'll be able to create a detailed and visually appealing texture that will bring your fish drawing to life.
Step 3: Finalizing the Details of the Fish
Here is the introduction paragraph: To finalize the details of the fish, there are several key elements to focus on. These include adding facial features, defining the gills, and refining the fins and scales. By incorporating these details, you can create a more realistic and visually appealing fish. In this section, we will explore each of these elements in more depth, starting with the addition of eyes and a mouth to give the fish a face. Here is the supporting paragraph: Adding eyes and a mouth to the fish is a crucial step in bringing it to life. The eyes should be positioned on either side of the head, with the top of the eye aligned with the top of the head. The mouth should be placed below the eyes, and can be shaped to resemble a small oval or a curved line. The size and shape of the eyes and mouth can vary depending on the type of fish you are drawing, but the key is to create a sense of balance and proportion. By adding these facial features, you can give your fish a sense of personality and character, and make it more relatable and engaging to the viewer.
Draw Eyes and a Mouth to Give the Fish a Face
To bring your fish to life, focus on adding a face by drawing eyes and a mouth. Start by sketching two small circles for the eyes, making sure they're positioned on either side of the head and roughly one-third of the way down from the top. The circles should be fairly close together, but not overlapping. For a more realistic look, add a small dot in the center of each circle to represent the pupil. You can also add a slight curve to the top of each circle to give the eyes a more rounded appearance. Next, draw a small, curved line below the eyes to create the mouth. The curve should be subtle, with the ends of the line pointing slightly upwards to give your fish a friendly appearance. You can also add a small line below the mouth to create a chin, which will help define the jawline of your fish. To add some personality to your fish, consider adding some eyebrows or eyelids, which can be created using small, curved lines above the eyes. You can also experiment with different mouth shapes and sizes to give your fish a unique expression. By adding these facial features, you'll be able to bring your fish to life and give it a personality all its own.
Add a Gill Slit on Each Side of the Head
To add a gill slit on each side of the head, start by drawing a small, curved line that follows the shape of the head, just below the eye. The gill slit should be positioned about one-third of the way down from the top of the head, and should be slightly angled towards the back of the head. The curve of the gill slit should be smooth and flowing, and should be in line with the overall shape of the head. Once you have drawn the first gill slit, repeat the process on the other side of the head, making sure to mirror the shape and position of the first gill slit. The gill slits should be symmetrical and evenly spaced on either side of the head, giving your fish a balanced and realistic appearance. By adding these small details, you can add depth and dimension to your fish drawing, and create a more lifelike and engaging image.
Refine the Fins and Scales for a More Realistic Look
Refine the fins and scales to create a more realistic look. Start by adding more details to the fins, such as the fin rays and the fin membrane. You can use short, curved lines to suggest the shape of the fin rays, and a smooth, curved line to define the edge of the fin membrane. For the scales, use short, curved lines to suggest the shape of each scale, and vary the size and spacing of the scales to create a more natural look. You can also add some texture to the scales by drawing short, curved lines that follow the shape of each scale. To add some shine to the scales, use a small dot or a short, curved line to suggest the highlight on each scale. Finally, use a range of values to create depth and dimension on the fish, with the darkest values on the back and the lightest values on the belly.