How To Tie A Shirt
Tying a shirt is a fundamental skill that every individual should possess, regardless of age or profession. Not only does it add a touch of elegance to one's appearance, but it also exudes confidence and professionalism. However, for many, tying a shirt can be a daunting task, especially for those who are new to it. In this article, we will break down the process of tying a shirt into three essential components: mastering the basics, following a step-by-step guide, and incorporating advanced techniques. By the end of this article, you will be able to tie a shirt with ease and precision. To begin, let's start with the foundation of tying a shirt - Mastering the Basics of Tying a Shirt.
Mastering the Basics of Tying a Shirt
Mastering the basics of tying a shirt is an essential skill that can elevate your style and confidence. To achieve this, it's crucial to understand the different types of shirt collars, choose the right knot for your shirt style, and prepare your shirt for tying. By grasping these fundamental concepts, you'll be able to tie your shirt with ease and create a polished look. In this article, we'll delve into the world of shirt-tying, starting with the various types of shirt collars that can make or break your outfit. Understanding the Different Types of Shirt Collars is the first step in mastering the art of tying a shirt, and it's essential to get it right.
Understanding the Different Types of Shirt Collars
Understanding the different types of shirt collars is essential to mastering the basics of tying a shirt. A shirt collar is the part of the shirt that fits around the neck, and it comes in various styles, each with its unique characteristics. The most common types of shirt collars are the point collar, spread collar, cutaway collar, and button-down collar. A point collar is the most traditional type of collar, characterized by two pointed ends that meet at the center of the neck. A spread collar, on the other hand, is wider and more angular, with the points spread apart. A cutaway collar is similar to a spread collar but has a more extreme angle, making it ideal for formal occasions. A button-down collar, as the name suggests, has buttons that fasten the collar points down, creating a more relaxed and casual look. Understanding the different types of shirt collars is crucial in choosing the right collar style to match your face shape, personal style, and the occasion. For instance, a point collar is suitable for formal events, while a button-down collar is perfect for casual gatherings. By knowing the different types of shirt collars, you can ensure that your shirt is properly tied and that you look polished and put-together.
Choosing the Right Knot for Your Shirt Style
When it comes to tying a shirt, the type of knot you choose can make a significant difference in the overall look and feel of your outfit. With so many different knots to choose from, it can be overwhelming to decide which one is right for you. The key is to consider the style of your shirt and the occasion you're dressing for. For a classic, timeless look, the Four-in-Hand knot is a great choice. It's simple, elegant, and works well with most collared shirts. If you're looking for something a bit more formal, the Windsor knot is a good option. It's a bit thicker and triangular in shape, making it perfect for spread-collar shirts and formal events. For a more modern and trendy look, the Half-Windsor knot is a great choice. It's a bit smaller than the Windsor knot, but still packs a stylish punch. If you're looking for a knot that's a bit more relaxed and casual, the Bow Tie knot is a great option. It's perfect for button-down shirts and adds a touch of whimsy to any outfit. Ultimately, the right knot for your shirt style will depend on your personal preference and the occasion you're dressing for. By experimenting with different knots and finding what works best for you, you'll be able to tie a shirt that looks great and makes you feel confident and stylish.
Preparing Your Shirt for Tying
Preparing your shirt for tying is a crucial step that often gets overlooked, but it's essential to ensure a smooth and successful tying process. To start, make sure your shirt is clean and ironed, as wrinkles and creases can make it difficult to achieve a neat and tidy knot. Next, button up your shirt, leaving the top button undone, as this will provide a clear path for the tie to pass through. Adjust the collar to your desired height and make sure it's even on both sides. If your shirt has a stiff or detachable collar, you may need to adjust it slightly to accommodate the tie. Finally, give your shirt a quick tug to ensure it's sitting comfortably and evenly around your neck. By taking these simple steps, you'll be able to create a solid foundation for your tie and set yourself up for success in mastering the basics of tying a shirt.
Step-by-Step Guide to Tying a Shirt
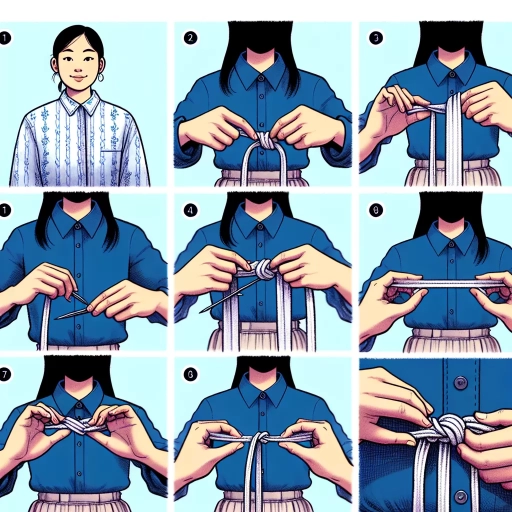
Tying a shirt can be a daunting task, especially for those who are new to it. However, with a step-by-step guide, anyone can master the art of tying a shirt. The process involves creating a foundation loop, wrapping the tie around the neck, and passing the tie through the loop. By following these simple steps, you can achieve a neat and professional-looking knot. In this article, we will break down the process into three key steps, starting with creating the foundation loop. This initial step is crucial in setting the stage for the rest of the tying process, and it's essential to get it right. By mastering the foundation loop, you'll be able to build a solid base for your knot and ensure a smooth and effortless tying experience. So, let's dive into the first step: creating the foundation loop.
Creating the Foundation Loop
The foundation loop is the starting point of tying a shirt, and it's essential to create it correctly to ensure a secure and balanced knot. To begin, place the tie around your neck with the wide end on your left side and the narrow end on your right side. The tie should be hanging down about 12 inches below your neck. Cross the wide end over the narrow end, so that it forms an "X" shape. Take the wide end and pass it behind the narrow end, then bring it up and over the knot, so that it forms a loop. You should see the wide end resting on top of the narrow end, with the loop facing upwards. This is the foundation loop, and it's the base of the knot. Make sure it's snug against your shirt and the edges are even, as this will affect the overall appearance of the knot. Adjust the loop as needed to achieve a comfortable and balanced position. With the foundation loop in place, you can now proceed to the next step of tying your shirt.
Wrapping the Tie Around the Neck
To wrap the tie around the neck, start by facing a mirror and standing up straight. Place the tie around your neck with the wide end on your left side and the narrow end on your right side. The tie should be hanging down about 12 inches below your neck. Cross the wide end over the narrow end, so that it forms an "X" shape. Take the wide end and pass it behind the narrow end. Then, bring it up and through the loop that you just created in the front. You should see the wide end start to form a knot. Take the wide end and pass it behind the narrow end again, and then bring it up and through the loop again. This will start to tighten the knot. Pull the wide end gently to tighten the knot, and adjust it so it's centered and sits comfortably under your collar. Make sure the tie is at the right length for your body, and the knot is snug against your shirt. You can adjust the tie as needed to get the perfect fit.
Passing the Tie Through the Loop
Here is the paragraphy: Passing the tie through the loop is a crucial step in tying a shirt. To do this, take the wide end of the tie and pass it behind the narrow end. Then, bring it up and through the loop that you just created in the previous step. You should see the tie start to take shape as it passes through the loop. Make sure the tie is sitting comfortably under the collar and the knot is starting to form. As you pass the tie through the loop, keep your fingers inside the loop to guide it and prevent it from coming undone. This will help you maintain control and ensure a smooth, even knot. Once the tie is through the loop, you can start to tighten it by pulling gently on the wide end. This will help the knot start to take shape and sit snugly under the collar. With the tie through the loop, you're one step closer to achieving a perfectly tied shirt.
Advanced Techniques for a Perfect Knot
The art of tying a perfect knot is a skill that requires patience, practice, and attention to detail. A well-tied knot can elevate a person's entire outfit, while a poorly tied one can detract from it. In this article, we will explore advanced techniques for achieving a perfect knot, including adjusting the knot for a comfortable fit, adding a dimple to the knot for a polished look, and tucking the tie into the shirt for a neat finish. By mastering these techniques, individuals can take their knot-tying skills to the next level and make a lasting impression. To start, let's focus on the foundation of a great knot: adjusting the knot for a comfortable fit.
Adjusting the Knot for a Comfortable Fit
Adjusting the knot for a comfortable fit is a crucial step in mastering the art of tying a shirt. Once you have tied the knot, you may need to make some adjustments to ensure it sits comfortably under your collar. To do this, start by gently tugging on the edges of the knot to loosen or tighten it as needed. If the knot feels too tight, you can try sliding it down slightly to create some extra space. On the other hand, if the knot feels too loose, you can try pulling it up to tighten it. It's also important to pay attention to the knot's position in relation to your collar. Ideally, the knot should sit snugly under the collar, without being too tight or too loose. By making these adjustments, you can achieve a comfortable and secure fit that will last throughout the day. Additionally, adjusting the knot can also help to create a more balanced and symmetrical look, which can elevate your overall style and confidence. By taking the time to adjust the knot, you can ensure that your shirt looks and feels great, and that you can focus on more important things.
Adding a Dimple to the Knot for a Polished Look
Adding a dimple to the knot is a simple yet effective way to elevate your shirt-tying game and achieve a polished look. To create a dimple, start by adjusting the knot so that it's centered and the edges are even. Then, use your index finger to create a small indentation in the center of the knot, just above the collar. Gently press down on the knot with your finger, making sure not to push too hard and distort the shape of the knot. As you press down, you should start to see a small dimple form in the center of the knot. To set the dimple in place, use your thumb to gently press the edges of the knot towards the center, making sure they're even and symmetrical. Finally, adjust the knot one last time to make sure it's centered and the dimple is in place. With a little practice, adding a dimple to your knot can become second nature, and it's a great way to add a touch of sophistication to your outfit. By incorporating this advanced technique into your shirt-tying routine, you'll be able to achieve a polished look that's sure to impress.
Tucking the Tie into the Shirt for a Neat Finish
Tucking the tie into the shirt for a neat finish is a simple yet effective technique to elevate your overall appearance. To achieve this, start by adjusting the tie so that it is centered and the edges are even. Next, gently tuck the tie into the shirt, making sure it is smooth and flat against the fabric. You can use a dimple to create a small indentation in the center of the knot, which will help the tie stay in place. To secure the tie, you can use a tie clip or a tie bar, which will keep it from coming undone throughout the day. Alternatively, you can also use a small pin to attach the tie to the shirt, but be careful not to prick yourself. By tucking the tie into the shirt, you will create a streamlined and polished look that is perfect for formal events or business meetings. This technique is especially useful for slim-cut shirts, as it helps to create a more defined silhouette. Additionally, tucking the tie into the shirt can also help to prevent it from getting in the way of your movements, allowing you to feel more comfortable and confident. Overall, tucking the tie into the shirt is a simple yet effective way to add a touch of sophistication to your outfit and make a great impression.