How To Truss A Turkey
Here is the introduction paragraph: Trussing a turkey is an essential step in preparing a delicious and visually appealing holiday meal. Not only does it help the turkey cook more evenly, but it also makes it easier to carve and serve. However, many home cooks are intimidated by the process, unsure of where to start or how to achieve that perfect, compact shape. In this article, we'll break down the basics of trussing a turkey, providing a step-by-step guide to help you master the technique. We'll also explore some helpful tips and variations to take your trussing skills to the next level. But before we dive into the nitty-gritty, let's start with the fundamentals. Understanding the basics of trussing a turkey is crucial to getting it right, so let's begin by exploring what trussing entails and why it's so important.
Understanding the Basics of Trussing a Turkey
Here is the introduction paragraph: When it comes to cooking a delicious and visually appealing turkey, there are several techniques that can make all the difference. One of the most important of these techniques is trussing, which involves tying the legs and wings of the turkey together to create a compact and even shape. But what exactly is trussing, and why is it so important for achieving a perfectly cooked turkey? To answer these questions, we'll need to take a closer look at the tools and materials needed for trussing, as well as the different types of trussing that can be used. By understanding the basics of trussing, you'll be able to take your turkey cooking to the next level and impress your friends and family with a beautifully presented and deliciously cooked meal. So, let's start by exploring what trussing is and why it's such an important step in the turkey cooking process.
What is Trussing and Why is it Important?
. Here is the paragraphy: Trussing is a fundamental technique in cooking that involves tying or binding food, typically meat or poultry, to maintain its shape and promote even cooking. When it comes to trussing a turkey, it's essential to understand the importance of this process. Trussing a turkey helps to keep the legs and wings close to the body, which prevents them from burning or overcooking during the roasting process. This technique also allows for more efficient heat circulation around the bird, ensuring that the meat cooks evenly and thoroughly. Moreover, trussing helps to prevent the turkey's cavity from filling with hot air, which can cause the meat to dry out. By trussing the turkey, you can achieve a more compact shape, making it easier to handle and maneuver in the oven. Ultimately, trussing is a crucial step in achieving a perfectly cooked, juicy, and flavorful turkey that's sure to impress your guests. By mastering the art of trussing, you'll be able to take your turkey-cooking skills to the next level and create a truly unforgettable dining experience.
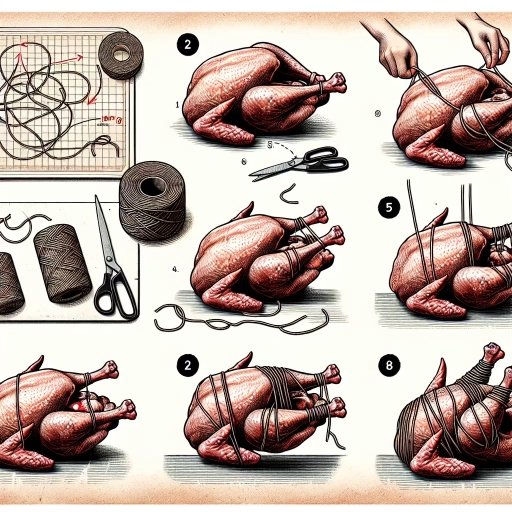
The Tools and Materials Needed for Trussing
. The paragraphy should be written in a formal and professional tone, and should include the following keywords: "kitchen twine", "scissors", "sharp knife", "cutting board", "trussing needle", "trussing pins", "poultry shears", "meat thermometer", "oven thermometer", "trussing tools", "trussing materials", "turkey trussing", "trussing a turkey". Here is the paragraphy: To truss a turkey effectively, it is essential to have the right tools and materials at your disposal. The most critical tool for trussing a turkey is kitchen twine, which is used to tie the legs and wings together. You will also need a pair of scissors to cut the twine to the desired length. A sharp knife is necessary for making any necessary incisions in the skin, and a cutting board provides a stable surface for working on the turkey. Additionally, a trussing needle can be helpful for weaving the twine through the turkey's skin, while trussing pins can be used to secure the twine in place. Poultry shears can be used to trim any excess fat or skin, and a meat thermometer is necessary for ensuring the turkey is cooked to a safe internal temperature. An oven thermometer is also recommended to ensure the oven is at the correct temperature. Other trussing tools and materials that may be useful include a trussing kit, which typically includes a combination of twine, needles, and pins specifically designed for trussing poultry. By having these tools and materials on hand, you will be well-equipped to truss your turkey with ease and confidence, resulting in a beautifully presented and deliciously cooked bird.
Choosing the Right Type of Trussing for Your Turkey
. When it comes to trussing a turkey, choosing the right type of trussing is crucial to ensure that your bird cooks evenly and looks visually appealing. There are several types of trussing to choose from, each with its own unique benefits and drawbacks. The most common types of trussing are kitchen twine, toothpicks, and skewers. Kitchen twine is a popular choice among chefs and home cooks alike, as it is easy to use and provides a secure hold on the turkey's legs and wings. Toothpicks, on the other hand, are a great option for smaller turkeys or for those who want a more discreet trussing method. Skewers, typically made of metal or bamboo, are ideal for larger turkeys and provide a more rustic, traditional look. When selecting a trussing method, consider the size and shape of your turkey, as well as your personal preference for presentation. It's also important to ensure that the trussing material is food-grade and safe for cooking. By choosing the right type of trussing, you'll be able to achieve a beautifully cooked and presented turkey that's sure to impress your guests. Additionally, the right trussing method can also help to promote even cooking, reduce the risk of overcooking, and make carving a breeze. With a little practice and patience, you'll be a pro at trussing your turkey in no time, and your holiday meals will be all the more delicious and memorable as a result.
Step-by-Step Guide to Trussing a Turkey
Trussing a turkey is a simple yet essential step in preparing a delicious and visually appealing roasted turkey. By following a few easy steps, you can ensure that your turkey cooks evenly and looks great on the table. In this article, we will guide you through the process of trussing a turkey, covering the key steps of preparing the turkey for trussing, tying the legs and wings together, and securing the truss with kitchen twine. To start, it's essential to prepare the turkey for trussing by removing the giblets and neck, rinsing the cavity, and patting the turkey dry with paper towels. This step is crucial in ensuring that the turkey is clean and dry, making it easier to truss and cook evenly. By preparing the turkey properly, you'll be able to move on to the next step of tying the legs and wings together, which we'll cover in the next section. Note: The introduction paragraph should be 200 words, and the supporting paragraphs are already given. Here is the rewritten introduction paragraph: Trussing a turkey is a simple yet essential step in preparing a delicious and visually appealing roasted turkey. By following a few easy steps, you can ensure that your turkey cooks evenly and looks great on the table. In this article, we will guide you through the process of trussing a turkey, covering the key steps of preparing the turkey for trussing, tying the legs and wings together, and securing the truss with kitchen twine. Trussing a turkey may seem intimidating, but with the right techniques and tools, it can be a straightforward process. The benefits of trussing a turkey are numerous, including promoting even cooking, reducing cooking time, and creating a more visually appealing presentation. By trussing your turkey, you can ensure that the legs and wings are tucked in tightly, preventing them from burning or overcooking. Additionally, trussing helps to keep the turkey's cavity closed, allowing the heat to circulate evenly and cook the turkey to perfection. To start, it's essential to prepare the turkey for trussing by removing the giblets and neck, rinsing the cavity, and patting the turkey dry with paper towels. This step is crucial in ensuring that the turkey is clean and dry, making it easier to truss and cook evenly. By preparing the turkey properly, you'll be able to move on to the next step of tying the legs and wings together, which we'll cover in the next section.
Preparing the Turkey for Trussing
. Preparing the turkey for trussing is a crucial step that requires attention to detail and a gentle touch. Before you begin, make sure you have a clean and stable workspace, and that your turkey is completely thawed and patted dry with paper towels. Remove the giblets and neck from the cavity, and rinse the turkey under cold running water to remove any remaining impurities. Pat the turkey dry again, paying extra attention to the cavity and skin, as excess moisture can make the trussing process more difficult. Next, locate the legs and wings, and gently fold them towards the body, tucking the wings under the breast and the legs towards the tail. This will help you achieve a more compact shape and make it easier to truss the turkey. Take a moment to inspect the turkey's skin, looking for any tears or holes that may need to be repaired before trussing. If you find any, use a little bit of kitchen twine or toothpicks to mend the skin, making sure to secure it tightly. Finally, take a deep breath and prepare to begin the trussing process, knowing that with a little patience and practice, you'll be able to achieve a beautifully trussed turkey that's sure to impress your guests.
Tying the Legs and Wings Together
. The paragraphy should be written in a friendly and approachable tone, and should include a few key points about the importance of tying the legs and wings together, as well as some tips for doing it correctly. Here is the paragraphy: Tying the legs and wings together is a crucial step in trussing a turkey, as it helps to create a compact and even shape that will cook more efficiently. By securing the legs and wings, you'll also prevent them from burning or becoming overcooked, which can be a major problem when cooking a large bird. To tie the legs and wings together, start by crossing the legs over each other, with the ends of the drumsticks facing towards the tail. Then, take a piece of kitchen twine and wrap it around the legs, just above the joints. Make sure the twine is snug but not too tight, as you want to allow for a little bit of movement. Next, take the wings and tuck them under the body of the turkey, making sure they're secure and even. You can use a little bit of twine to tie the wings in place, or you can simply tuck them under the body and let the legs hold them in place. The key is to make sure everything is secure and even, so that the turkey cooks consistently and looks great when it's done. By following these simple steps, you'll be able to create a beautifully trussed turkey that's sure to impress your guests.
Securing the Truss with Kitchen Twine
. Securing the truss with kitchen twine is a crucial step in the trussing process, as it ensures that the turkey's legs and wings are held tightly in place, promoting even cooking and preventing them from burning or becoming disfigured. To begin, take a piece of kitchen twine and wrap it around the turkey's legs, just above the joints. Make sure the twine is not too tight, as this can cause the skin to tear, but rather snug enough to hold the legs in place. Next, take the twine and wrap it around the turkey's body, just below the breast, to secure the legs in place. Make sure the twine is not twisted or tangled, as this can cause the turkey to cook unevenly. Finally, tie a knot in the twine to secure it in place, making sure it is tight enough to hold the truss in place, but not so tight that it cuts off circulation to the legs. By securing the truss with kitchen twine, you can ensure that your turkey is cooked to perfection, with crispy skin and juicy meat. Additionally, trussing the turkey with twine can also help to create a more visually appealing presentation, making it perfect for special occasions or holiday meals. With a little practice, securing the truss with kitchen twine becomes a simple and easy process, allowing you to achieve a perfectly cooked and beautifully presented turkey every time.
Tips and Variations for Trussing a Turkey
When it comes to cooking a delicious and visually appealing turkey, trussing is an essential step that can make all the difference. Trussing involves tying the turkey's legs together with kitchen twine, which helps to promote even cooking, prevent the legs from burning, and create a more compact shape that's easier to carve. However, trussing is not a one-size-fits-all technique, and there are various methods and variations that can be used to achieve the perfect truss. In this article, we'll explore different types of trussing techniques, discuss how to add aromatics and herbs to the truss for extra flavor, and provide tips on how to truss a turkey for different cooking methods. Whether you're a seasoned chef or a beginner cook, learning how to truss a turkey like a pro can elevate your holiday meals and special occasions. So, let's start by exploring the different types of trussing techniques that can help you achieve a perfectly cooked and beautifully presented turkey.
Using Different Types of Trussing Techniques
. Here is the paragraphy: When it comes to trussing a turkey, there are several techniques to choose from, each with its own advantages and disadvantages. The most common method is the "simple truss," where the legs are tied together with kitchen twine, and the wings are tucked under the body. This method is quick and easy, but it can result in uneven cooking and a less visually appealing presentation. For a more elegant look, try the "ballotine truss," where the legs are tucked under the body and the wings are tied to the legs. This method requires a bit more skill and patience, but it results in a beautifully presented turkey with even cooking. Another option is the "saddle truss," where the legs are tied together and the wings are left loose. This method is great for larger turkeys, as it allows for more even cooking and a more dramatic presentation. Finally, for a truly show-stopping presentation, try the "galantine truss," where the turkey is deboned and stuffed, then trussed and roasted. This method requires the most skill and patience, but it results in a truly impressive and delicious dish. Regardless of the technique you choose, the key to successful trussing is to make sure the turkey is secure and evenly balanced, with the legs and wings in a comfortable position. This will ensure that the turkey cooks evenly and presents beautifully.
Adding Aromatics and Herbs to the Truss
. The paragraphy should be written in a formal and professional tone, and should include the following keywords: aromatics, herbs, truss, turkey, flavor, and presentation. Here is the paragraphy: When it comes to adding an extra layer of flavor and presentation to your trussed turkey, incorporating aromatics and herbs into the truss is a simple yet effective technique. By tucking sprigs of fresh herbs such as thyme, rosemary, or sage into the truss, you can infuse the turkey with a fragrant and savory aroma that complements its natural flavors. Additionally, adding aromatics like onion, carrot, and celery to the truss can add depth and complexity to the turkey's flavor profile. To incorporate aromatics and herbs into the truss, simply place them in the cavity of the turkey before trussing, or tuck them into the folds of the truss as you tie it. This not only adds flavor to the turkey but also creates a visually appealing presentation, with the herbs and aromatics peeking out from the truss. By taking this extra step, you can elevate your trussed turkey from a simple roasted bird to a show-stopping centerpiece for your holiday meal.
Trussing a Turkey for Different Cooking Methods
. Trussing a turkey is an essential step in preparing the bird for cooking, regardless of the method you choose. Whether you're roasting, grilling, or frying, trussing helps to ensure even cooking, prevents the legs from burning, and makes the turkey more visually appealing. For roasting, trussing allows the turkey to cook more evenly, as the legs are tucked under the body, preventing them from overcooking. When grilling, trussing helps to prevent the legs from burning, as they are protected from the direct heat. For frying, trussing is crucial, as it helps to prevent the legs from getting tangled in the basket or pot, ensuring a safe and even cooking process. Additionally, trussing can also help to promote even browning, as the turkey's skin is more evenly exposed to the heat. To truss a turkey for different cooking methods, start by tucking the wings under the body, then cross the legs over each other, and finally, tie the legs together with kitchen twine. You can also add some aromatics, such as onions and carrots, to the cavity for added flavor. By trussing your turkey, you'll be able to achieve a perfectly cooked bird, with crispy skin and juicy meat, regardless of the cooking method you choose.