How To Draw A Female Body
Here is the introduction paragraph: Learning to draw the female body can be a challenging but rewarding experience. To create a realistic and aesthetically pleasing representation, it's essential to understand the basics of female body proportions, sketch the overall shape and form, and refine the details and features. In this article, we will guide you through the process of drawing a female body, starting with the fundamentals of proportion and measurement. By grasping these basics, you'll be able to create a solid foundation for your drawing, which will make it easier to sketch the overall shape and form, and eventually refine the details and features. Understanding the basics of female body proportions is crucial, as it will help you to accurately depict the relationships between different body parts and create a more realistic and balanced drawing. Let's start by exploring the basics of female body proportions.
Understanding the Basics of Female Body Proportions
Understanding the basics of female body proportions is essential for artists, designers, and anyone interested in human anatomy. To accurately depict the female form, it's crucial to grasp the fundamental principles of proportion, measurement, and balance. This involves measuring the head and body ratio, identifying key landmarks and reference points, and recognizing the importance of symmetry and balance. By mastering these concepts, individuals can create more realistic and aesthetically pleasing representations of the female body. In this article, we will delve into the world of female body proportions, starting with the foundation of measurement: the head and body ratio. By understanding how to accurately measure and proportion the head in relation to the body, artists and designers can establish a solid foundation for their work. Let's begin by exploring the intricacies of measuring the head and body ratio.
Measuring the Head and Body Ratio
The head and body ratio is a fundamental aspect of drawing the female body. To measure this ratio, start by drawing a vertical line from the top of the head to the heels. Divide this line into eight equal parts, with the top part representing the head. The body should be roughly seven times the size of the head. This ratio can vary slightly depending on the individual and the style of drawing, but it provides a general guideline for achieving proportionate measurements. The head is typically one-eighth of the total body length, with the remaining seven-eighths comprising the torso, arms, and legs. By using this ratio, artists can ensure that their drawings are proportionate and visually appealing. Additionally, measuring the head and body ratio can help artists to better understand the overall proportions of the female body and make adjustments as needed to achieve a more realistic and balanced representation.
Identifying the Key Landmarks and Reference Points
When drawing the female body, it's essential to identify the key landmarks and reference points to ensure accurate proportions and a natural, fluid shape. Start by locating the head, which should be positioned at the top of the body, with the chin aligned with the center of the torso. The shoulders should be slightly sloped and in line with the ears, while the breasts should be positioned about one-third of the way down from the shoulders. The nipples should be aligned with the center of the torso, and the waist should be narrower than the bust and hips. The hips should be wider than the waist, with the pelvic bone positioned about halfway between the waist and knees. The knees should be in line with the center of the ankles, and the feet should be positioned directly under the body, with the weight evenly distributed between both feet. Additionally, pay attention to the following reference points: the clavicles, which should be visible and slightly curved; the ribcage, which should be slightly indented; and the navel, which should be positioned about halfway between the waist and pubic bone. By identifying and accurately placing these key landmarks and reference points, you'll be able to create a well-proportioned and natural-looking female body.
Recognizing the Importance of Symmetry and Balance
Recognizing the importance of symmetry and balance is crucial when drawing the female body. Symmetry refers to the arrangement of body parts on either side of a central axis, while balance refers to the distribution of visual weight and stability. A symmetrical body has identical features on both sides of the axis, such as the eyes, eyebrows, and shoulders. Balance, on the other hand, is achieved when the visual weight of the body is evenly distributed, creating a sense of stability and harmony. To achieve symmetry and balance in your drawing, start by dividing the paper into two halves with a vertical line, representing the central axis. Then, draw the features on one side of the axis and mirror them on the other side, making sure to maintain identical proportions and placement. Pay attention to the overall balance of the body, ensuring that the visual weight is evenly distributed and the body appears stable and harmonious. By recognizing the importance of symmetry and balance, you can create a more realistic and aesthetically pleasing drawing of the female body.
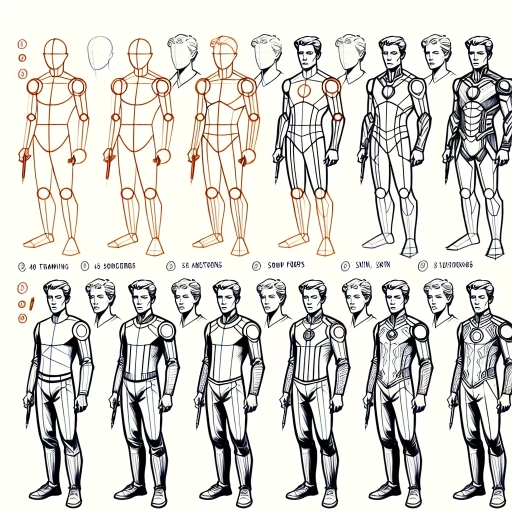
Sketching the Overall Shape and Form
When it comes to sketching the overall shape and form of a subject, it's essential to break down the process into manageable steps. By doing so, artists can ensure that their sketches are accurate, proportionate, and visually appealing. One effective approach is to start by using simple shapes to block out the body, which helps to establish the overall proportions and placement of the subject's features. From there, artists can refine their sketches by defining the curves and contours of the female form, paying close attention to the subtle nuances that make each subject unique. Finally, adding volume and dimension to the sketch can help to create a more lifelike and engaging representation of the subject. By following these steps, artists can create a solid foundation for their sketches and set themselves up for success. In this article, we'll explore each of these steps in more detail, starting with the importance of using simple shapes to block out the body.
Using Simple Shapes to Block Out the Body
When sketching the overall shape and form of the female body, using simple shapes to block out the body can be a helpful technique. This method involves breaking down the body into basic geometric shapes, such as spheres, cylinders, and rectangles, to create a rough outline of the figure. By using simple shapes, you can quickly and easily capture the proportions and overall structure of the body, without getting bogged down in details. Start by sketching a large oval or egg shape for the torso, making sure to capture the gentle curves of the female form. Add a smaller oval or sphere for the head, connected to the torso by a neck. Use a cylinder or rectangle to block out the arms and legs, paying attention to their proportions and placement in relation to the torso. For the hips and thighs, use a larger oval or rectangle, making sure to capture the curves and contours of the female form. By using simple shapes to block out the body, you can create a solid foundation for your drawing and ensure that your proportions are accurate. This technique can also help you to focus on the overall shape and form of the body, rather than getting caught up in details, allowing you to create a more balanced and harmonious drawing.
Defining the Curves and Contours of the Female Form
The female form is characterized by a unique combination of curves and contours that define its shape and structure. The overall shape of the female body can be broken down into several key areas, including the bust, waist, hips, and thighs. The bust is typically rounded and curved, with the breasts forming a gentle, sloping shape. The waist is narrower than the bust and hips, creating a defined silhouette. The hips are wider than the waist, with a subtle curve that flows into the thighs. The thighs are generally straighter than the hips, with a slight tapering towards the knees. When sketching the female form, it's essential to capture these curves and contours accurately, using smooth, flowing lines to convey the softness and femininity of the body. Pay attention to the subtle transitions between each area, using gentle, gradual curves to create a sense of continuity and fluidity. By carefully defining the curves and contours of the female form, you can create a sketch that is both anatomically accurate and aesthetically pleasing.
Adding Volume and Dimension to the Sketch
When adding volume and dimension to the sketch, it's essential to consider the overall proportions and anatomy of the female body. Start by identifying the major muscle groups, such as the deltoids, biceps, and triceps in the arms, and the quadriceps and hamstrings in the legs. Use gentle, flowing lines to suggest the contours of these muscles, taking care not to overdefine them. The female form is typically softer and more curved than the male form, so avoid sharp angles and harsh lines. Instead, focus on creating a sense of fluidity and movement, as if the body is in motion. Pay attention to the way the muscles interact with the bones, creating subtle bulges and indentations that add depth and dimension to the sketch. For example, the deltoids should be slightly rounded, while the biceps and triceps should be more defined. The quadriceps should be prominent, while the hamstrings should be slightly more subtle. By carefully balancing these elements, you can create a sketch that captures the essence of the female form, with all its curves and contours. As you add volume and dimension, remember to keep your lines confident and expressive, using a range of values and textures to create a sense of depth and dimensionality. By doing so, you'll be able to bring your sketch to life, creating a vibrant and engaging representation of the female body.
Refining the Details and Features
When it comes to refining the details and features of a character, there are several key elements to focus on in order to bring the character to life. Three crucial aspects to consider are rendering the facial features and expressions, defining the hands and feet with precision, and adding texture and pattern to the hair and clothing. By paying close attention to these details, artists can create a more realistic and engaging character that captures the viewer's attention. Rendering the facial features and expressions is particularly important, as the face is often the first thing that people notice when looking at a character. By carefully crafting the shape and structure of the face, as well as the subtle nuances of expression, artists can convey a wealth of information about the character's personality, emotions, and backstory. In the next section, we'll take a closer look at the techniques involved in rendering the facial features and expressions.
Rendering the Facial Features and Expressions
When rendering the facial features and expressions, it's essential to capture the subtleties that convey emotion and personality. Start by defining the overall shape of the face, including the contours of the forehead, cheeks, and jawline. Use gentle, flowing lines to suggest the softness of the skin, and pay attention to the proportions of the facial features. The eyes, for example, should be about one-third of the way down from the top of the head, while the nose should be roughly halfway between the eyes and the chin. The mouth should be slightly curved, with the Cupid's bow (the curve of the upper lip) forming a gentle, rounded shape. To add depth and dimension, use subtle shading and hatching techniques to suggest the contours of the face, such as the hollows of the eyes and the curve of the cheekbones. When it comes to expressions, consider the emotions you want to convey and use a range of techniques to bring them to life. For a subtle, enigmatic smile, for example, you might use a gentle, upward curve of the mouth and a slight raising of the eyebrows. For a more dramatic expression, such as a look of surprise or shock, you might use more exaggerated lines and shading to convey a sense of tension or drama. Ultimately, the key to rendering convincing facial features and expressions is to observe the subtleties of the human face and to practice, practice, practice until you can capture them with confidence and precision.
Defining the Hands and Feet with Precision
The hands and feet are often considered the most challenging parts of the body to draw, as they require a great deal of precision and attention to detail. To define the hands and feet with precision, start by breaking them down into their individual components. The hands consist of the wrist, palm, fingers, and fingernails, while the feet comprise the ankle, heel, arch, toes, and toenails. When drawing the hands, pay close attention to the proportions and placement of the fingers, as well as the shape and size of the fingernails. The fingers should be tapered and slightly curved, with the thumb being the shortest and thickest. The fingernails should be oval-shaped and smooth, with a slight curve to follow the natural shape of the finger. When drawing the feet, focus on the shape and proportions of the toes, as well as the arch and heel. The toes should be tapered and slightly curved, with the big toe being the largest and most prominent. The arch should be smooth and curved, with a slight indentation at the heel. The toenails should be oval-shaped and smooth, with a slight curve to follow the natural shape of the toe. By paying close attention to these details and proportions, you can create hands and feet that are both precise and realistic.
Adding Texture and Pattern to the Hair and Clothing
Adding texture and pattern to the hair and clothing can elevate the overall realism and visual interest of your drawing. For the hair, consider adding texture by suggesting individual strands or layers, using short, curved lines that follow the shape of the head. You can also add volume and depth by indicating the hair's thickness and flow, using gentle, sweeping lines that radiate from the scalp. For a more detailed look, try adding texture to the hair's ends, using short, choppy lines to suggest a layered or feathered cut. When it comes to clothing, texture and pattern can add a wealth of visual interest. Consider adding subtle texture to fabrics like cotton or denim, using short, gentle lines that suggest the weave of the fabric. For more luxurious fabrics like silk or velvet, try adding a soft, smooth texture that catches the light. Patterns like stripes, polka dots, or florals can add a playful touch to your drawing, and can be achieved using a variety of techniques, from simple lines and shapes to more intricate, detailed designs. To add pattern to your drawing, start by lightly sketching the overall shape of the garment, then use a range of lines and shapes to suggest the pattern. Don't be afraid to experiment and try out different techniques – the key to adding texture and pattern is to have fun and be creative!