How To Remove Lashes At Home
Removing false lashes at home can be a daunting task, but with the right guidance, it can be done safely and effectively. To achieve a successful removal, it's essential to understand the process and take necessary precautions. In this article, we will walk you through the steps to remove lashes at home, covering preparation, the removal process, and aftercare. Preparation is crucial to ensure a smooth and safe removal, and it's the first step in the process. By understanding what to expect and how to prepare, you can set yourself up for success. So, let's start with the foundation of a successful removal: preparation is key.
Preparation is Key
Preparation is key when it comes to removing individual lashes. To ensure a safe and successful process, it's essential to take the time to prepare properly. This involves choosing the right remover, preparing your lashes, and gathering essential tools. By doing so, you'll be able to remove your individual lashes with ease and minimize the risk of damage or irritation. In this article, we'll explore each of these steps in more detail, starting with the importance of choosing the right remover.
Choose the Right Remover
When it comes to removing lashes at home, choosing the right remover is crucial. There are several types of removers available, including oil-based, gel, and cream removers. Oil-based removers, such as coconut oil or olive oil, are gentle and effective, but may not be suitable for sensitive eyes. Gel removers are easy to apply and remove, but can be more drying to the eyes. Cream removers are a good option for sensitive eyes, but may require more effort to remove the lashes. It's essential to choose a remover that is suitable for your eye type and the type of lashes you have. If you have sensitive eyes, look for a remover that is fragrance-free and hypoallergenic. If you have stubborn lashes, a gel or cream remover may be more effective. Always read the instructions and follow the recommended application and removal process to ensure safe and effective removal.
Prepare Your Lashes
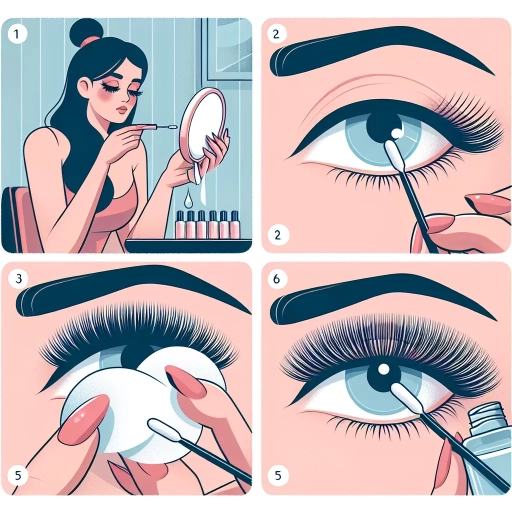
Here is the paragraphy: To prepare your lashes for removal, start by gently washing your face with a mild cleanser to remove any dirt, oil, or makeup. This will help loosen the adhesive and make the removal process easier. Next, use a lash cleanser or a mixture of equal parts water and white vinegar to clean the lashes themselves. This will help break down the adhesive and prepare the lashes for removal. Be sure to let the solution sit on the lashes for a few minutes before rinsing with warm water. You can also use a cotton swab or a soft-bristled brush to gently remove any excess adhesive or debris from the lashes. Additionally, you can use a lash remover or a adhesive remover to help dissolve the adhesive and make the removal process easier. It's also important to note that if you have sensitive eyes or skin, you may want to do a patch test before using any new products or solutions to ensure that you don't have any adverse reactions. By taking the time to properly prepare your lashes, you can make the removal process much easier and reduce the risk of damaging your natural lashes.
Gather Essential Tools
To remove lashes at home, it's crucial to gather essential tools to ensure a safe and successful process. You'll need a good quality lash remover, which can be a cream, gel, or liquid solution. Choose a remover that is suitable for your lash type and the type of adhesive used. Additionally, you'll need a pair of tweezers to gently grasp the lashes, a lash applicator or a cotton swab to apply the remover, and a clean cloth or cotton pad to wipe away any excess remover and adhesive. It's also recommended to have a mirror, preferably a magnifying one, to get a closer look at the lashes and ensure you're removing them correctly. Furthermore, having a pair of scissors on hand can be helpful in case you need to trim any excess lash or adhesive. Lastly, make sure to have a gentle eye makeup remover and a moisturizer to clean and soothe the area after the removal process. By having all these tools ready, you'll be well-prepared to remove your lashes at home safely and effectively.
The Removal Process
The removal process of individual lashes can be a bit tricky, but with the right techniques and products, it can be done safely and effectively. To start, it's essential to apply a remover specifically designed for individual lashes, which helps to break down the adhesive. Once the remover is applied, it's crucial to wait for the adhesive to break down, allowing the lashes to loosen and become easier to remove. Finally, gently removing the lashes is key to avoiding any damage or discomfort. By following these steps, you can ensure a successful removal process. To begin, let's take a closer look at the first step: applying the remover.
Apply the Remover
Apply the remover to the lashes, making sure to saturate the adhesive thoroughly. Gently massage the remover into the lashes, working from the outer corner of the eye to the inner corner. Be careful not to get the remover in your eyes, as it can cause irritation. Let the remover sit for a few minutes to allow it to penetrate the adhesive and loosen the lashes. You can use a cotton swab or a lint-free wipe to gently wipe away any excess remover. Repeat the process if necessary, until the lashes start to come off easily. It's essential to be patient and gentle when applying the remover, as rough handling can cause damage to your natural lashes.
Wait for the Adhesive to Break Down
When removing lashes at home, it's essential to wait for the adhesive to break down before attempting to take off the lashes. This step is crucial in ensuring a safe and successful removal process. The adhesive used to attach the lashes is designed to be strong and long-lasting, but it can be broken down with the right products and techniques. To start, apply a lash remover or a mixture of oil and water to the lashes and let it sit for a few minutes. This will help loosen the adhesive and make it easier to remove the lashes. It's also important to be patient and not rush the process, as forcing the lashes off can cause damage to your natural lashes or even lead to lash loss. Instead, gently massage the remover into the lashes and wait for the adhesive to break down. This can take anywhere from a few minutes to an hour, depending on the type of adhesive used and the individual's lash type. Once the adhesive has broken down, you can proceed with the removal process, carefully peeling off the lashes from the outer corner of your eye. By waiting for the adhesive to break down, you can ensure a safe and successful removal process that doesn't damage your natural lashes.
Gently Remove the Lashes
Gently remove the lashes by soaking a cotton pad with the adhesive remover and placing it on the lash band. Let it sit for about 30 seconds to allow the remover to penetrate the adhesive. Then, gently peel the lashes off from the outer corner, working your way inward. Be careful not to pull or tug on the lashes, as this can cause damage to your natural lashes. If the lashes are still stubborn, you can repeat the process or use a lash remover wipe to help loosen the adhesive. Once the lashes are removed, use a gentle eye makeup remover to clean the area and remove any remaining adhesive or makeup.
Aftercare and Precautions
After getting eyelash extensions, it's essential to take good care of your lashes to maintain their quality and longevity. Proper aftercare and precautions can make a significant difference in how long your lashes last and how healthy they remain. To ensure the best results, it's crucial to clean and moisturize your lids regularly, avoid using harsh products that can damage the lashes or the adhesive, and consider seeking professional help if you experience any issues or complications. By following these simple tips, you can enjoy your beautiful eyelash extensions for a longer period. In this article, we will explore the importance of aftercare and precautions for eyelash extensions, starting with the first crucial step: clean and moisturize your lids.
Clean and Moisturize Your Lids
To clean and moisturize your lids after removing your lashes, start by gently washing the area with a mild soap and lukewarm water. Be sure to remove any remaining adhesive or debris from the lash removal process. Next, pat the area dry with a clean towel and apply a fragrance-free moisturizer to help soothe and hydrate the skin. You can also use a cotton swab to apply a small amount of coconut oil or olive oil to the lash line, as these oils are gentle and can help to nourish the skin. Additionally, consider using a lash serum or lash oil that is specifically designed to promote healthy lash growth and strengthen the lashes. By following these steps, you can help to keep your lids clean and moisturized, reducing the risk of irritation or infection. It's also important to note that you should avoid using harsh chemicals or exfoliating products on the area for at least 24 hours after removing your lashes, as this can cause further irritation. By taking good care of your lids, you can help to ensure a healthy and successful lash removal process.
Avoid Using Harsh Products
When it comes to removing lashes at home, it's essential to avoid using harsh products that can damage your natural lashes or irritate your eyes. Many commercial lash removers contain chemicals like acetone, which can be too harsh for your delicate eye area. Instead, opt for a gentle and fragrance-free remover that is specifically designed for lash removal. Look for products that are labeled as "gentle" or "sensitive eyes friendly." You can also consider using natural alternatives like coconut oil or olive oil, which are gentle and effective in breaking down the adhesive. Additionally, avoid using products that contain alcohol, as they can dry out your lashes and cause irritation. By choosing a gentle remover, you can ensure a safe and successful lash removal process.
Consider Professional Help if Needed
If you're struggling to remove your lashes at home or if you're unsure about the process, consider seeking professional help from a licensed esthetician or a lash technician. They have the training, experience, and equipment to safely remove your lashes and prevent any damage to your natural lashes. A professional can also provide guidance on how to care for your lashes after removal and recommend the best products to use. Additionally, if you experience any complications or discomfort during the removal process, a professional can address these issues promptly and effectively. Don't hesitate to seek help if you're unsure or uncomfortable removing your lashes at home, as it's always better to prioritize your eye health and safety.