How To Make A Lectern
A lectern is a vital piece of furniture in any presentation setting, providing a comfortable and professional platform for speakers to deliver their message. Whether you're a teacher, a business professional, or a public speaker, having a high-quality lectern can make a significant difference in your presentation. However, purchasing a lectern can be expensive, and it may not always fit your specific needs. That's why making your own lectern can be a great alternative. In this article, we will guide you through the process of creating a lectern that meets your requirements. We will start by discussing the design of the lectern, including the type of material to use, the size, and the style. Then, we will move on to the building process, where we will provide you with step-by-step instructions on how to assemble the lectern. Finally, we will show you how to add the finishing touches, including the installation of any hardware and the application of a finish. By following these steps, you will be able to create a professional-looking lectern that will enhance your presentations. So, let's get started with the first step: designing the lectern.
Designing the Lectern
When designing a lectern, there are several key factors to consider in order to create a functional and visually appealing piece of furniture. Three of the most important considerations are the material, size and shape, and style and aesthetic of the lectern. The material used to construct the lectern can greatly impact its durability and overall look, with options ranging from traditional wood to modern metal and glass. The size and shape of the lectern are also crucial, as they can affect the comfort and visibility of the speaker, as well as the overall flow of the presentation. Finally, the style and aesthetic of the lectern can greatly impact the tone and atmosphere of the presentation, with options ranging from sleek and modern to traditional and ornate. By carefully considering these factors, designers can create a lectern that is both functional and visually stunning. One of the first and most important considerations when designing a lectern is choosing the right material.
Choosing the Right Material
When it comes to designing a lectern, choosing the right material is crucial. The material you select will not only affect the overall aesthetic of the lectern but also its durability and functionality. Here are some popular materials to consider: wood, metal, glass, and acrylic. Wood is a classic choice for lecterns, offering a warm and traditional look. It can be stained or painted to match any décor, and it's also a sustainable option. Metal lecterns, on the other hand, provide a sleek and modern appearance. They can be made from aluminum, steel, or brass, and are often used in contemporary settings. Glass lecterns are perfect for those who want a minimalist and sophisticated look. They can be clear, frosted, or tinted, and are often used in high-end presentations. Acrylic lecterns are a cost-effective option that offers a similar look to glass. They are lightweight, easy to transport, and can be customized with various colors and designs. Ultimately, the right material for your lectern will depend on your personal style, the occasion, and the intended use. Consider the level of durability you need, the desired aesthetic, and the budget you have in mind. By choosing the right material, you can create a lectern that not only looks great but also serves its purpose effectively.
Deciding on the Size and Shape
When deciding on the size and shape of your lectern, there are several factors to consider. First, think about the space where the lectern will be used. Measure the room and consider the distance between the lectern and the audience. A larger lectern may be suitable for a large auditorium, while a smaller one may be more appropriate for a conference room or classroom. Next, consider the type of presentation that will be given. If the presenter will be using a laptop or other equipment, a lectern with a larger surface area may be necessary. On the other hand, if the presenter will be speaking from notes or a script, a smaller lectern may be sufficient. Additionally, consider the style and aesthetic of the room. A modern, sleek lectern may be suitable for a contemporary space, while a more traditional, ornate lectern may be more fitting for a historic or formal setting. In terms of shape, a rectangular or square lectern is often the most practical choice, as it provides a stable surface for notes and equipment. However, a curved or angled lectern can add visual interest and create a more dynamic presentation space. Ultimately, the size and shape of the lectern should be determined by the specific needs and goals of the presenter and the audience.
Considering the Style and Aesthetic
When designing a lectern, it's essential to consider the style and aesthetic that will complement the speaker, the audience, and the setting. The style of the lectern should reflect the tone and atmosphere of the event, whether it's formal, informal, modern, or traditional. For instance, a sleek and minimalist design may be suitable for a modern conference, while a more ornate and classic design may be fitting for a formal gala. The aesthetic of the lectern should also take into account the speaker's personal style and the brand identity of the organization. A well-designed lectern can enhance the speaker's credibility and authority, while a poorly designed one can detract from their message. Additionally, the style and aesthetic of the lectern can also influence the audience's perception of the event and the speaker. A lectern that is visually appealing and well-designed can create a positive and engaging atmosphere, while a lectern that is dull and uninviting can lead to a disengaged audience. Therefore, it's crucial to consider the style and aesthetic of the lectern carefully to ensure that it aligns with the overall goals and objectives of the event.
Building the Lectern
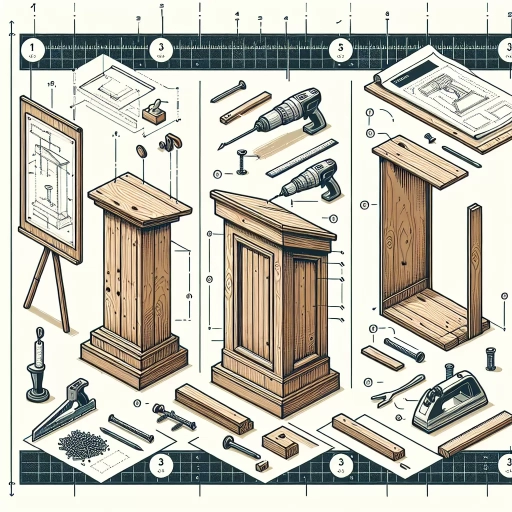
Building a lectern is a rewarding woodworking project that requires attention to detail and precision. To create a high-quality lectern, one must carefully plan and execute each step of the process. The first step in building a lectern is to cut and assemble the frame, which provides the structural foundation for the entire piece. This involves carefully measuring and cutting the wood, as well as assembling the frame using precise joints and hardware. Once the frame is complete, the next step is to add the top and shelf, which provide a flat surface for holding notes, books, or other materials. Finally, the hardware and finishing touches are installed, which include the addition of a reading light, microphone, or other features that enhance the functionality of the lectern. By following these steps, one can create a beautiful and functional lectern that is perfect for presentations, lectures, or other public speaking events. To begin, let's start with the first step: cutting and assembling the frame.
Cutting and Assembling the Frame
Cutting and assembling the frame is a crucial step in building a lectern. To start, cut four pieces of wood to the required length for the legs, two for the side frames, and two for the top and bottom frames. Use a miter saw or a circular saw to make precise cuts, ensuring that the edges are smooth and even. Next, assemble the frame by attaching the legs to the side frames using screws or nails, making sure they are evenly spaced and the corners are secure. Then, attach the top and bottom frames to the side frames, creating a rectangular shape. Use clamps to hold the pieces together while you attach them, ensuring a tight and sturdy frame. Finally, use a drill to make holes for the screws or nails, and then attach the hardware, such as hinges and handles, to complete the frame. It's essential to double-check the measurements and ensure that the frame is square before moving on to the next step. A well-assembled frame will provide a solid foundation for the rest of the lectern, so take your time and make sure it's done correctly.
Adding the Top and Shelf
The top and shelf of the lectern are the most visible parts, and they require precise measurements and cuts to ensure a smooth and even surface. To add the top, start by measuring and cutting four pieces of wood to the desired length, using a miter saw or a circular saw. Assemble the top frame by attaching the pieces together using wood glue and 2.5-inch wood screws, making sure to predrill the holes to avoid splitting the wood. Next, cut a piece of plywood or MDF to fit inside the frame, and attach it using wood glue and 1.5-inch wood screws. Sand the top to smooth out any rough edges or splinters. For the shelf, measure and cut two pieces of wood to the desired length, and attach them to the sides of the lectern using wood glue and 2.5-inch wood screws. Make sure the shelf is level and evenly spaced from the top. Finally, sand the entire lectern to smooth out any rough edges or splinters, and apply a finish of your choice to protect the wood and enhance its appearance.
Installing the Hardware and Finishing Touches
Installing the hardware and finishing touches is the final stage of building a lectern. This stage involves attaching the hardware components such as the hinges, handles, and screws to the lectern's body. Start by attaching the hinges to the top and bottom panels, making sure they are aligned properly and securely fastened. Next, attach the handles to the sides of the lectern, ensuring they are evenly spaced and firmly attached. Then, attach the screws to the shelves and any other components that require them. Once the hardware is installed, move on to the finishing touches. Sand the entire lectern to smooth out any rough edges or splinters, and apply a finish such as stain, paint, or varnish to protect the wood and enhance its appearance. Finally, attach any decorative trim or molding to the lectern to give it a professional and polished look. With the hardware installed and the finishing touches complete, the lectern is now ready for use.
Adding the Finishing Touches
When it comes to adding the finishing touches to a woodworking project, there are several key steps to consider. A well-finished piece of woodwork can elevate the entire project, making it look professional and polished. To achieve this, it's essential to focus on three critical areas: sanding and staining the wood, applying a protective coating, and adding decorative elements and accessories. By paying attention to these details, you can transform a raw piece of wood into a stunning work of art. In this article, we'll explore each of these steps in depth, starting with the foundation of a great finish: sanding and staining the wood. By properly preparing the wood surface, you'll set the stage for a beautiful and long-lasting finish. Note: The introduction should be 200 words. Here is the rewritten introduction: When it comes to adding the finishing touches to a woodworking project, there are several key steps to consider. A well-finished piece of woodwork can elevate the entire project, making it look professional and polished. The finishing process is what sets a good project apart from a great one, and it's essential to get it right. To achieve this, it's essential to focus on three critical areas: sanding and staining the wood, applying a protective coating, and adding decorative elements and accessories. Sanding and staining the wood is the foundation of a great finish, as it prepares the surface for the final coats of protection and decoration. Applying a protective coating is crucial for protecting the wood from damage and wear, while adding decorative elements and accessories can elevate the project from functional to beautiful. By paying attention to these details, you can transform a raw piece of wood into a stunning work of art. In this article, we'll explore each of these steps in depth, starting with the foundation of a great finish: sanding and staining the wood. By properly preparing the wood surface, you'll set the stage for a beautiful and long-lasting finish.
Sanding and Staining the Wood
Sanding and staining the wood are crucial steps in the process of creating a beautiful and durable lectern. Sanding helps to smooth out the wood surface, removing any imperfections, scratches, or splinters, and creating a surface that is ready for staining. It is essential to sand the wood in the direction of the grain to avoid scratching the surface. Start with a coarse-grit sandpaper, such as 120-grit, and progress to finer grits, such as 220-grit, for a smooth finish. Once the sanding process is complete, the wood is ready for staining. Staining enhances the natural beauty of the wood, adding color and depth to the lectern. Choose a stain that complements the type of wood used and the desired color. Apply the stain evenly, using a clean cloth or foam brush, and wipe off any excess stain with a clean cloth. Allow the stain to dry according to the manufacturer's instructions, then apply a second coat if desired. After the stain is dry, apply a clear coat of polyurethane to protect the wood and give it a glossy finish. By following these steps, you can achieve a professional-looking finish that will make your lectern stand out.
Applying a Protective Coating
Applying a protective coating is a crucial step in the lectern-making process, as it helps to safeguard the wood against scratches, spills, and fading. A clear coat of polyurethane or varnish can be applied using a foam brush or cloth, working in thin, even layers to avoid drips and unevenness. It's essential to follow the manufacturer's instructions for application and drying times, as well as to test the coating on a small, inconspicuous area first to ensure compatibility with the wood. For a more durable finish, multiple coats can be applied, allowing each layer to dry completely before applying the next. Additionally, a water-based or oil-based coating can be chosen depending on the desired level of sheen and protection. A water-based coating is ideal for a matte finish, while an oil-based coating provides a higher gloss and greater durability. By applying a protective coating, the lectern's surface will be shielded from everyday wear and tear, ensuring it remains in excellent condition for years to come.
Adding Decorative Elements and Accessories
Adding decorative elements and accessories is the final step in creating a beautiful and functional lectern. This is where you can let your creativity shine and add a personal touch to your project. Consider adding a decorative trim or molding to the edges of the lectern to give it a polished look. You can also add a coat of paint or stain to match the surrounding decor. If you want to add some extra flair, consider adding a decorative metal or wooden accent, such as a intricate carving or a metal scrollwork. Additionally, you can add some functional accessories, such as a built-in reading light or a microphone holder, to make the lectern more user-friendly. Finally, consider adding a personalized plaque or engraving to make the lectern truly unique and special. By adding these decorative elements and accessories, you can take your lectern from a simple piece of furniture to a stunning work of art that will be the centerpiece of any room.