How To Remove Thermal Paste
Thermal paste plays a crucial role in maintaining optimal heat transfer between your computer's CPU and heatsink. However, there may come a time when you need to remove and replace this essential component. Whether you're upgrading your cooling system, reapplying fresh thermal paste, or troubleshooting overheating issues, knowing how to properly remove thermal paste is a valuable skill for any PC enthusiast or technician. This comprehensive guide will walk you through the process of safely and effectively removing thermal paste from your CPU and heatsink. We'll cover three key aspects of the procedure: preparing for thermal paste removal, effective techniques for removing the paste, and post-removal care and reapplication. By following these steps, you'll ensure that your computer's cooling system remains in top condition, promoting better performance and longevity for your hardware. Before we dive into the nitty-gritty of thermal paste removal, it's essential to understand the importance of proper preparation. Let's begin by exploring the necessary tools and precautions you should take before embarking on this delicate task.
Preparing for Thermal Paste Removal
Thermal paste plays a crucial role in maintaining optimal heat transfer between a computer's processor and its cooling system. Over time, this paste can degrade, leading to decreased performance and potential overheating issues. When it's time to replace the thermal paste, proper preparation is key to ensuring a smooth and effective process. This article will guide you through the essential steps of preparing for thermal paste removal, covering three critical aspects. First, we'll discuss the importance of gathering the necessary tools and materials, ensuring you have everything at hand before starting the procedure. Next, we'll delve into the vital safety precautions that must be taken to protect both yourself and your valuable hardware during the process. Finally, we'll walk you through the proper method of powering down and disassembling your device, setting the stage for a successful thermal paste removal and replacement. By following these preparatory steps, you'll be well-equipped to tackle the task of thermal paste removal with confidence and precision. Now, let's dive into the details of preparing for thermal paste removal and explore each of these supporting ideas in greater depth.
Gathering necessary tools and materials
When preparing to remove thermal paste from your CPU or GPU, gathering the necessary tools and materials is a crucial first step. This process requires precision and care, so having the right equipment at hand will ensure a smooth and effective cleaning operation. Begin by assembling a clean, well-lit workspace where you can comfortably access your computer components without risk of static discharge or accidental damage. The most essential item for thermal paste removal is isopropyl alcohol, preferably with a concentration of 90% or higher. This high-purity alcohol is excellent for dissolving and removing old thermal paste without leaving residue. Pair this with lint-free cloths or coffee filters, which are ideal for application and wiping away the dissolved paste without leaving fibers behind. Microfiber cloths are another excellent option, as they're gentle on delicate surfaces and highly absorbent. For stubborn or dried thermal paste, you may need some plastic scraping tools. Avoid using metal scrapers, as they can damage the delicate surface of your CPU or GPU. Instead, opt for plastic spudgers or old credit cards, which are firm enough to remove paste but soft enough to prevent scratches. Cotton swabs can be useful for cleaning hard-to-reach areas and corners, but be cautious of leaving behind cotton fibers. Safety should always be a priority, so include a pair of disposable gloves to protect your hands from the alcohol and any potential skin irritation from the old thermal paste. Anti-static wrist straps are also recommended to prevent accidental static discharge, which can damage sensitive electronic components. Additional helpful items include compressed air cans for blowing away loose debris, a soft-bristled brush for gentle cleaning, and a bright desk lamp or headlamp for better visibility during the process. If you're working on a laptop, you may need a set of precision screwdrivers to access the CPU or GPU. Lastly, don't forget to have your new thermal paste ready for application after cleaning. Choose a high-quality thermal compound appropriate for your specific hardware to ensure optimal heat transfer once reassembled. By gathering all these tools and materials beforehand, you'll be well-prepared to tackle the thermal paste removal process efficiently and effectively. This preparation will help minimize the risk of damage to your components and ensure that you can complete the task without interruptions or delays caused by missing supplies.
Ensuring proper safety precautions
Ensuring proper safety precautions is a crucial step in the process of removing thermal paste from your computer's CPU or GPU. While it may seem like a straightforward task, taking the necessary precautions can prevent damage to your hardware and protect you from potential harm. Before diving into the removal process, it's essential to create a safe working environment and equip yourself with the right tools and knowledge. First and foremost, always work in a well-lit, clean, and static-free area. Ensure your workspace is free from clutter and potential sources of static electricity, such as carpets or synthetic fabrics. Consider using an anti-static mat or wrist strap to ground yourself and prevent accidental electrostatic discharge, which can damage sensitive computer components. Before beginning any work on your computer, power it down completely and unplug it from the electrical outlet. This step is crucial to avoid the risk of electrical shock and to prevent any accidental short circuits. If you've recently used the computer, allow it sufficient time to cool down, as CPUs and GPUs can retain heat for some time after being powered off. When handling computer components, it's advisable to wear disposable nitrile or latex gloves. These not only protect your hands from potentially harmful chemicals in the thermal paste but also prevent oils and dirt from your skin from transferring to sensitive hardware surfaces. Additionally, wearing safety glasses can protect your eyes from any debris or accidental splashes during the cleaning process. Proper ventilation is another important safety consideration. Many cleaning solutions used for removing thermal paste can emit strong fumes. Work in a well-ventilated area or near an open window to minimize exposure to these vapors. If possible, use a small fan to direct fumes away from your face. Before starting the removal process, gather all the necessary tools and materials. This typically includes isopropyl alcohol (preferably 90% or higher), lint-free cloths or coffee filters, cotton swabs, and a plastic spudger or credit card for gentle scraping. Having everything at hand before you begin will help you work efficiently and minimize the time your computer components are exposed. It's also crucial to familiarize yourself with the specific hardware you're working on. Different CPUs and GPUs may have varying levels of sensitivity or special considerations. Consult your device's manual or manufacturer's website for any specific guidelines or warnings related to thermal paste removal. Lastly, proceed with patience and caution. Rushing through the process can lead to mistakes that may damage your hardware. If you encounter any resistance or uncertainty during the removal process, stop and reassess the situation. It's better to take a step back and seek additional information or assistance than to risk damaging expensive components. By following these safety precautions, you create a secure foundation for the thermal paste removal process, ensuring the protection of both yourself and your valuable computer hardware. With the proper preparation and mindset, you can confidently proceed to the next steps of removing and replacing the thermal paste, ultimately improving your system's thermal performance.
Powering down and disassembling the device
Powering down and disassembling the device is a crucial step in the process of removing thermal paste from your computer's CPU or GPU. This step ensures your safety and protects the sensitive components within your device from potential damage. Before you begin, it's essential to approach this task with patience and care, as rushing through the disassembly process can lead to costly mistakes. Start by shutting down your computer completely and unplugging it from any power source. If you're working on a laptop, remove the battery as well. This precaution eliminates the risk of electrical shock and prevents any accidental power-ups during the disassembly process. Allow the device to cool down for at least 30 minutes to an hour, as components can retain heat even after powering off. Next, gather all the necessary tools for disassembly. Typically, you'll need a set of precision screwdrivers, including Phillips and flathead types, as well as a pair of tweezers and an anti-static wrist strap. The anti-static strap is particularly important as it prevents static electricity from damaging sensitive components. Begin the disassembly process by removing the case or panel that houses the CPU or GPU. For desktop computers, this usually involves removing the side panel of the tower. Laptop disassembly can be more complex, often requiring the removal of the keyboard, palm rest, and sometimes even the motherboard to access the processor. As you remove each component, keep track of the screws and their corresponding locations. A smart practice is to use a magnetic screw tray or a piece of paper with labeled sections to organize the screws. This will make reassembly much easier and prevent the loss of tiny, crucial parts. When you reach the CPU or GPU, carefully detach any connected cables or wires, taking note of their original positions. Remove the heatsink or cooling assembly by unscrewing it from the motherboard. Be gentle during this process, as the thermal paste may cause the heatsink to stick to the processor. If you encounter resistance, try gently twisting the heatsink back and forth to break the seal before lifting it off. Throughout the disassembly, be mindful of other components surrounding the CPU or GPU. Avoid touching or damaging nearby capacitors, resistors, or other delicate parts on the motherboard. If you're unsure about any step in the process, consult your device's manual or seek guidance from online resources specific to your model. By taking your time and following these steps carefully, you'll successfully power down and disassemble your device, setting the stage for the safe and effective removal of old thermal paste. This meticulous approach not only facilitates the cleaning process but also ensures that your valuable hardware remains intact and functional throughout the procedure.
Effective Techniques for Removing Thermal Paste
Thermal paste plays a crucial role in maintaining optimal heat transfer between a computer's processor and its heatsink. However, there comes a time when this essential compound needs to be replaced, whether due to degradation or component upgrades. Removing old thermal paste efficiently is a critical step in ensuring your computer's continued performance and longevity. This article delves into three effective techniques for removing thermal paste, each tailored to different situations and levels of residue stubbornness. We'll explore the widely-used method of using isopropyl alcohol and a microfiber cloth, which is suitable for most standard removal tasks. For those seeking a more specialized approach, we'll discuss the benefits of employing thermal paste remover solutions designed explicitly for this purpose. Additionally, we'll cover the dry scrape technique, an effective method for dealing with particularly stubborn or hardened thermal paste residue. By mastering these techniques, you'll be well-equipped to maintain your computer's cooling system effectively. Before we dive into these methods, it's essential to understand the importance of proper preparation for thermal paste removal, which sets the foundation for a successful and safe cleaning process.
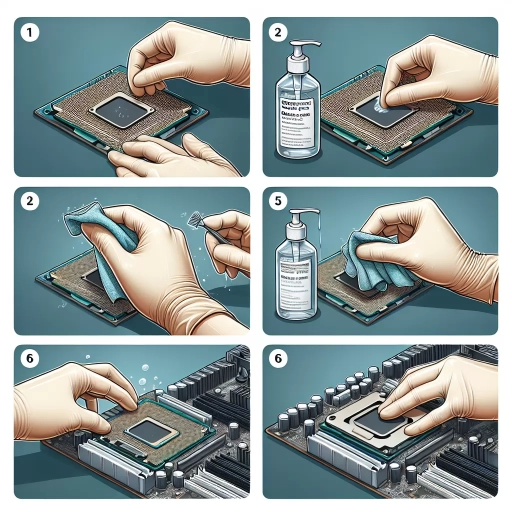
Using isopropyl alcohol and microfiber cloth method
Using isopropyl alcohol and a microfiber cloth is one of the most effective and widely recommended methods for removing thermal paste from a CPU or GPU. This technique strikes an excellent balance between thoroughness and safety, making it a go-to choice for both novice and experienced computer enthusiasts. Isopropyl alcohol, also known as rubbing alcohol, is particularly well-suited for this task due to its ability to dissolve thermal paste quickly and evaporate rapidly without leaving residue. To begin the process, it's crucial to use high-concentration isopropyl alcohol, preferably 90% or higher. Lower concentrations may contain too much water, which can potentially damage sensitive electronic components. Carefully apply a small amount of alcohol to the thermal paste using a lint-free cloth or cotton swab. Allow it to sit for a few seconds to begin breaking down the paste. Then, using a microfiber cloth, gently wipe the surface in a circular motion, gradually removing the softened thermal paste. The microfiber cloth is an essential tool in this method due to its unique properties. Unlike regular cloths or paper towels, microfiber is composed of extremely fine fibers that can trap microscopic particles of thermal paste without scratching the delicate surface of the CPU or GPU. This characteristic makes it highly effective at removing even stubborn remnants of paste while minimizing the risk of damage to the component. As you work, you may need to reapply small amounts of alcohol and use fresh sections of the microfiber cloth to ensure you're not simply spreading the paste around. Pay special attention to the edges and corners of the chip, where thermal paste can sometimes accumulate. For particularly stubborn areas, you can allow the alcohol to sit for a slightly longer period before wiping, but avoid oversaturating the area. One of the advantages of this method is its versatility. It can be used on various types of thermal paste, including silicone-based, metal-based, and ceramic-based compounds. However, it's important to note that some high-performance or conductive thermal pastes may require extra care or specialized cleaning products. After removing all visible traces of thermal paste, perform a final cleaning with a fresh application of alcohol and a clean section of the microfiber cloth. This step ensures that any microscopic residue is removed, providing a pristine surface for applying new thermal paste. Allow the surface to air dry completely before proceeding with the application of fresh thermal compound. While effective, this method requires patience and a gentle touch. Rushed or overly aggressive cleaning can potentially damage the CPU or GPU, so it's essential to work carefully and methodically. By following these steps and using high-quality materials, you can safely and effectively remove old thermal paste, preparing your components for optimal heat transfer with a fresh application.
Employing specialized thermal paste remover solutions
When it comes to removing thermal paste, employing specialized thermal paste remover solutions can be a game-changer. These purpose-designed products are formulated to effectively break down and dissolve thermal compounds, making the cleaning process easier and more efficient. Unlike generic solvents or household cleaners, thermal paste removers are specifically engineered to tackle the unique properties of thermal interface materials without risking damage to sensitive computer components. One of the primary advantages of using specialized thermal paste removers is their ability to quickly soften and lift even stubborn, dried-out thermal compounds. These solutions typically contain a blend of non-conductive and non-corrosive ingredients that are safe for use on delicate electronic surfaces. Many high-quality thermal paste removers are also designed to evaporate quickly, leaving no residue behind and ensuring a clean surface for applying new thermal paste. When selecting a thermal paste remover, it's essential to choose a product from a reputable manufacturer. Look for solutions that are explicitly marketed for use with computer components and have positive reviews from tech enthusiasts and professionals. Some popular brands include Arctic Clean, ArctiClean, and Noctua NT-H2 Cleaning Wipes. These products often come in convenient packaging, such as small bottles with precision applicator tips or pre-moistened wipes, making the application process straightforward and mess-free. To use a specialized thermal paste remover, simply apply a small amount to the surface with thermal paste residue. Allow the solution to sit for a few moments to penetrate and soften the compound. Then, gently wipe away the dissolved thermal paste using a lint-free cloth or coffee filter. For particularly stubborn residues, you may need to repeat the process or use a soft, plastic scraper in conjunction with the remover solution. It's worth noting that while specialized thermal paste removers are highly effective, they may be slightly more expensive than DIY alternatives. However, the added cost is often justified by the superior results and reduced risk of damaging components. Additionally, a small bottle of thermal paste remover can last for numerous applications, making it a worthwhile investment for enthusiasts who frequently work with computer hardware. When using thermal paste removers, always work in a well-ventilated area and follow the manufacturer's instructions carefully. Some solutions may have specific safety precautions or recommended application methods. By incorporating specialized thermal paste removers into your maintenance routine, you can ensure a thorough and safe cleaning process, paving the way for optimal heat transfer when applying fresh thermal compound.
Applying the dry scrape technique for stubborn residue
Applying the dry scrape technique for stubborn residue is a highly effective method for removing particularly tenacious thermal paste that refuses to budge with gentler cleaning methods. This approach is especially useful when dealing with older, dried-out thermal compounds or paste that has been subjected to high temperatures for extended periods, causing it to harden and adhere more strongly to the surface. To begin the dry scrape technique, you'll need a plastic scraper or an old credit card. These tools are ideal because they're firm enough to remove stubborn paste but soft enough to avoid scratching the delicate surfaces of your CPU or GPU. It's crucial to avoid using metal scrapers or sharp objects, as these can easily damage the processor or heatsink, potentially rendering them useless. Start by holding the scraper at a 45-degree angle to the surface and apply gentle pressure. Use short, controlled strokes to gradually lift and remove the thermal paste. Work from the edges towards the center, being careful not to apply too much force. The goal is to remove the paste in thin layers rather than trying to scrape it all off at once, which could potentially damage the component. As you scrape, you'll notice the thermal paste beginning to roll up or flake off. It's important to frequently clean your scraper to prevent redepositing the removed paste back onto the surface. You can use a lint-free cloth or paper towel to wipe the scraper clean between strokes. For particularly stubborn areas, you may need to increase the pressure slightly, but always err on the side of caution. If you encounter significant resistance, it's better to switch to a different removal method, such as using a specialized thermal paste remover solution, rather than risking damage to the component. After the bulk of the paste has been removed, you may notice a thin film or small particles remaining. At this stage, it's beneficial to switch to a softer material, such as a microfiber cloth or coffee filter, to gently buff away the remaining residue. This will help achieve a clean surface without risking any scratches from continued scraping. Remember that patience is key when using the dry scrape technique. It may take some time to remove all the thermal paste, especially if it's been in place for a long time. However, the results are worth the effort, as a clean surface is essential for proper application of new thermal paste and optimal heat transfer between the CPU or GPU and the heatsink. Once you've successfully removed all visible traces of the old thermal paste, it's a good idea to follow up with a final cleaning using isopropyl alcohol. This will ensure that any microscopic particles are removed and the surface is perfectly prepared for the application of fresh thermal compound.
Post-Removal Care and Reapplication
Thermal paste plays a crucial role in maintaining optimal performance and longevity of computer processors. As time passes, this essential component may degrade, necessitating its removal and reapplication. This process, while seemingly straightforward, requires careful attention to detail and adherence to best practices to ensure the continued efficiency of your CPU. In this comprehensive guide, we'll explore the essential steps of post-removal care and reapplication of thermal paste, focusing on three key areas. First, we'll discuss the importance of properly cleaning and drying the surface, eliminating any residue that could compromise the new application. Next, we'll delve into the critical task of inspecting both the CPU and heatsink for any signs of damage or wear, which could affect heat dissipation. Finally, we'll cover the correct techniques for applying new thermal paste to achieve optimal performance and heat transfer. By following these steps, you'll be well-equipped to maintain your computer's cooling system effectively. Before we dive into these crucial aspects, let's begin by preparing for the thermal paste removal process, setting the stage for a successful reapplication.
Properly cleaning and drying the surface
Properly cleaning and drying the surface is a crucial step in post-removal care and reapplication of thermal paste. This process ensures optimal heat transfer between the CPU and the heatsink, ultimately contributing to the overall performance and longevity of your computer system. After removing the old thermal paste, it's essential to thoroughly clean both the CPU and heatsink surfaces to prepare them for the new application. Begin by using a lint-free cloth or coffee filter lightly dampened with isopropyl alcohol (preferably 90% or higher concentration) to gently wipe away any remaining thermal paste residue. Be sure to work in a circular motion, starting from the center and moving outwards, to avoid spreading the residue further. Pay close attention to the corners and edges where paste may have accumulated. For stubborn residue, you can use a plastic spudger or credit card to carefully scrape it off, being extremely cautious not to scratch or damage the delicate surface of the CPU or heatsink. Once the bulk of the old paste has been removed, switch to a fresh portion of the cloth or a new coffee filter and continue cleaning until no visible residue remains. It's important to be thorough, as even small amounts of old thermal paste can interfere with the effectiveness of the new application. For particularly resistant residue, you may need to repeat the cleaning process multiple times. After cleaning, allow the surfaces to air dry completely. This typically takes only a few minutes due to the quick-evaporating nature of isopropyl alcohol. However, if you're in a hurry, you can use compressed air to speed up the drying process. Be sure to hold the can upright and at a safe distance to avoid any liquid propellant from contacting the components. Inspect both surfaces under good lighting to ensure they are completely clean and dry. Look for any remaining spots of paste, dust, or lint that may have settled during the cleaning process. If necessary, give the surfaces a final wipe with a fresh, dry lint-free cloth to remove any last traces of debris or moisture. Remember that a properly cleaned and dried surface is essential for the new thermal paste to adhere correctly and perform its heat-transfer function effectively. Taking the time to clean thoroughly at this stage will pay off in improved thermal conductivity and overall system performance. Once you're satisfied that both the CPU and heatsink surfaces are immaculately clean and completely dry, you're ready to proceed with applying the new thermal paste, confident that you've created the ideal foundation for optimal heat dissipation.
Inspecting for damage or wear on the CPU and heatsink
Inspecting for damage or wear on the CPU and heatsink is a crucial step in the process of removing and reapplying thermal paste. This inspection allows you to identify any potential issues that may affect the performance or longevity of your computer components. By taking the time to carefully examine these parts, you can ensure optimal heat dissipation and prevent future problems. When inspecting the CPU, start by examining the surface of the integrated heat spreader (IHS). Look for any signs of scratches, dents, or discoloration that may have occurred during previous installations or removals. Pay close attention to the edges of the IHS, as these areas are particularly susceptible to damage. If you notice any significant imperfections, it's essential to assess whether they will impact the CPU's ability to make proper contact with the heatsink. Next, turn your attention to the pins or contact pads on the underside of the CPU. For Intel processors, inspect the LGA (Land Grid Array) pads for any bent or damaged pins. AMD processors typically use a PGA (Pin Grid Array) design, so check for any bent or broken pins on the CPU itself. Even slight misalignments can cause connectivity issues or prevent the CPU from functioning correctly. Moving on to the heatsink, examine the base plate that makes contact with the CPU. This surface should be smooth and free from any scratches, dents, or corrosion. Run your finger gently across the surface to feel for any irregularities that may not be visible to the naked eye. Pay special attention to the edges of the base plate, as these areas can sometimes become warped or damaged over time. Inspect the heatsink fins for any signs of damage, such as bent or broken fins. These fins play a crucial role in dissipating heat, so any imperfections can reduce the heatsink's efficiency. Additionally, check for any dust or debris that may have accumulated between the fins, as this can impede airflow and reduce cooling performance. If your heatsink uses a vapor chamber or heat pipe design, inspect these components for any signs of leakage or damage. Look for any discoloration or residue that may indicate a coolant leak. Additionally, check the overall structure of the heatsink for any loose or rattling parts, which could suggest internal damage. For liquid cooling systems, carefully examine the cold plate (the part that makes contact with the CPU) for any signs of corrosion, leaks, or damage to the micro-channels. Inspect the tubing and fittings for any cracks, kinks, or loose connections that could lead to leaks. If you discover any significant damage or wear during your inspection, consider replacing the affected components to ensure optimal performance and longevity of your system. Even minor imperfections can impact heat transfer efficiency, so it's better to address these issues before reapplying thermal paste and reassembling your computer. By thoroughly inspecting your CPU and heatsink for damage or wear, you can identify potential problems early on and take appropriate action. This careful examination will help ensure that your computer runs smoothly and efficiently, with proper heat dissipation and optimal performance for years to come.
Applying new thermal paste correctly for optimal performance
Applying new thermal paste correctly is a crucial step in maintaining optimal performance for your computer's CPU or GPU. After thoroughly cleaning the old thermal paste from the processor and heatsink surfaces, it's time to apply a fresh layer. The goal is to create a thin, even coating that efficiently transfers heat from the chip to the cooler. Begin by selecting a high-quality thermal paste. There are various types available, including ceramic, metal-based, and liquid metal compounds. Each has its own set of properties and application methods, so be sure to read the manufacturer's instructions carefully. For most users, a standard ceramic or metal-based paste will suffice and be easier to work with. When applying the new thermal paste, less is often more. A common mistake is using too much paste, which can lead to poor heat transfer and even cause electrical shorts if it spills onto surrounding components. As a general rule, a pea-sized amount in the center of the CPU is sufficient for most desktop processors. For larger chips or GPUs, you may need to use a thin line or an "X" pattern to ensure proper coverage. The application technique is just as important as the amount used. Avoid spreading the paste yourself with a credit card or spatula, as this can introduce air bubbles and result in uneven coverage. Instead, let the pressure from attaching the heatsink spread the paste naturally. This method, known as the "squeeze-out" technique, allows the paste to distribute evenly across the chip's surface. When reattaching the heatsink, apply even pressure to ensure uniform contact with the processor. If your cooler uses mounting screws, tighten them in a cross-pattern, gradually increasing pressure until they're secure. This prevents the paste from being pushed to one side and helps maintain an even layer. After application, it's advisable to run stress tests or benchmarks to ensure proper heat dissipation. Monitor your temperatures closely during the first few days of operation, as some thermal pastes have a "burn-in" period where performance improves slightly over time. Remember that thermal paste application is not a permanent solution. Depending on usage and environmental factors, you may need to reapply paste every 1-3 years to maintain optimal thermal performance. Regular monitoring of your system temperatures can help you determine when it's time for a fresh application. By following these guidelines and paying attention to detail, you can ensure that your new thermal paste application provides the best possible heat transfer, keeping your processor running cool and efficient for optimal performance.