How To Do Gel Nails
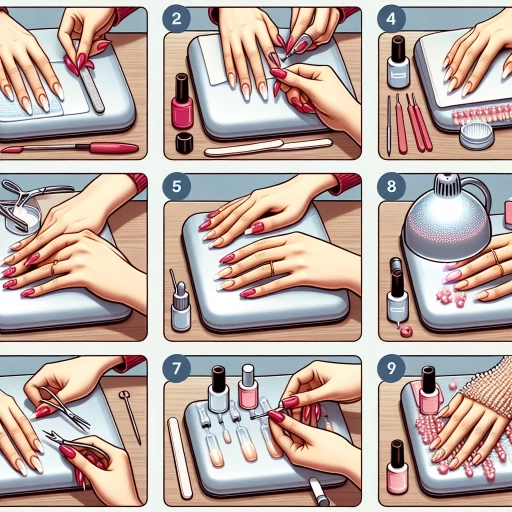
Gel nails have become a popular choice for those looking for a long-lasting and high-gloss finish. With the right techniques and tools, you can achieve salon-quality results in the comfort of your own home. To get started, it's essential to understand the process involved in creating beautiful gel nails. This article will guide you through the three crucial steps: preparation, application and shaping, and finishing touches and aftercare. By following these steps, you'll be able to achieve professional-looking gel nails that will leave you feeling confident and glamorous. In this article, we'll dive into the details of each step, starting with the foundation of it all - preparation. Preparation is Key
Preparation is Key
When it comes to achieving a professional-looking gel nail finish at home, preparation is key. A well-prepared nail surface, the right gel nail kit, and a carefully selected gel color can make all the difference in the final result. To ensure a successful gel nail application, it's essential to start with a solid foundation. This involves choosing the right gel nail kit that meets your needs and skill level. With so many options available, selecting the right kit can be overwhelming, but by considering a few key factors, you can make an informed decision. By choosing the right gel nail kit, you'll be well on your way to achieving a salon-quality finish at home. In this article, we'll explore the importance of preparation in gel nail application, starting with the crucial step of choosing the right gel nail kit.
Choose the Right Gel Nail Kit
Here is the paragraphy: When it comes to choosing the right gel nail kit, there are several factors to consider. First, think about the type of gel polish you want to use. Do you prefer a classic, glossy finish or a more modern, matte look? Different kits offer different types of gel polish, so make sure to choose one that aligns with your desired finish. Next, consider the size of the kit. Do you want a starter kit with just the basics or a more comprehensive kit with multiple colors and tools? If you're new to gel nails, a starter kit may be the way to go. However, if you're looking to stock up on supplies, a larger kit may be a better value. You should also think about the quality of the kit. Look for kits that include high-quality gel polish, a good UV or LED lamp, and durable tools. A good kit should also include instructions and tips for application and removal. Finally, consider the price of the kit. Gel nail kits can range in price from under $20 to over $100, so set a budget and look for kits that fit within it. By considering these factors, you can choose the right gel nail kit for your needs and achieve professional-looking results at home.
Prep the Nail Surface
Here is the paragraphy: Prep the nail surface by gently buffing it with a buffer to remove any oils or residue. This step is crucial in ensuring a strong bond between the nail and the gel polish. Use a lint-free wipe or cotton ball to remove any dust or debris from the buffing process. Next, apply a small amount of nail cleanser to the nail surface and gently wipe it clean with a lint-free wipe. This will help to remove any remaining oils or residue. Finally, use a nail primer to create a strong bond between the nail and the gel polish. Apply a thin layer of primer to the nail surface and let it dry completely before moving on to the next step. By properly prepping the nail surface, you can ensure a long-lasting and chip-resistant gel polish application.
Select the Perfect Gel Color
Here is the paragraphy: When it comes to selecting the perfect gel color, there are several factors to consider. First, think about the occasion and the style you're going for. If you're looking for a bold, eye-catching color, consider a bright red or coral shade. If you want something more subtle, a soft pink or nude tone may be the way to go. Next, consider your skin tone. If you have cool skin, look for colors with blue or pink undertones, while warm skin tones look best with yellow or golden undertones. You should also think about your personal style and preferences. If you like to make a statement, a bold, bright color may be the way to go. If you prefer a more natural look, a subtle, neutral shade may be better. Finally, consider the finish you want. Do you want a glossy, high-shine finish or a more matte, subtle look? By considering these factors, you can select the perfect gel color that complements your skin tone, personal style, and the occasion.
Application and Shaping
The art of nail application and shaping is a delicate process that requires precision, patience, and practice. To achieve a professional-looking finish, it's essential to follow a step-by-step approach. First, a base coat is applied to protect the nail and promote even polish adhesion. Next, the nail is carefully built and shaped to create a desired form, whether it's a classic oval or a trendy square. Finally, a top coat is applied to seal in the color and add a glossy finish. By mastering these three key steps, individuals can achieve salon-quality results at home. To begin, let's start with the foundation of a great nail application: applying a base coat.
Apply a Base Coat
Applying a base coat is a crucial step in the gel nail application process. It serves as a protective barrier between your natural nail and the gel polish, preventing staining and promoting a strong bond. To apply a base coat, start by prepping your nail surface by gently buffing it with a buffer to remove any oils or residue. Next, apply a thin layer of clear base coat to each nail, making sure to cover the entire surface. Cure the base coat under the UV or LED lamp for the recommended time, usually around 30 seconds to 1 minute. This will help the base coat adhere to the nail and create a smooth surface for the gel polish to adhere to. It's essential to choose a high-quality base coat that is specifically designed for gel nail applications, as it will help to prevent lifting and promote a long-lasting finish. By applying a base coat, you'll be able to achieve a professional-looking gel nail finish that lasts.
Build and Shape the Nail
The build and shape of the nail is a crucial step in the gel nail application process. To achieve a natural-looking shape, start by applying a thin layer of gel builder to the center of the nail, making sure to cover the entire surface. Use a nail brush to gently shape the gel, working from the cuticle to the tip of the nail. Focus on building up the center of the nail, creating a smooth, curved shape. As you shape the gel, use a nail file to gently remove any excess gel from around the cuticles and nail bed. This will help prevent the gel from lifting or separating from the nail. Once you have achieved the desired shape, use a lint-free wipe to remove any excess gel from around the nail. Finally, use a nail buffer to gently buff the nail, creating a smooth, even surface for the gel polish to adhere to. By following these steps, you can create a strong, durable, and beautifully shaped nail that will last for weeks to come.
Finish with a Top Coat
Finishing with a top coat is the final step in the gel nail application process. This step is crucial in sealing the gel polish and adding a glossy finish to the nails. To apply a top coat, start by wiping the nail surface with a lint-free wipe or cotton ball to remove any excess gel polish or oils. Then, apply a thin layer of top coat to each nail, making sure to cover the entire surface. Cure the top coat under the UV or LED lamp for the recommended time, usually 30 seconds to 1 minute. Once cured, use a lint-free wipe to gently remove any excess top coat from around the cuticles and nail bed. Finally, apply a cuticle oil to hydrate the cuticles and nail bed. A good top coat can make a big difference in the overall appearance of the gel nail, so choose a high-quality top coat that is specifically designed for gel nails. Some popular types of top coats include gel top coats, dipping top coats, and no-wipe top coats. Gel top coats are the most common type and provide a high-gloss finish. Dipping top coats are used for dipping gel nail applications and provide a long-lasting finish. No-wipe top coats are a newer type of top coat that does not require wiping off excess top coat, making the application process faster and easier. Regardless of the type of top coat used, it is essential to follow the manufacturer's instructions for application and curing times to ensure a long-lasting and high-quality finish.
Finishing Touches and Aftercare
Finishing touches and aftercare are crucial steps in the gel nail application process. After the gel polish has been applied and cured, it's essential to remove any excess gel from around the cuticles and nail bed to prevent lifting and promote a long-lasting finish. Additionally, moisturizing the cuticles is vital to keep them healthy and hydrated, preventing dryness and irritation. Finally, following a gel nail aftercare routine can help extend the life of your gel nails and keep them looking their best. By taking these extra steps, you can ensure a professional-looking finish and maintain the health of your nails. To start, let's take a closer look at the importance of removing excess gel from around the cuticles and nail bed.
Remove Excess Gel
When it comes to removing excess gel, it's essential to be gentle and precise to avoid damaging the nail or surrounding skin. Start by using a lint-free wipe or cotton ball to gently remove any excess gel from around the cuticles and nail bed. Be careful not to press too hard, as this can cause the gel to spread and create a mess. Next, use a nail cleanser or acetone to wipe away any remaining excess gel from the nail surface. This will help to remove any sticky residue and prevent the gel from lifting or peeling off prematurely. If there are any stubborn areas of excess gel, you can use a cuticle pusher or orange stick to gently scrape them away. However, be cautious not to scratch the nail surface. Finally, use a lint-free wipe to remove any remaining residue and clean up the nail area. By removing excess gel carefully and thoroughly, you can ensure a long-lasting and professional-looking gel nail finish.
Moisturize the Cuticles
Moisturize the cuticles to keep them hydrated and healthy. Apply a cuticle oil or cream to the cuticles and gently massage it in. This will help to soften and push back the cuticles, making them less prone to dryness and irritation. Regular moisturizing can also help to promote healthy nail growth by keeping the nail bed and surrounding skin hydrated. Additionally, moisturizing the cuticles can help to reduce the appearance of fine lines and wrinkles around the nail area, giving the hands a more youthful appearance. To moisturize the cuticles, simply apply a small amount of cuticle oil or cream to the cuticles and gently massage it in with a circular motion. Leave the oil or cream on for a few minutes before wiping off any excess with a lint-free wipe or cotton ball. For best results, moisturize the cuticles daily, ideally after washing your hands or taking a shower. This will help to lock in moisture and keep the cuticles hydrated throughout the day. By incorporating cuticle moisturizing into your daily routine, you can keep your cuticles healthy, hydrated, and looking their best.
Follow a Gel Nail Aftercare Routine
To ensure the longevity and health of your gel nails, it's essential to follow a proper aftercare routine. Start by applying a cuticle oil or cream to hydrate the skin around your nails, paying special attention to the cuticles and nail beds. This will help to prevent dryness and irritation. Next, gently wash your hands with a mild soap and lukewarm water, avoiding harsh chemicals or abrasive cleansers that can damage the gel polish. When drying your hands, gently pat them dry with a towel instead of rubbing vigorously, which can cause lifting or chipping of the gel. To maintain the shine and prevent fading, apply a gel top coat every 7-10 days. Additionally, avoid using your nails as tools, such as opening packages or picking at things, as this can cause damage and lifting. By following these simple steps, you can enjoy your gel nails for an extended period while keeping your natural nails healthy and strong.