How To Draw Santa
Understanding the Basics of Drawing Santa
The Role of Shapes and Proportions in Sketching Santa
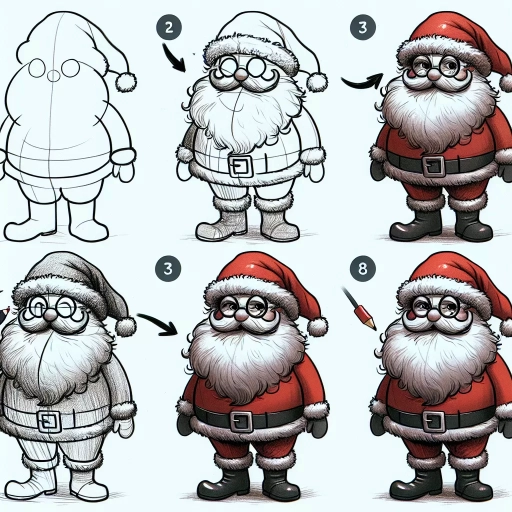
Mastering the art of how to draw Santa begins with understanding the basic shapes and proportions that contribute to his iconic image. Santa is often represented as a plump, jolly character with a high waistline, wide shoulders, and full beard. In drawing, these characteristics translate into a series of circles and ovals that break down into Santa's head, body, arms, and legs. Using a light pencil, sketch these basic shapes onto your canvas, making sure they are proportionate to each other. This process, known as blocking, is essential in creating an accurate draft before progressing to the finer details.
- Circles represent Santa's head and belly.
- Smaller ovals and circles depict his arms, hands, legs, and boots.
- Another oval is drawn to frame Santa's bushy beard and a circle for his nose.
The Importance of Facial Details in Creating Santa’s Character
Once you have outlined Santa's basic form, the next step in learning how to draw Santa involves adding his character-defining facial features. These elements include his twinkling eyes, jovial smile, rosy cheeks, spectacles, and red hat. To portray Santa's eyes as "twinkling", small circles or sparkles can be added around the pupils. His mouth is typically drawn as a broad smile beneath his bushy mustache. Use gentle strokes to create the texture of his beard and mustache, and don't forget to include his famous red hat, which should drape over one side of his forehead with a fluffy pom-pom on the end.
- The eyes are a focal point, they convey Santa's jolliness.
- A broad smile and rosy cheeks infuse the picture with warmth.
- Texture can be added to Santa's beard and mustache with gentle pencil strokes.
Adding Colors and Details to Enhance Santa's Image
The Definitive Role of Colors in Santa’s Image
The use of right colors is crucial in bringing Santa's image to life. The traditional colors associated with Santa are red and white, which are used for his hat and suit. However, additional colors help to create a more detailed and dynamic picture. Flesh tones should be used for his face and hands, pink for his rosy cheeks and cherry nose, and a mix of white and grey for his beard and eyebrows. For the background, a palette of cold wintry colors or the warm glow of a fireplace can be utilized to set a festive scene.
- Red and white are primary colors for Santa's attire.
- Flesh tones, pink, and grey are used to color his face and beard.
- Select suitable background colors to depict the Christmas season.
Realistic Details and Finishing Touches
The final step in learning how to draw Santa involves adding realistic details and finishing touches. For instance, crinkles around his eyes can convey his age and jolliness, while folds in his clothing suggest movement and add depth to the picture. You can also incorporate accessories such as a sack of toys over his shoulder or a list of good children in his hand to depict his role as a gift-giver. Finally, remember to blend your colors well and erase any visible sketch lines for a clean, polished finish.
- Crinkles around Santa's eyes exhibit age and happiness.
- Folds in the clothing give depth and movement to the picture.
- Accessories add context to Santa's role in the festive season.