How To Draw A Light Bulb
Here is a 200-word introduction paragraph for an article about how to draw a light bulb: Drawing a light bulb may seem like a simple task, but it requires attention to detail and a understanding of its basic form and structure. A well-drawn light bulb can add a touch of realism to any artwork or design, and with the right techniques, you can create a convincing and detailed representation of this everyday object. In this article, we will guide you through the process of drawing a light bulb, from understanding its basic shape and proportions to adding intricate details and shading. We will explore how to sketch the light bulb's basic form, including the glass or plastic cover and the metal base. We will also delve into the details of adding texture and pattern to the glass or plastic cover, drawing the filament and internal details, and applying shading and highlights to create depth and dimension. By the end of this article, you will have a comprehensive understanding of how to draw a light bulb and be able to create a realistic and detailed representation of this common object. To get started, let's begin by understanding the basics of drawing a light bulb.
Understanding the Basics of Drawing a Light Bulb
Drawing a light bulb may seem like a simple task, but it requires attention to detail and a basic understanding of its shape and structure. To create a realistic and accurate drawing, it's essential to familiarize yourself with the different parts of a light bulb, including the glass cover, metal base, and filament. Additionally, choosing the right drawing tools and materials can make a significant difference in the quality of your drawing. A range of pencils, erasers, and paper can help you achieve the desired level of detail and texture. Furthermore, setting up your drawing space and reference images can also impact the outcome of your drawing. By having a clear and well-lit workspace, you can focus on capturing the intricate details of the light bulb. In this article, we will explore the basics of drawing a light bulb, starting with the fundamental step of familiarizing yourself with its shape and structure.
Familiarizing yourself with the shape and structure of a light bulb
. Before you start drawing a light bulb, it's essential to familiarize yourself with its shape and structure. A standard light bulb consists of a rounded or oval-shaped glass body, a metal base, and a series of internal components such as the filament, support wires, and a gas-filled chamber. The glass body is typically smooth and curved, with a slight tapering towards the base. The metal base is usually a screw-in type, with a threaded portion that fits into a socket. The internal components are not visible from the outside, but understanding their layout can help you draw the bulb more accurately. For example, the filament is usually a thin, spiral-shaped wire that runs through the center of the bulb, while the support wires are typically thicker and more rigid. By studying the shape and structure of a light bulb, you can develop a better understanding of its proportions, curves, and details, which will ultimately help you create a more realistic and detailed drawing. Additionally, observing the way light reflects off the bulb's surface can also help you capture its texture and shine in your drawing. By taking the time to study the shape and structure of a light bulb, you'll be well-prepared to tackle the drawing process and create a accurate and visually appealing representation of this everyday object.
Choosing the right drawing tools and materials
. Choosing the right drawing tools and materials is essential for creating a realistic and detailed light bulb drawing. To start, you'll need a few basic drawing tools, including a pencil, eraser, and sharpener. A graphite pencil (#2) is ideal for creating a range of values and shading, while a charcoal pencil can add depth and texture to your drawing. A blending stump or tortillon can also be used to smooth out transitions and create subtle gradations of tone. In addition to these tools, you'll also need a surface to draw on, such as paper or a drawing board. Look for paper with a smooth finish, such as hot press or vellum, which will allow for precise lines and details. A drawing board or light box can also be helpful for creating a stable and even drawing surface. Finally, consider investing in a few reference images of light bulbs to study their shape, proportions, and details. By having the right tools and materials at your disposal, you'll be able to create a detailed and realistic light bulb drawing that showcases your artistic skills.
Setting up your drawing space and reference images
. Here is the paragraphy: When it comes to drawing a light bulb, setting up your drawing space and reference images is crucial for achieving accuracy and detail. Start by gathering reference images of different types of light bulbs, including traditional incandescent bulbs, LED bulbs, and halogen bulbs. Observe the shapes, sizes, and textures of each type, taking note of the subtle variations in their designs. You can find reference images online or take your own photographs of light bulbs in different settings. Next, set up your drawing space to ensure good lighting and comfort. Choose a well-lit area with minimal distractions, and invest in a comfortable drawing chair and a sturdy drawing table. Consider using a drawing board or a lap desk to support your paper and keep it at a comfortable drawing height. Finally, organize your drawing tools, including pencils, erasers, and markers, within easy reach to minimize interruptions and maximize your creative flow. By setting up your drawing space and reference images, you'll be able to focus on capturing the intricate details and nuances of your light bulb subject, resulting in a more accurate and engaging drawing.
Sketching the Light Bulb's Basic Form
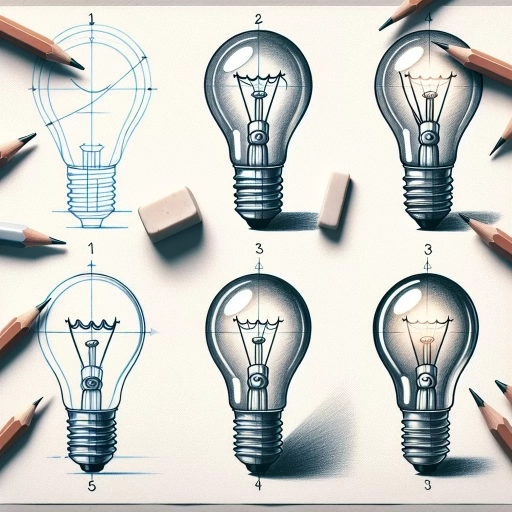
Here is the introduction paragraph: Sketching a light bulb can be a fun and creative activity, but it requires attention to detail and a basic understanding of its form. To draw a realistic light bulb, you'll need to focus on its overall shape and proportions, as well as the details that make it functional. In this article, we'll break down the process of sketching a light bulb into three key steps: drawing the overall shape and proportions, adding the base and socket details, and sketching the glass or plastic cover. By following these steps, you'll be able to create a detailed and accurate drawing of a light bulb. Let's start by exploring the first step: drawing the overall shape and proportions of the light bulb.
Drawing the overall shape and proportions of the light bulb
. Here is the paragraphy: When drawing the overall shape and proportions of the light bulb, start by sketching a rough outline of the bulb's basic form. Begin with a large oval or teardrop shape for the main body of the bulb, making sure to capture its rounded and smooth contours. Pay attention to the proportions, ensuring that the bulb is slightly taller than it is wide. The oval shape should be more vertical than horizontal, with the top end being slightly narrower than the bottom. Next, add a smaller oval or circle at the top of the bulb to represent the metal base or socket. This smaller shape should be centered and aligned with the main body of the bulb. Take note of the proportions again, making sure the metal base is in proportion to the rest of the bulb. The metal base should be about one-quarter to one-third the size of the main body. By establishing the overall shape and proportions of the light bulb, you'll create a solid foundation for adding more details and features in the next steps.
Adding the base and socket details
. Here is the paragraphy: To add the base and socket details to your light bulb drawing, start by sketching a cylindrical shape at the bottom of the bulb, making sure it's centered and evenly proportioned. The base should be slightly narrower than the bulb itself, and should be positioned about one-third of the way down from the bottom of the bulb. Next, draw a small circle at the top of the base, which will serve as the socket. The socket should be slightly recessed into the base, and should be positioned directly in the center. You can add some subtle shading to the socket to give it some depth and dimension. Moving on to the base itself, you can add some gentle curves to suggest the shape of the metal or plastic that makes up the base. You can also add some small lines or ridges to indicate the threading or other details that are typically found on a light bulb base. Finally, take a step back and evaluate the overall proportions and balance of your drawing. Make any necessary adjustments to ensure that the base and socket are in harmony with the rest of the bulb. With these details in place, your light bulb drawing is really starting to take shape!
Sketching the glass or plastic cover
. Here is the paragraphy: Sketching the glass or plastic cover of the light bulb is a crucial step in creating a realistic and detailed drawing. To start, lightly draw a rounded shape around the basic form of the light bulb, making sure to leave a small gap between the two shapes. The glass or plastic cover should be slightly larger than the basic form, with a smooth and curved surface. Pay attention to the proportions and make sure the cover is not too large or too small compared to the basic form. Next, add some gentle curves to the cover to give it a more rounded and three-dimensional appearance. You can also add some subtle lines to suggest the texture and shape of the glass or plastic. For example, you can add some faint lines to suggest the ridges or bumps on the surface of the cover. Additionally, you can add some shading to the cover to give it a more realistic and reflective appearance. Use a range of values, from light to dark, to create a sense of depth and dimension. Finally, make sure to blend the edges of the cover with the basic form, creating a seamless transition between the two shapes. By following these steps, you can create a detailed and realistic glass or plastic cover that adds depth and dimension to your light bulb drawing.
Adding Details and Shading to Your Light Bulb Drawing
Adding texture and pattern to the glass or plastic cover
Drawing the filament and internal details
Applying shading and highlights to create depth and dimension
Here is the introduction paragraph: To take your light bulb drawing to the next level, it's essential to add details and shading that bring it to life. By incorporating texture and pattern to the glass or plastic cover, drawing the filament and internal details, and applying shading and highlights, you can create a realistic and visually appealing representation of a light bulb. In this article, we will explore these three key elements and provide you with step-by-step instructions on how to add them to your drawing. By the end of this article, you will have a comprehensive understanding of how to add texture and pattern to the glass or plastic cover, draw the filament and internal details, and apply shading and highlights to create depth and dimension in your light bulb drawing.
Adding texture and pattern to the glass or plastic cover
Drawing the filament and internal details
Applying shading and highlights to create depth and dimension
Adding texture and pattern to the glass or plastic cover
Drawing the filament and internal details
Applying shading and highlights to create depth and dimension
Adding texture and pattern to the glass or plastic cover
Drawing the filament and internal details
Applying shading and highlights to create depth and dimension
Adding texture and pattern to the glass or plastic cover
Drawing the filament and internal details
Applying shading and highlights to create depth and dimension
Adding texture and pattern to the glass or plastic cover
Drawing the filament and internal details
Applying shading and highlights to create depth and dimension
Adding texture and pattern to the glass or plastic cover
Drawing the filament and internal details
Applying shading and highlights to create depth and dimension
Adding texture and pattern to the glass or plastic cover
Drawing the filament and internal details
Applying shading and highlights to create depth and dimension
Adding texture and pattern to the glass or plastic cover
Drawing the filament and internal details
Applying shading and highlights to create depth and dimension
Adding texture and pattern to the glass or plastic cover
Drawing the filament and internal details
Applying shading and highlights to create depth and dimension
Adding texture and pattern to the glass or plastic Adding texture and pattern to the glass or plastic cover
Adding texture and pattern to the glass or plastic cover
Drawing the filament and internal details
Applying shading and highlights to create depth and dimension
Adding texture and pattern to the glass or plastic cover
Drawing the filament and internal details
Applying shading and highlights to create depth and dimension
Adding texture and pattern to the glass or plastic cover
Drawing the filament and internal details
Applying shading and highlights to create depth and dimension
Adding texture and pattern to the glass or plastic cover
Drawing the filament and internal details
Applying shading and highlights to create depth and dimension
Adding texture and pattern to the glass or plastic cover
Drawing the filament and internal details
Applying shading and highlights to create depth and dimension
Adding texture and pattern to the glass or plastic cover
Drawing the filament and internal details
Applying shading and highlights to create depth and dimension
Adding texture and pattern to the glass or plastic Adding texture and pattern to the glass or plastic cover
Adding texture and pattern to the glass or plastic cover
Drawing the filament and internal details
Applying shading and highlights to create depth and dimension
Adding texture and pattern to the glass or plastic cover
Drawing the filament and internal details
Applying shading and highlights to create depth and dimension
Adding texture and pattern to the glass or plastic cover
Drawing the filament and internal details
Applying shading and highlights to create depth and dimension
Adding texture and pattern to the glass or plastic cover
Drawing the filament and internal details
Applying shading and highlights to create depth and dimension
Adding texture and pattern to the glass or plastic Adding texture and pattern to the glass or plastic cover
Adding texture and pattern to the glass or plastic cover
Drawing the filament and internal details
Applying shading and highlights to create depth and dimension
Adding texture and pattern to the glass or plastic cover
Drawing the filament and internal details
Applying shading and highlights to create depth and dimension
Adding texture and pattern to the glass or plastic Adding texture and pattern to the glass or plastic cover
Adding texture and pattern to the glass or plastic Adding texture and pattern to the glass or plastic cover
Adding texture and pattern to the glass or plastic cover of your light bulb drawing can add an extra layer of realism and visual interest. To do this, you can use a variety of techniques such as hatching, cross-hatching, and stippling. For a glass cover, you can create a smooth, reflective surface by using gentle, curved lines that follow the shape of the bulb. You can also add some subtle texture to suggest the glass's transparency and fragility. For a plastic cover, you can use more defined lines and patterns to create a sense of texture and flexibility. You can also experiment with different patterns, such as a grid or a series of concentric circles, to add visual interest to the cover. Additionally, you can use different shading techniques to create a sense of depth and dimension on the cover, such as using darker shades to create a sense of curvature or lighter shades to create a sense of highlights. By adding texture and pattern to the glass or plastic cover, you can create a more detailed and realistic light bulb drawing that captures the viewer's attention.
Drawing the filament and internal details
Drawing the filament and internal details is a crucial step in creating a realistic light bulb drawing. The filament is the thin wire inside the bulb that produces light when heated. To draw the filament, start by sketching a thin, curved line that follows the shape of the bulb. You can use a ruler or a curved edge to help you draw a smooth, even line. Next, add some texture to the filament by drawing short, curved lines that follow the direction of the wire. These lines should be close together and evenly spaced to give the appearance of a thin, woven wire. To add some depth and dimension to the filament, you can also draw some shading lines that follow the curve of the wire. These lines should be darker at the center of the bulb and lighter towards the edges. In addition to the filament, you can also draw some internal details such as the support wires that hold the filament in place. These wires are usually thin and straight, and can be drawn using a ruler or a straightedge. You can also add some texture to the internal details by drawing short, curved lines that follow the direction of the wires. By adding these internal details, you can create a more realistic and detailed light bulb drawing.