How To Drain Portable Air Conditioner
Here is the introduction paragraph: Draining a portable air conditioner is a crucial maintenance task that ensures the unit operates efficiently and effectively. However, many users are unsure about how to properly drain their portable air conditioner, which can lead to reduced performance, increased energy bills, and even damage to the unit. To help you avoid these issues, this article will guide you through the process of draining your portable air conditioner, covering three essential steps: preparation before draining, the actual draining process, and post-draining maintenance. By following these steps, you'll be able to keep your portable air conditioner running smoothly and prolong its lifespan. So, let's start with the first step: preparation before draining.
Preparation Before Draining
Before draining your portable air conditioner, it's essential to take a few crucial steps to ensure a safe and efficient process. Preparation is key to avoiding any potential risks or complications. To begin with, you'll need to turn off the portable air conditioner to prevent any accidental start-ups or electrical shocks. Additionally, unplugging the unit from the power source is vital to eliminate any electrical hazards. Lastly, locating the drainage port is necessary to identify where the water will be drained from. By following these steps, you'll be well-prepared to drain your portable air conditioner safely and effectively. To start, let's begin with the first step: turning off the portable air conditioner.
Turn Off the Portable Air Conditioner
When it's time to drain your portable air conditioner, the first step is to turn it off. This may seem obvious, but it's crucial to ensure your safety while performing the draining process. Turning off the portable air conditioner will prevent any accidental start-ups, which could lead to injuries or damage to the unit. Additionally, turning off the air conditioner will allow you to access the drainage system without any obstacles or hazards. Make sure to switch off the power button or unplug the unit from the power outlet to completely shut it down. Once the air conditioner is turned off, you can proceed with the next steps to drain the excess water that has accumulated inside the unit.
Unplug the Portable Air Conditioner
When it's time to drain your portable air conditioner, the first step is to unplug the unit from the power source. This is a crucial safety precaution to prevent any accidental start-ups or electrical shocks while you're working on the device. Locate the power cord and carefully pull the plug out of the socket. Make sure it's completely disconnected before proceeding. This simple yet important step ensures your safety and allows you to focus on the draining process without any interruptions or hazards. By unplugging the portable air conditioner, you're also preventing any potential damage to the unit's electrical components, which could be caused by water or moisture during the draining process. So, take a moment to unplug the unit, and then you can move on to the next step in preparing your portable air conditioner for draining.
Locate the Drainage Port
Locate the drainage port on your portable air conditioner, which is usually found at the back or bottom of the unit. This port is designed to allow excess water to drain out of the air conditioner, and it's essential to locate it before you start the draining process. The drainage port may be a small hole, a tube, or a removable cap, depending on the model of your air conditioner. Check your user manual or manufacturer's instructions to confirm the location of the drainage port on your specific unit. Once you've located the port, make sure it's clear of any blockages or debris that could prevent water from draining properly. If you're having trouble finding the drainage port, consult the user manual or contact the manufacturer's customer support for assistance. By locating the drainage port, you'll be able to drain your portable air conditioner efficiently and effectively, ensuring it continues to run smoothly and effectively.
Draining the Portable Air Conditioner
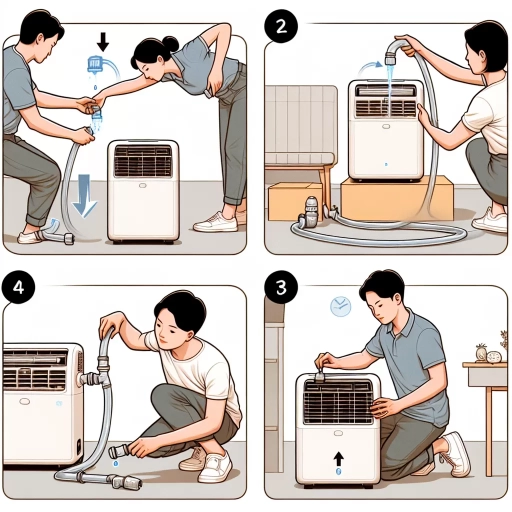
Draining a portable air conditioner is a crucial maintenance task that ensures the unit operates efficiently and effectively. A portable air conditioner collects water from the air as it cools, and if not drained properly, it can lead to water accumulation, reduced performance, and even damage to the unit. To drain a portable air conditioner, you need to follow a few simple steps. First, you need to attach a drainage hose to the drainage port, which is usually located at the back or bottom of the unit. This hose will direct the water to a drainage area, such as a sink or a bucket. Once the hose is attached, you can direct the drainage hose to a drainage area, making sure it is securely positioned to prevent any spills or leaks. Finally, you need to allow the water to drain completely, which may take several minutes depending on the amount of water collected. By following these steps, you can ensure your portable air conditioner is properly drained and functioning at its best. To get started, let's take a closer look at the first step: attaching a drainage hose to the drainage port.
Attach a Drainage Hose to the Drainage Port
To attach a drainage hose to the drainage port, start by locating the drainage port on your portable air conditioner. This is usually found at the back or bottom of the unit and is designed to allow excess moisture to escape. Next, take the drainage hose provided with your portable air conditioner and insert one end into the drainage port. Make sure it is securely attached by twisting or clicking it into place, depending on the type of connector your unit has. Some portable air conditioners may have a drainage hose with a threaded end that needs to be screwed into the drainage port, while others may have a simple push-fit connector. Once the hose is attached, place the other end in a suitable drainage location, such as a sink or a drain, to allow the excess moisture to escape. It's essential to ensure the drainage hose is not kinked or blocked, as this can prevent proper drainage and cause water to accumulate inside the unit. By attaching the drainage hose correctly, you can ensure your portable air conditioner operates efficiently and effectively, while also preventing any potential water damage or leaks.
Direct the Drainage Hose to a Drainage Area
Direct the drainage hose to a drainage area, such as a sink, floor drain, or a designated drainage pan. Ensure the hose is securely connected to the drainage area to prevent water from spilling or leaking onto the floor. If you're using a sink, make sure the hose is positioned in a way that allows the water to flow freely into the drain. For a floor drain, ensure the hose is directed into the drain and not onto the surrounding floor. If you're using a drainage pan, place it under the air conditioner and direct the hose into the pan. Regularly check the drainage hose and area to ensure they are not clogged and are functioning properly. This will help prevent water from accumulating and causing damage to the air conditioner or surrounding area. By directing the drainage hose to a suitable drainage area, you can ensure efficient and safe drainage of the portable air conditioner.
Allow the Water to Drain Completely
When draining a portable air conditioner, it's essential to allow the water to drain completely to prevent any damage to the unit or surrounding areas. This means that you should not interrupt the draining process or try to speed it up, as this can cause water to spill over or leak out of the unit. Instead, let the water drain slowly and steadily until the tank is empty. This may take several minutes, depending on the amount of water in the tank and the drainage system of your portable air conditioner. Allowing the water to drain completely also helps to prevent mineral buildup and bacterial growth, which can affect the performance and longevity of your portable air conditioner. Additionally, complete drainage helps to reduce the risk of water damage to your floors, walls, and other surrounding surfaces. By letting the water drain completely, you can ensure that your portable air conditioner continues to function efficiently and effectively, while also protecting your home from potential water damage.
Post-Draining Maintenance
Proper post-draining maintenance is crucial to ensure your portable air conditioner continues to function efficiently and effectively. After draining the excess water from the unit, it's essential to perform a series of tasks to maintain its performance and longevity. Firstly, checking for any blockages in the drainage system is vital to prevent clogs and ensure smooth water flow. Additionally, cleaning the drainage port and hose is necessary to remove any debris or mineral deposits that may have accumulated during the draining process. Finally, reassembling the portable air conditioner requires attention to detail to ensure all parts are securely in place. By following these steps, you can ensure your portable air conditioner remains in good working condition. To start, let's begin with the first step: checking for any blockages in the drainage system.
Check for Any Blockages in the Drainage System
When it comes to post-draining maintenance, one crucial step is to check for any blockages in the drainage system. This is essential to ensure that the drainage system is functioning properly and that water can flow freely. Blockages can occur due to various reasons such as dirt, dust, and debris accumulation, or even mineral buildup from the water. If left unchecked, these blockages can cause water to back up into the air conditioner, leading to damage and potentially causing the unit to malfunction. To check for blockages, start by inspecting the drainage hose and tubing for any visible signs of blockage or kinking. You can also use a flashlight to peer into the drainage ports and check for any debris or buildup. If you find any blockages, use a soft brush or a plumbing snake to gently remove them. Additionally, consider using a mixture of equal parts water and white vinegar to flush out the drainage system and remove any mineral deposits. By regularly checking and clearing blockages, you can ensure that your portable air conditioner's drainage system is working efficiently and effectively, and prevent any potential issues from arising.
Clean the Drainage Port and Hose
Cleaning the drainage port and hose is a crucial step in post-draining maintenance for your portable air conditioner. Over time, the drainage port and hose can become clogged with debris, dust, and dirt, which can hinder the proper functioning of the drainage system. To clean the drainage port, start by locating it, usually found at the back or bottom of the unit. Use a soft-bristled brush or a small, dry cloth to gently remove any visible debris or dust from the port. Next, use a mixture of equal parts water and white vinegar to create a cleaning solution. Dip a small cloth into the solution, wring it out thoroughly, and use it to wipe down the port and surrounding area. This will help loosen any stubborn dirt or grime. For the drainage hose, start by disconnecting it from the unit and rinsing it with warm water to remove any loose debris. Then, use a soft-bristled brush or a bottle brush to scrub away any stubborn dirt or grime that may be clogging the hose. Finally, use the cleaning solution to wipe down the hose and let it air dry before reconnecting it to the unit. Regular cleaning of the drainage port and hose will ensure that your portable air conditioner continues to drain properly and efficiently, preventing any potential issues or damage to the unit.
Reassemble the Portable Air Conditioner
Reassembling the portable air conditioner is a straightforward process that requires attention to detail to ensure all parts are securely in place. Start by reattaching the drain hose to the unit, making sure it's securely connected to prevent any leaks. Next, replace the drain pan or container, ensuring it's properly aligned and securely fastened to the unit. If your portable air conditioner has a removable grille or filter, now is the time to put it back in place, making sure it's securely fastened with screws or clips. Finally, plug in the unit and turn it on to test that it's working properly. It's essential to check for any leaks or unusual noises during the reassembly process, as this can indicate a problem with the unit. By following these steps, you can ensure your portable air conditioner is reassembled correctly and ready for use.