How To Score Sourdough
 In the artisan bread-baking world, achieving the perfect score on a sourdough loaf is both an art and a science. The world of scoring, or slashing, offers an opportunity to impart stunning, edible artwork on the crust while also improving the bread's taste and structure. This explore-worthy article unfolds essential elements of how to score sourdough, anchoring your baking journey on a strong, knowledge-based foundation. Initially guiding you through 'Understanding the Basics of Scoring Sourdough', the article subsequently equips you with the art required in 'Mastering the Techniques of Scoring Sourdough'. Additionally, receiving an ace card, 'Tips and Tricks for Achieving the Perfect Score', your scoring skills are bound to soar. As we knead into the topic, let us start by understanding the bedrock of this beautiful and delectable craft - scoring sourdough - its importance, goal, and the tools you require.
Understanding the Basics of Scoring Sourdough
knowledge about scoring sourdough is essential for any baking enthusiast aiming to master the craft of sourdough baking, thus, we delve into a comprehensive understanding of the basics. This article illuminates three fundamental aspects of scoring sourdough; namely, understanding its importance and relevance, discerning the tools necessary for the task, and realizing the crucial timing of scoring your sourdough. First, we will break down what scoring is and why it plays an integral role in the process of sourdough baking. It goes beyond aesthetics, carrying technical implications that directly affect the quality of your loaf. Subsequently, we will look into the tools needed to score sourdough adeptly. While seemingly simple, choosing the correct tool is a decisive step that ensures clean, precise cuts. Finally, we will tackle how preparation and timing significantly impact the outcome of scoring, teaching you when exactly to score your sourdough. As we embark on this exploration, our first stop is comprehending the roots of scoring and its importance in the art of baking sourdough.
What is Scoring and Why is it Important?
Scoring is one of the key processes involved in baking sourdough bread. It refers to the technique of creating small, shallow slits on the surface of the dough right before it goes into the oven. Scoring serves multiple powerful roles in the baking process, and its importance cannot be overstressed. Firstly, scoring creates a controlled vent for the trapped gases in the dough to escape as the bread bakes. This prevents the bread from bursting and ruining your carefully structured loaf. It essentially guides the final shape and structure of your sourdough loaf and influences the oven spring - the quick rise of the bread in the early stages of baking due to the heat. Moreover, scoring also imparts an aesthetic element to the loaf. Through varied scoring methods, experienced bakers can create unique and artistic patterns on their bread, transforming a simple loaf of sourdough into a work of art. Thus, scoring makes your bread more visually inviting, enhancing the overall baking and consumption experience. However, the impact of scoring extends beyond the physical aspects of the bread. It reflects the competency of the baker in managing the tricky nuances of the sourdough. Each sourdough is distinctive, varying in hydration levels, fermentation time, and gluten development. As such, the method and intensity of scoring must be adjusted accordingly. A well-scored loaf implies that the baker could optimally adapt to the dough’s conditions, striking the perfect balance between the depth and positioning of the score to produce a fine, mouth-watering loaf. Finally, scoring is collectively a test and display of a baker’s expertise in bread making. It is essentially the final necessary touch that drives the transformation of a simple mixture of flour, water, and salt into a delectable sourdough loaf. Even the neatest, most intricate scoring can result in lesser oven spring if the other stages of the bread-making process haven't been performed well. Alternatively, a well-executed scoring can aid in achieving the ideal final texture despite minor hiccups in the mixing or fermenting stages. Therefore, understanding and mastering the art of scoring is fundamental in the journey of sourdough baking as it magnifies the beauty, character, and flavor of the loaf.
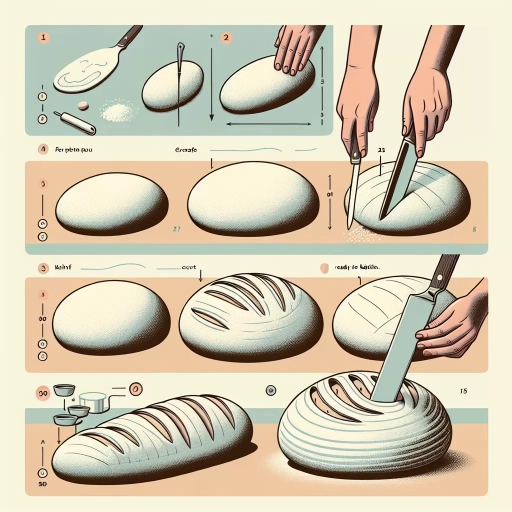
The Tools You Need to Score Sourdough
Baking sourdough, one of Earth's oldest forms of bread, is no small endeavor. The complex nature of its ingredients and the precision required in its making process set scoring sourdough bread apart, as this great mini-art form needs a profound understanding of how the gas contained within the dough expands and how to control it. One of the critical steps to master in this process is scoring. Often underestimated, scoring is the act of slashing the dough with a blade or a lame before baking. To score a sourdough loaf like a pro, one needs to be equipped with the right tools. First and foremost is the lame – a specialized tool designed for scoring dough. It gives you the ability to make precise cuts that control how the dough expands when baking, and thus, your bread’s final appearance. This tool consists of a sharp and thin razor blade attached to a handle for a secure grip while scoring your bread. As it's incredibly sharp, it allows you to smoothly cut the dough without dragging it. Bread scoring can also be done using a sharp knife, though it might not give you the same precision as a lame. A knife can sometimes snag or tug at the dough, resulting in a less clean cut. If you choose your cooker's knife, it should be as sharp as possible to limit the dough's drag. Another vital tool is a dough scraper. Beyond its use for manipulating and dividing your dough, this tool can also be used to transfer your scored dough into the baking vessel, helping to preserve the pattern you've meticulously carved. Meanwhile, a good scoring guide can also be invaluable, especially for beginners. Plenty of online resources are available, many with step-by-step instructions, images, or even video tutorials on various scoring patterns. Finally, you need a lightly floured work surface. This provides your dough a non-stick area when you’re doing the scoring. It will allow for clean, precise cuts that are essential for a beautiful final product. Understanding the scoring process– its importance, techniques, and the correct tools –is an important part of your sourdough bread journey. It is a skill that requires a healthy level of respect, patience, and practice. Remember that each scoring session is an opportunity to better your craft, and even the most seasoned bakers continue to learn and develop their skills. After all, the true beauty of baking lies in its process and endless room for creativity!
Preparation is Key: When to Score Your Sourdough
When creating artisan sourdough bread, timing when to score your dough is an indispensable part of the procedure. Imagine putting in all the effort of making your dough only to watch it disappointingly deflate right before your eyes. To avoid this, it is vital to grasp the 'when' of scoring your sourdough. Scoring a sourdough, which is simply the act of slashing the surface of your dough with a knife or a lame (a baker’s blade), guides the dough's expansion in the oven. It controls where and how the dough will 'spring' or puff during baking, and it helps prevent unintended splits and cracks on the bread's surface. Now, when is the precise moment to score your dough? Generally, this is done right before the bread gets into the oven. Ideally, your oven should already be preheated and your steaming method primed and ready. Also, it's important to note that the dough should be increase in size and become puffier during the proofing (final rise). To the touch, it should still hold its shape but give slightly to the pressure. Too firm, and it might be under-proofed; too soft, and it could be over-proofed. Scoring over-proofed dough is a precarious practice as it is highly likely to deflate. Alternatively, if your sourdough is under-proofed, the scores may not open properly, denying your bread the coveted 'ear'— the raised flap at the edge of a score, often seen on artisan loaves. Essentially, you should ideally aim to score the dough when it’s at the peak of fermentation, when it’s fully risen but not yet starting to fall. Scoring the dough in this window of time allows for the ultimate creation of beautiful patterns, allowing your creative juices to flow. It's not just about aesthetics, though. The pretty patterns allow for an even distribution of heat across your loaf, resulting in an evenly baked crumb and crust. In conclusion, preparation is indeed key in the process of scoring sourdough as it determines a lot about how your final loaf of bread would look and taste like. A keen understanding of the stages of fermentation and practice on timing will get you on a path to baking artisan-style sourdough on a regular basis. Always remember that when it comes to creating that picture-perfect artisan loaf, precision is the name of the game.
Mastering the Techniques of Scoring Sourdough
Sourdough bread making is both an art and a science, and to truly master this craft, one needs to understand the intricacies of scoring. Scoring, the act of making deliberate cuts on the dough's surface before baking, has profound effects on the bread's final appearance and quality. There are a multitude of techniques and styles when it comes to scoring, allowing you to create everything from a humble, traditional loaf to an impressive, artisanal masterpiece. Our in-depth guide will explore the three key areas to help you master the techniques of scoring sourdough; the basic techniques, including the slash, cross, and parallel cuts; the advanced methods which involve more complex patterns and designs; and the variations in scoring methods based on the type of sourdough being baked, whether it's a robust Ciabatta or a slender Baguette. Each provides a unique perspective and offers a different set of skills to enhance your sourdough baking prowess. Now, let us roll up our sleeves and dive into the world of scoring techniques, beginning with the foundational methods; the slash, cross, and parallel cuts.
The Basic Scoring Techniques: Slash, Cross, and Parallel
Scoring is an essential skill to master for any serious home bread baker or professional. Scoring is the artful process of making slashes on the surface of your bread before it is baked. This process aids in controlling the expansion of the loaf as it bakes. Knowing scoring techniques essential to regulate the rapid rise of bread while in the oven, thus preventing it from cracking in random places. Three basic scoring techniques are commonly employed: slash, cross, and parallel. The slash is the simplest and most commonly used technique. A single slash down the middle of the loaf is often enough for bread baked in a tray. However, for round artisan-style loaves, a series of slashes in a pattern creates a beautiful effect as the bread expands in the oven. The depth and angle of the slashes affect the final result, and mastering these elements can take some practice. The cross technique is used mostly for round loaves like boules or bâtards. The cross is scored deeply in the middle of the loaf, often going down nearly half the depth of the bread. As the bread bakes and expands, the cross opens up, creating a rustic and handmade appearance. This technique is particularly useful for bread with higher hydration levels, as it allows for plenty of room for expansion during baking. Parallel scoring involves making several straight cuts alongside each other. This technique is often used for baguettes and other long loaves, guiding the direction of the bread's expansion and creating a visually appealing pattern. Unlike the previous two techniques, parallel cuts should not be too deep, as the cuts need to open up only slightly during baking. Proper scoring depth would depend on the type and hydration of your dough. Mastering these three fundamental scoring techniques is a significant step towards creating beautifully presented, bakery-standard loaves. Besides aesthetic enhancement, these techniques assist in dealing with the ‘oven spring’ - an almost abrupt rise in temperature triggering rapid yeast activity. A good understanding of the scoring techniques can save your crust from erratic tearing and provide it with the desired lift and expansion during baking. Hence, they form a critical element of the sourdough scoring chapter in our 'how to score sourdough bedrock' article. Art meets science in scoring, and each cut can be seen as a baker's personal signature on his bread.
Advanced Scoring Techniques: Creating Patterns and Designs
Sourdough bread, with its unique tangy taste, crusty exterior, and soft chewy interior, is a favorite among bread lovers. However, the beauty of sourdough lies not only in its taste and texture but also in the various intricate patterns and designs that can be created on its surface, thanks to advanced scoring techniques. Mastering these techniques can transform a plain loaf of bread into a work of art, with patterns ranging from a simple cross to meticulous floral designs. Scoring is the art of slashing the dough's surface before baking. Simple scoring allows the bread to expand in the oven, but advanced techniques can bring a decorative level that impresses far beyond a simple slice. The key to mastering advanced scoring lies in understanding the behavior of the dough, the sharpness of the blade (or lame), and the confidence in your steady hand. Creating patterns on sourdough begins with visualizing the design on the proved dough. It can be helpful to sketch the design lightly on the surface with a blunt edge before making the actual cuts. The depth, angle, and length of the cuts affect the final result. For instance, shallow cuts tend to open minimally and preserve intricate details, ideal for detailed work. Deeper slashes, conversely, open up more during baking to exhibit bold and dramatic patterns. Notably, your choice of scoring tool significantly impacts the result. A sharp, thin blade such as a baker's lame is recommended for clean-cut lines. However, the dough's surface should be taut, not too soft or overly proofed, to achieve a sharp design without tearing. The art of scoring also takes into account the dough's composition. For instance, higher hydration doughs tend to spread more during baking. Therefore, closer and more numerous slashes are needed to maintain design control. In contrast, drier doughs hold their shape well, making deep, bold cuts possible. Moreover, the creative possibilities with scoring are boundless. Many bakers draw inspiration from nature, creating floral, leaf, wheat stalk patterns, and more on their loaves. Others prefer abstract designs, geometric patterns, or traditional motifs like the baker's wheat ear or fern leaf. Finally, while scoring is an artistic endeavor, it is also a science that requires practice and patience. Trial and error lead to continuous learning, helping to shape your individual style in creating unique sourdough masterpieces. Each sourdough loaf, with its unique fermenting and proofing process, offers a unique canvas to the baker's innovative scoring designs. With time and experimentation, these advanced techniques can turn humble sourdough into awe-inspiring edible art. Conclusively, mastering advanced sourdough scoring techniques is an incredible way to distinguish your bread. The intersection of science, art, and creativity enhances not just its aesthetics but the overall baking experience. With every stab of the blade, patterns and designs are etched onto the dough's surface, leaving behind the baker's personal mark, waiting eagerly for the oven's heat to bring it to life.
Scoring for Different Types of Sourdough: From Ciabatta to Baguette
If you're passionate about perfecting sourdough bread, mastering the technique of scoring should be on your list. Scoring is much more than decorative - it's functional. Without scoring, your sourdough loaf would not have the appropriate room to expand in the oven, resulting in irregular shapes, uneven texture, and suboptimal baking. Now, scoring various sourdough bread like Ciabatta and Baguettes need specific techniques. Scoring for Ciabatta, a flat rectangular Italian bread, involves making deep parallel scores on the dough’s surface, almost slicing it open. This aids in getting those characteristic large voids and an airy crumb that sets Ciabatta apart. Ciabatta is a wetter dough, which can make it tricky to score. Here, a well-floured surface and a sharp lame (bread scoring tool) are your best friends. The scores can be anywhere from a few to many, but always straight, evenly spaced, and deep, made just before it goes into the oven. On the other hand, Baguette, the iconic French bread, is known for its slender shape and beautiful scoring pattern. This pattern, called Coupe or 'ear' in the baking world, isn't for just aesthetics but holds a functional purpose. The dough is scored diagonally with an overlapping pattern, creating a beautiful ridged surface once baked. This pattern helps the steam escape, optimizing the Baguette's rise and texture. Each score must be swift, confident, and at a shallow angle to the dough's surface for ideal results. Just prior to baking, you need to make quick, diagonal slashes across the top surface of the dough, ensuring they overlap slightly. This unique scoring allows the dough to expand during baking while retaining that beloved elongated shape. Understanding the scoring technique for different kinds of sourdough ensures you're in control. It helps to guide the bread during the cooking process, contributing to the finished product's shape, taste, and texture. Nevertheless, remember that your first few attempts at scoring might not be perfect, but practice indeed makes perfect. Try different patterns and styles, see how your dough reacts, and in no time, you'll be a maestro at scoring your sourdough.
Tips and Tricks for Achieving the Perfect Score
Achieving a perfect score isn't something that happens by sheer coincidence, but a compilation of meticulous tactics, conscious effort, and deliberate steps to avoid pitfalls. This article aims at providing you with tested and proven tips and tricks to help you grasp the art of achieving a flawless score in any task you undertake. Indeed, our journey will venture through diverse yet fundamental spheres of the process, starting with a detailed guide on how to handle sticky dough and prevent tears – a metaphorical way of addressing the initial complexities you might encounter in your course. Next, we will navigate the nuances of using the right angle and applying the correct pressure for a clean cut, significantly influencing the overall result and precision in execution. Lastly, we delve into common blunders that could deter you from your perfect score and how to troubleshoot these issues. Now, let's dive in, starting with our first critical area of focus: how to handle sticky dough and prevent tears.
How to Handle Sticky Dough and Prevent Tears
Handling sticky dough and preventing tears can feel like a daunting task for anyone, from professional bakers to novice sourdough enthusiasts. But, don't be deterred! There are several strategies you can employ to master this essential baking skill. Firstly, it's crucial to note that sourdough's stickiness is a natural consequence of its hydration process. Generally, high-hydration dough tends to be stickier. So, understanding the nature of your dough is key. A great tip for managing sticky dough is wetting your hands before handling the dough. Water acts as a temporary barrier between your hands and the dough, making it easier to manipulate. Also, when shaping your dough, use swift and precise movements to avoid overworking it. Too much handling can cause the gluten network to tear, resulting in a denser loaf. While dough hydration is something to take into consideration, it's important not to overlook the intricate balance between flour and water. If your dough is excessively sticky and hard to manage, it wouldn't hurt to add a smidge more flour. But remember— this should be done sparingly to maintain the dough's moisture content and prevent a dense, tight crumb structure. Temperature also plays a pivotal role in dough handling. Keep in mind that yeast (the dependable leavening agent in sourdough) is a fan of warmer climates. If you're working in a cool kitchen, consider finding a warmer spot for your dough to rest. This will make your dough a little less sticky and a lot easier to work with. Another key aspect we should not ignore is the fermentation process. An over-fermented or improperly fermented dough can cause it to be sticky and difficult to handle. Pay attention to the dough's bulk fermentation phase. If it's bubbly, jiggly and has grown in size, it's likely ready to be shaped. Lastly, the surface on which you're working can make a huge difference. Consider lightly oiling your work surface, rather than heavily flouring it, when working with high hydration dough. This will help prevent the dough from sticking to the surface and keep your sourdough soft and elastic, significantly reducing the risk of tears. Remember, mastering the art of handling sticky dough and preventing tears comes with practice. Don't be disheartened if you don't get it right the first time. Embrace the sticky challenge, persevere, and with time, you'll certainly master the art of sourdough baking. After all, baking is as much about the journey as it is about the final product. So, go ahead, dig your hands into that dough and let your sourdough adventure begin!
Using the Right Angle and Pressure for a Clean Cut
Achieving the perfect score on sourdough bedrock calls for the right balance between precision and process. This brings us to the heart of the matter - mastering the concept of using the right angle and pressure for a clean cut. Undoubtedly, scoring is an artistry in itself, but it traverses beyond that and actually forms the backbone of baking. Scoring affects how and where your bread will expand during baking. When scoring sourdough, the optimal angle is approximately 30 to 45 degrees for a majority of patterns. Holding your lame at this angle allows for a balanced cut that guides the bread's oven spring, leading to a visually pleasing expansion of the crust. The incision made should be on the bread’s surface, just about half a centimeter deep, ensuring that you just scratch the surface rather than ground deeper into the loaf. Next in line is pressure application, which is almost as significant as angle use. A gentle yet decisive cutting action can prevent the dough from being overly stretched, torn, or squashed. It's essential to keep in mind that a timid or fearful approach can result in dragging the dough. Instead, smoothly and confidently dragging the lame across the surface works best. The necessity for just the right pressure rings particularly true for different types of dough. For instance, a slightly firmer hand may be required for denser doughs while a delicate touch might do the trick for high hydration, airy doughs. However, excessive pressure can deflate your dough and impair the oven spring, ultimately affecting the final product's taste and aesthetics. Nonetheless, the key to getting that perfect score lies in continuous practice. It's about not shying away from trial and error - trying different angles, varying the pressure, while persistently observing how each loaf responds. Gradually, you will be able to identify that ‘sweet spot’ - the ideal angle and pressure combo that works best for your dough, your oven, and your hands. Just remember, every sourdough loaf is unique, and you'll need to adapt your scoring techniques to its individual characteristics. With meticulousness, patience, and practice, achieving a clean, beautiful cut that yields the perfectly scored sourdough bedrock is entirely possible!