How To Make Stickers With Cricut
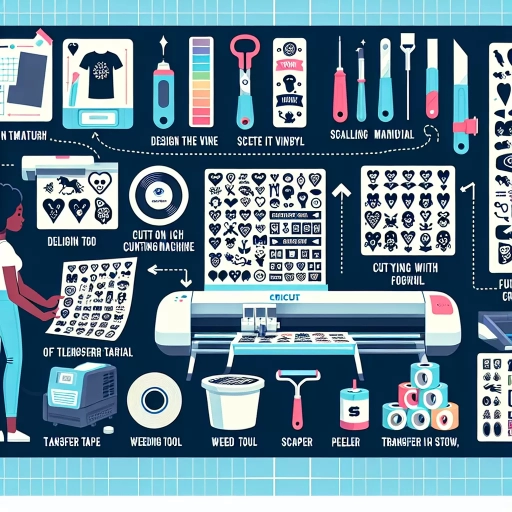
Here is the introduction paragraph: Making stickers with a Cricut machine is a fun and creative way to personalize your belongings, decorate your space, or even start a small business. With a Cricut, you can cut out intricate designs and patterns with ease, making it a great tool for crafty individuals. To get started, you'll need to design your sticker, prepare your Cricut machine, and cut and weed your stickers. In this article, we'll take you through each step of the process, starting with the first and most important part: designing your sticker. With a little creativity and some basic design skills, you can create unique and eye-catching stickers that reflect your personality or brand. So, let's dive in and explore the world of sticker making with Cricut, beginning with the design process.
Designing Your Sticker
Designing your sticker can be a fun and creative process, but it can also be overwhelming with so many options available. To create a high-quality sticker, it's essential to consider several key elements, including the font and color scheme, images and graphics, and text and shapes. Choosing the right font and color scheme can make or break the overall look and feel of your sticker. A well-chosen font can convey the tone and personality of your brand, while a color scheme can evoke emotions and grab attention. In this article, we'll explore the importance of choosing the right font and color scheme, using images and graphics, and adding text and shapes to enhance your design. By the end of this article, you'll have a better understanding of how to design a sticker that effectively communicates your message and stands out from the crowd. First, let's start with the foundation of your sticker design: choosing the right font and color scheme.
Choosing the Right Font and Color Scheme
When it comes to designing your sticker, choosing the right font and color scheme is crucial to convey your message effectively. The font you select should be clear, readable, and consistent with your brand's identity. For a bold and eye-catching look, consider using a sans-serif font like Arial or Helvetica, while a script font like Lobster or Pacifico can add a touch of elegance and sophistication. If you're creating a sticker for a specific industry, such as a food truck or a children's party, you may want to choose a font that's playful and fun, like Comic Sans or Great Vibes. In addition to font style, font size is also important to consider. Make sure your text is large enough to be easily readable, but not so large that it overwhelms the design. A good rule of thumb is to use a font size between 12-24 points, depending on the size of your sticker. When it comes to color scheme, the options are endless, but it's essential to choose colors that complement each other and align with your brand's color palette. A simple and effective way to choose a color scheme is to select a dominant color and then choose one or two accent colors that complement it. For example, if you're creating a sticker for a summer sale, you may want to choose a bright and cheerful color like yellow or orange, paired with a deep blue or green accent color. Another option is to use a monochromatic color scheme, where different shades of the same color are used to create a cohesive and sophisticated look. Ultimately, the key to choosing the right font and color scheme is to keep it simple, consistent, and aligned with your brand's identity. By doing so, you'll create a sticker that effectively communicates your message and leaves a lasting impression on your audience.
Using Images and Graphics in Your Design
When it comes to designing your sticker, using images and graphics can elevate your design and make it more visually appealing. Incorporating images and graphics can help convey your message, add texture, and create visual interest. You can use a variety of images and graphics, such as photographs, illustrations, icons, and patterns, to enhance your design. However, it's essential to ensure that the images and graphics you use are high-resolution and relevant to your design. Low-quality images can make your sticker look unprofessional, while irrelevant images can confuse your message. To use images and graphics effectively, consider the following tips: use simple and bold graphics to make your design stand out, balance images with text to avoid overwhelming the viewer, and experiment with different image sizes and placements to create visual hierarchy. Additionally, make sure to check the copyright and licensing terms of any images or graphics you use to avoid any legal issues. By incorporating high-quality images and graphics into your design, you can create a sticker that is both visually appealing and effective in communicating your message.
Adding Text and Shapes to Enhance Your Design
Adding text and shapes to your sticker design can elevate it from a simple image to a visually appealing and effective marketing tool. With Cricut's design software, you can easily add text and shapes to your design using the "Text" and "Shapes" tools. To add text, simply click on the "Text" tool and type in your desired text. You can then adjust the font, size, and color to match your brand's style. For shapes, you can choose from a variety of pre-made shapes, such as circles, squares, and triangles, or create your own custom shape using the "Pen" tool. You can also use the "Shape" tool to add icons, logos, or other graphics to your design. To add a shape, simply click on the "Shape" tool and select the desired shape from the menu. You can then resize and customize the shape to fit your design. Additionally, you can use the "Layer" feature to arrange your text and shapes in a specific order, allowing you to create complex and layered designs. By adding text and shapes to your sticker design, you can add context, emphasize important information, and create a visually appealing design that grabs attention.
Preparing Your Cricut Machine
To get the most out of your Cricut machine, it's essential to prepare it properly before starting your projects. This involves a series of steps that ensure your machine is working at its best, allowing you to achieve professional-looking results. First, you need to calibrate your Cricut for optimal performance, which involves adjusting the machine's settings to ensure accurate cuts and precise movements. Additionally, choosing the right blade and mat for sticker cutting is crucial, as it can affect the quality of your cuts and the longevity of your machine. Finally, updating your Cricut software is vital to access the latest features and ensure compatibility with new materials and tools. By following these steps, you'll be able to unlock your Cricut's full potential and take your crafting to the next level. In this article, we'll dive deeper into the first step: Calibrating Your Cricut for Optimal Performance.
Calibrating Your Cricut for Optimal Performance
Calibrating your Cricut machine is a crucial step in ensuring optimal performance and achieving professional-looking results. Calibration involves adjusting the machine's settings to ensure accurate cutting, writing, and scoring. To calibrate your Cricut, start by checking the machine's blade depth and alignment. Make sure the blade is securely in place and the housing is properly aligned with the machine's track. Next, perform a test cut using the Cricut's built-in calibration tool or a calibration mat. This will help the machine adjust its settings to ensure accurate cutting. Additionally, calibrate the machine's scoring tool by adjusting the scoring wheel to the correct depth and alignment. It's also essential to calibrate the machine's writing tool by adjusting the pen holder to the correct height and alignment. Regular calibration will ensure that your Cricut machine continues to perform optimally, producing high-quality cuts, scores, and writes. By taking the time to calibrate your machine, you'll be able to achieve professional-looking results and make the most of your Cricut's capabilities.
Choosing the Right Blade and Mat for Sticker Cutting
When it comes to cutting stickers with your Cricut machine, choosing the right blade and mat is crucial for achieving professional-looking results. The Cricut machine comes with a fine-point blade, which is ideal for cutting intricate designs and small details. However, if you're planning to cut thicker or more complex sticker designs, you may need to switch to a deep-cut blade. The deep-cut blade is designed for cutting thicker materials, such as cardstock, chipboard, or even thin wood, and is perfect for creating custom stickers with intricate cuts or layers. In addition to the blade, the mat you use is also important. The Cricut machine comes with a light-grip mat, which is perfect for cutting delicate or thin materials. However, if you're working with thicker or more textured materials, you may need to switch to a strong-grip mat. The strong-grip mat provides extra hold and stability, ensuring that your material stays in place while cutting. When choosing a mat, consider the type of material you're working with and the level of grip you need. By selecting the right blade and mat for your sticker cutting project, you'll be able to achieve precise cuts, prevent material waste, and create professional-looking stickers that will make your project stand out.
Updating Your Cricut Software for the Latest Features
To ensure you're getting the most out of your Cricut machine, it's essential to keep your software up-to-date. Regular updates often bring new features, improvements, and bug fixes that can enhance your overall crafting experience. To update your Cricut software, start by opening the Design Space application on your computer or mobile device. Click on the three horizontal lines in the top left corner to access the menu, then select "Help" and "Check for Updates." If an update is available, follow the prompts to download and install the latest version. You can also check for updates on the Cricut website by clicking on the "Support" tab and selecting "Software Updates." Additionally, make sure your machine is connected to the internet and that your computer or device meets the minimum system requirements for the latest software version. By keeping your software current, you'll be able to take advantage of new features, such as improved cutting accuracy, enhanced image editing tools, and expanded material compatibility. For example, recent updates have introduced new scoring tools, allowing for more precise folds and creases in your projects. Furthermore, updated software often includes new fonts, shapes, and images, giving you even more creative options for your sticker designs. By staying up-to-date, you'll be able to unlock the full potential of your Cricut machine and create professional-looking stickers with ease.
Cutting and Weeding Your Stickers
Cutting and weeding your stickers can be a daunting task, especially if you're new to the world of vinyl crafting. However, with the right tools and techniques, you can achieve professional-looking results. To ensure precise cutting, it's essential to set up your Cricut machine correctly. This involves calibrating the machine, selecting the right cutting mat, and adjusting the blade depth. Once your Cricut is set up, you can move on to using transfer tape for easy sticker application. This involves applying the transfer tape to the sticker, weeding out excess vinyl, and transferring the sticker to your desired surface. Finally, removing excess vinyl and weeding your stickers is a crucial step in achieving a clean and professional finish. By following these steps, you can create high-quality stickers that will make your projects stand out. In this article, we'll dive deeper into the process, starting with setting up your Cricut for precise cutting.
Setting Up Your Cricut for Precise Cutting
Setting up your Cricut for precise cutting is a crucial step in creating high-quality stickers. To start, ensure your Cricut machine is properly calibrated by following the manufacturer's instructions. Next, prepare your cutting mat by cleaning it with a lint roller or a damp cloth to remove any debris or dust. This will prevent any unwanted particles from interfering with the cutting process. Then, load your cutting mat into the machine, making sure it is aligned properly with the grid on the mat. Select the correct cutting tool and material settings on your Cricut machine, depending on the type of sticker paper or vinyl you are using. For example, if you are using a intricate design, you may need to use the fine-point blade, while a more robust design may require the deep-cut blade. Additionally, adjust the machine's pressure settings to ensure a clean cut. If you are using a new blade, it's a good idea to perform a test cut to ensure it is cutting correctly. Finally, load your sticker paper or vinyl onto the cutting mat, smoothing out any air bubbles or wrinkles, and send the design to the Cricut machine to begin the cutting process. By following these steps, you can ensure that your Cricut is set up for precise cutting, resulting in professional-looking stickers with clean lines and intricate details.
Using Transfer Tape for Easy Sticker Application
Using transfer tape for easy sticker application is a game-changer for crafters and DIY enthusiasts. Transfer tape, also known as application tape or transfer film, is a specialized adhesive tape designed to help you apply stickers, decals, and vinyl graphics with precision and ease. When working with intricate designs or large stickers, transfer tape ensures that your stickers are applied smoothly, evenly, and without air bubbles or wrinkles. To use transfer tape, simply cut a piece to the desired size, place it over your sticker, and smooth out any air bubbles or wrinkles. Then, apply the sticker to your surface, starting from the center and working your way outwards. The transfer tape will help the sticker conform to the surface, ensuring a professional-looking finish. Once the sticker is applied, simply remove the transfer tape, and your sticker will be securely in place. Using transfer tape for easy sticker application saves time, reduces frustration, and ensures a flawless finish, making it an essential tool for anyone working with stickers and vinyl graphics.
Removing Excess Vinyl and Weeding Your Stickers
Removing excess vinyl and weeding your stickers is a crucial step in the sticker-making process. After cutting your stickers with your Cricut machine, you'll be left with a sheet of vinyl containing your stickers, as well as excess vinyl around and between them. To remove the excess vinyl, start by peeling the transfer tape away from the vinyl at a 45-degree angle. This will help prevent the stickers from lifting off the tape. Continue to peel the tape back slowly and carefully, making sure not to touch the stickers themselves. As you peel, the excess vinyl should start to separate from the stickers. If some excess vinyl remains, you can use a weeding tool or a credit card to gently scrape it away. Be careful not to scratch the stickers or the transfer tape. Once you've removed the excess vinyl, use your weeding tool to remove any remaining bits of vinyl from the stickers. This is called "weeding" and it's an essential step in preparing your stickers for application. By removing the excess vinyl and weeding your stickers, you'll be left with professional-looking stickers that are ready to use.