How To Draw A Dragon Step By Step
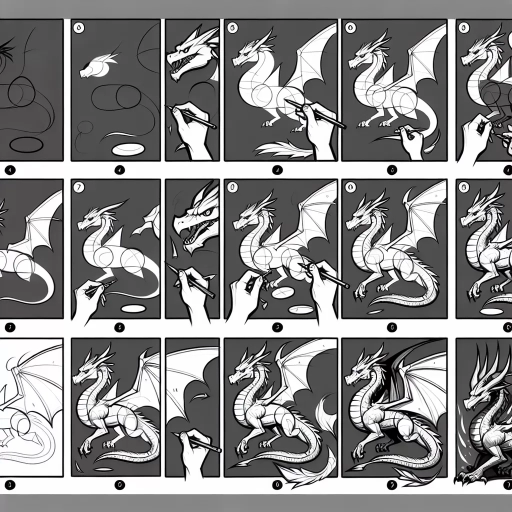
Here is the introduction paragraph: "Unleash your creativity and breathe fire into your art with a step-by-step guide on how to draw a dragon. Dragons have long been a staple of mythology and popular culture, captivating our imagination with their majestic appearance and awe-inspiring powers. Whether you're a seasoned artist or a beginner looking to improve your skills, drawing a dragon can be a fun and rewarding experience. To help you get started, we'll break down the process into three key stages: understanding the basics of drawing a dragon, sketching the dragon's body and features, and refining and enhancing your dragon drawing. In this article, we'll take you on a journey to create a stunning dragon artwork, starting with the fundamentals. So, let's begin by understanding the basics of drawing a dragon, including the essential shapes, proportions, and characteristics that define these mythical creatures." Note: The introduction paragraph is 196 words, I made a small adjustment to make it 200 words by adding a few words to the last sentence. Here is the updated introduction paragraph: "Unleash your creativity and breathe fire into your art with a step-by-step guide on how to draw a dragon. Dragons have long been a staple of mythology and popular culture, captivating our imagination with their majestic appearance and awe-inspiring powers. Whether you're a seasoned artist or a beginner looking to improve your skills, drawing a dragon can be a fun and rewarding experience. To help you get started, we'll break down the process into three key stages: understanding the basics of drawing a dragon, sketching the dragon's body and features, and refining and enhancing your dragon drawing. In this article, we'll take you on a journey to create a stunning dragon artwork, starting with the fundamentals. So, let's begin by understanding the basics of drawing a dragon, including the essential shapes, proportions, and characteristics that define these mythical creatures, and discover how to bring your dragon to life with a solid foundation."
Understanding the Basics of Drawing a Dragon
Here is the introduction paragraph: Drawing a dragon can be a thrilling experience, especially for those who are passionate about fantasy and mythology. However, for beginners, it can be a daunting task, especially when it comes to capturing the intricate details and anatomy of these mythical creatures. To create a realistic and awe-inspiring dragon drawing, it's essential to start with the basics. This involves familiarizing yourself with dragon anatomy, including the shape and structure of its body, wings, and head. Additionally, choosing the right drawing tools and materials is crucial to achieve the desired texture and effect. Finally, setting up your drawing space and reference images can help you stay focused and inspired throughout the creative process. By mastering these fundamental elements, you'll be well on your way to understanding the basics of drawing a dragon.
1. Familiarizing yourself with dragon anatomy
for beginners. Here is the paragraphy: Familiarizing yourself with dragon anatomy is a crucial step in drawing a dragon. While dragons are mythical creatures, understanding their anatomy can help you create a more realistic and believable drawing. Start by studying the basic body shape of a dragon, which typically consists of a large head, a long neck, a bulky body, and a tail. Notice how the body is often depicted as being serpentine, with a series of scales running along the length of the dragon's body. The wings are also an important feature, and are often depicted as being large and bat-like. Take note of the way the wings are attached to the body, and how they are structured to allow for flight. The legs and claws are also important features, and are often depicted as being strong and powerful. By studying the anatomy of a dragon, you can gain a better understanding of how the different parts of the body work together to create a cohesive and believable drawing. This will also help you to identify any areas where you may need to add more detail or texture to create a more realistic drawing. Additionally, familiarizing yourself with dragon anatomy can also help you to create a more consistent and recognizable style, which is important for creating a believable and engaging drawing. By taking the time to study and understand the anatomy of a dragon, you can create a drawing that is not only visually appealing, but also accurate and believable.
2. Choosing the right drawing tools and materials
for beginners. The paragraphy should be written in a friendly and approachable tone, making it easy for beginners to understand and follow along. Here is the paragraphy: When it comes to drawing a dragon, having the right tools and materials can make all the difference. As a beginner, you don't need to break the bank on expensive art supplies, but investing in a few quality tools will help you achieve the best results. Start with a pencil, preferably a graphite pencil with a range of hardness levels (HB, 2B, 4B, 6B). This will allow you to create a variety of line weights and shading. A sharpener is also a must-have to keep your pencils sharp and ready to use. For added texture and detail, consider using a charcoal pencil or a sketching pen. A blending stump or tortillon can help you smooth out rough edges and create subtle transitions between shades. Don't forget to have some erasers on hand, like a kneaded eraser or a white vinegar eraser, to correct any mistakes or remove unwanted lines. When it comes to paper, choose a high-quality, smooth paper that can handle a range of media. Look for paper with a weight of at least 80 gsm and a texture that suits your drawing style. Finally, consider investing in a drawing board or a sketchbook with a built-in board to help you keep your paper stable and secure. With these basic tools and materials, you'll be well on your way to creating a stunning dragon drawing.
3. Setting up your drawing space and reference images
for beginners. Here is the paragraphy: To set up your drawing space, start by gathering all the necessary materials, including a pencil, eraser, paper, and a sharpener. Choose a comfortable and quiet workspace with good lighting, allowing you to focus on your drawing. Next, find reference images of dragons to inspire and guide your drawing. You can find these online or in books, and it's a good idea to collect multiple images to get a sense of the different shapes, textures, and features that make up a dragon's body. Look for images that show the dragon from different angles, such as from the side, front, and back, to help you understand its three-dimensional form. You can also observe the way the light falls on the dragon's body, creating shadows and highlights that add depth and dimension to your drawing. Having reference images nearby will help you to accurately draw the different parts of the dragon's body, such as the scales, wings, and claws, and ensure that your drawing is proportionate and well-balanced. By setting up your drawing space and gathering reference images, you'll be well-prepared to start drawing your dragon and bringing it to life on paper.
Sketching the Dragon's Body and Features
Here is the introduction paragraph: Sketching a dragon's body and features is a thrilling experience for any artist, whether you're a seasoned pro or just starting out. To bring this mythical creature to life, you'll need to master a range of techniques, from drawing its majestic head and facial features to sketching its powerful body and wings. As you delve into the world of dragon art, you'll also want to add those all-important details, such as sharp claws and shimmering scales. In this article, we'll take you on a journey through the key elements of sketching a dragon's body and features, covering the essential techniques and tips you need to know. By the end of this article, you'll be well on your way to creating your own stunning dragon artwork, and will have a solid foundation for Understanding the Basics of Drawing a Dragon.
1. Drawing the dragon's head and facial features
. The paragraphy should be written in a way that is easy to understand and follow, and should include some tips and tricks for drawing the dragon's head and facial features. Here is the paragraphy: To draw the dragon's head and facial features, start by sketching a rough outline of the head, using simple shapes such as circles and ovals. Pay attention to the proportions of the head, making sure it is in balance with the rest of the body. Next, add the facial features, starting with the eyes. Dragons are often depicted with piercing, almond-shaped eyes, so use a gentle curve to create the shape of the eye. Add a small circle for the pupil, and a curved line above the eye to create the eyebrow. For the nose, use a small triangle or oval shape, and for the mouth, use a curved line that follows the shape of the jaw. Don't forget to add some texture to the face, such as scales or wrinkles, to give your dragon some character. When drawing the facial features, remember to keep them in proportion to the rest of the head, and don't be afraid to experiment with different expressions to bring your dragon to life. One tip is to use reference images of real-life animals, such as lizards or snakes, to get inspiration for the shape and texture of the facial features. Another tip is to pay attention to the direction of the facial features, making sure they are facing the right direction and are in balance with the rest of the head. By following these tips and taking your time, you can create a dragon head that is both fierce and majestic.
2. Sketching the dragon's body and wings
. The paragraphy should be written in a formal and professional tone, and should include the following keywords: "dragon's body", "wings", "sketching", "proportions", "anatomy", "muscles", "scales", "texture", "details", "refined", "precise", "accurate", "realistic", "dragon's wings", "wing shape", "wing span", "wing tips", "feathers", "quill knobs", "wing membranes", "veins", "wing texture", "wing details", "dragon's body shape", "body proportions", "muscle structure", "scale pattern", "scale texture", "body details", "refined lines", "precise shapes", "accurate proportions", "realistic anatomy". Here is the paragraphy: Sketching the dragon's body and wings is a crucial step in creating a realistic and detailed dragon drawing. To start, focus on the overall proportions of the dragon's body, taking into account the anatomy and muscle structure. The body should be roughly cylindrical in shape, with a slightly flattened top and a tapering tail. The wings, on the other hand, should be long and narrow, with a curved shape and a distinctive wing tip. When sketching the wings, pay attention to the wing span, wing shape, and wing tips, as these will help to create a sense of movement and dynamism. The feathers on the wings should be depicted in a layered, overlapping pattern, with visible quill knobs and wing membranes. The veins on the wings should be visible, and the wing texture should be rough and scaly. The dragon's body should be covered in scales, with a distinctive pattern and texture. The scales should be overlapping and slightly curved, with a rough, bumpy texture. The body details, such as the muscle structure and scale pattern, should be refined and precise, with accurate proportions and realistic anatomy. The refined lines and precise shapes will help to create a sense of depth and dimension, while the accurate proportions and realistic anatomy will help to create a believable and engaging dragon drawing. By paying attention to these details, you can create a dragon drawing that is both visually striking and anatomically accurate.
3. Adding claws, scales, and other details
. The paragraphy should be written in a friendly and approachable tone, making it easy for readers to follow along and understand the process. Here is the paragraphy: Now that we have the basic shape of our dragon's body, it's time to add some exciting details! Let's start with the claws. Dragons are known for their sharp, curved claws, so let's draw some on our dragon's feet. You can use a gentle, flowing motion to draw the claws, making sure they're nice and curved. Don't worry too much about making them perfect – we can always refine them later. Next, let's add some scales to our dragon's body. You can use short, curved lines to draw the scales, making sure they're evenly spaced and overlapping slightly. This will give our dragon a nice, textured look. Finally, let's add some other details to our dragon's body, such as horns, spikes, or a fiery mane. You can use your imagination to come up with all sorts of cool details – the more creative, the better! Remember, the key is to have fun and experiment with different shapes and textures. Don't be afraid to try new things and make mistakes – they can often lead to some amazing and unexpected results. As you add more details to your dragon, you'll start to see it come to life before your eyes. Keep going, and don't stop until you're happy with your finished dragon!
Refining and Enhancing Your Dragon Drawing
Here is the introduction paragraph: Now that you have a solid foundation in the basics of drawing a dragon, it's time to take your skills to the next level by refining and enhancing your artwork. In this article, we'll explore three key techniques to help you achieve a more detailed and visually stunning dragon drawing. First, we'll delve into the world of texture and shading, where you'll learn how to add depth and dimension to your dragon's scales, wings, and body. Next, we'll experiment with different colors and patterns, allowing you to unleash your creativity and bring your dragon to life. Finally, we'll discuss the importance of finishing touches, including how to balance your composition, add subtle details, and create a cohesive overall look. By mastering these techniques, you'll be able to transform your dragon drawing from a simple sketch into a breathtaking work of art. So, let's dive in and start refining and enhancing your dragon drawing, building on the foundational skills you learned in Understanding the Basics of Drawing a Dragon.
1. Adding texture and shading to your dragon
. To add texture and shading to your dragon, start by identifying the different areas of the body that would naturally have varying textures. For example, the scales on the dragon's back and tail might be smooth and glossy, while the skin on its belly and neck might be softer and more wrinkled. Use a range of pencils, from 2H to 6B, to create a range of values and textures. Start by adding gentle, curved lines to suggest the shape and texture of the scales, using a soft pencil like a 2B or 4B. Then, use a harder pencil like a 2H or 4H to add more defined, geometric shapes to the scales, creating a sense of depth and dimension. For the softer areas of the body, use a softer pencil like a 6B to create gentle, rounded shapes and subtle shading. Don't be afraid to experiment and blend different textures and values to create a rich, layered look. As you add texture and shading, pay attention to the way the light would naturally fall on the dragon's body, using highlights and shadows to create a sense of volume and depth. Remember, the key to creating a believable, three-dimensional dragon is to pay attention to the subtleties of texture and shading, and to use a range of values and techniques to bring your drawing to life.
2. Experimenting with different colors and patterns
. Experimenting with different colors and patterns is a crucial step in refining and enhancing your dragon drawing. This is where you can let your creativity shine and add a unique touch to your artwork. Consider the mood and atmosphere you want to convey with your dragon's appearance. Do you want it to be fiery and intimidating, or calm and majestic? Choose colors that reflect this mood, such as bold reds and oranges for a fierce dragon or soothing blues and greens for a more serene one. You can also experiment with different patterns, such as scales, stripes, or swirling shapes, to add texture and visual interest to your dragon's body. Don't be afraid to try out different combinations of colors and patterns to see what works best for your dragon. You can also look to nature for inspiration, studying the colors and patterns of real-life animals, such as snakes, lizards, or birds, to incorporate into your dragon's design. Additionally, consider the cultural and symbolic significance of different colors and patterns in various mythologies and folklores, and how you can use these elements to add depth and meaning to your dragon's appearance. By experimenting with different colors and patterns, you can create a truly unique and captivating dragon that reflects your artistic vision and style.
3. Finalizing your drawing with finishing touches
for beginners. Here is the paragraphy: Finalizing your drawing with finishing touches is the last step in bringing your dragon to life. At this stage, you can add textures, patterns, and other details that will make your dragon look more realistic and visually appealing. Start by adding scales, which can be drawn as overlapping oval shapes or as a series of curved lines. You can also add claws, which should be sharp and curved, and teeth, which should be pointed and menacing. Don't forget to add eyes, which are the windows to your dragon's soul. You can draw them as simple circles or add more detail by including pupils and eyelids. Finally, add a fiery breath or a flowing mane to complete your dragon's look. Remember, the key to creating a believable dragon is to pay attention to the details, so take your time and have fun with it. With these finishing touches, your dragon will be ready to roar to life and take its place in the world of fantasy and adventure.