How To Draw A Fish
Understanding the Basics of Drawing
The Importance of Learning Basic Drawing Skills
Before attempting to draw a fish or any other intricate object, you should first familiarize yourself with the basics of drawing. It always starts with knowing how to hold a pencil, which in itself sets the foundations for your drawing journey. Without sufficient knowledge and practice of basic drawing techniques, drawing a fish or anything for that matter can be a confusing and daunting task. Understanding how to control the pencil, applying various gradients of shading, maintaining the correct pencil pressure and so on are key skills of drawing which will determine the outcome of your artwork.
Basics of Shading
Shading is a fundamental drawing skill that adds depth, dimension, and the illusion of light to your drawings. Shading is a technique that helps your drawing come to life with a realistic touch. The core idea of shading is understanding the way light interacts with different surfaces. Different shading methods such as hatching, cross-hatching, contour shading, and stippling can be used, each offering a different texture and depth to your drawing. This skill is particularly important when drawing a fish because of its shiny, scaly texture that is further enhanced by light.
Fundamental Shapes and Lines
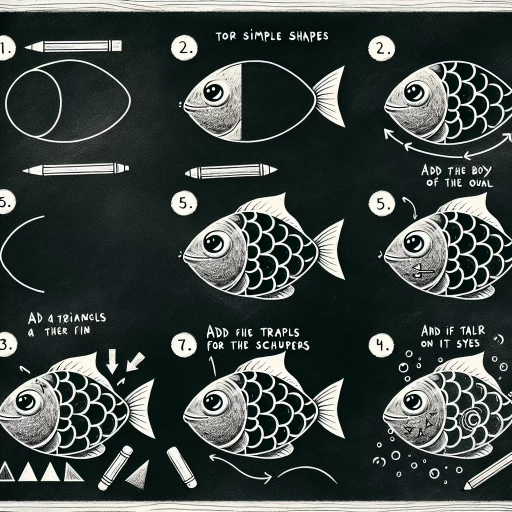
Everything around us can be broken down into basic shapes. The same applies to drawing a fish. Understanding this concept is key in learning how to draw. Lines and shapes serve as the skeleton of your drawing, upon which finer details can be added later on. In the case of a fish, you start out with a simple oval shape along with other basic shapes to form the body, fins, and tail. As you add more details, the fish will slowly start to take form. This process is called sketching or constructing the base.
Drawing a Fish Step-By-Step
Making the Initial Sketch
Making the Initial Sketch
Start out by sketching your desired fish species using simple lines and shapes. Use the oval to represent the body, triangles for the fins, and a crescent for the tail. Once you have these shapes outlined, you can start connecting and adjusting them to make the body of the fish. Stage can be daunting for beginners, but this is the step where you get to see your fish slowly take shape, and could be very rewarding.
Adding Details and Texture
Once you have the basic shape of your fish ready, it's time to add details and textures. Remember, a fish is a living creature with a unique anatomy that needs to be captured accurately in your drawing. Pay attention to the scales, fins, gills, and other such features to make your drawing realistic. Make sure to focus on adding smaller details, such as the scales, in a repetitive pattern to give the impression of real fish skin.
Applying Shading Techniques
Shading is paramount when drawing a fish, as it gives the illusion of a shiny, scaly body often associated with fish. Start light and gradually add darker shading to create depth and highlight the parts of the fish that light hits directly. Shading also helps show the roundness of the fish's body, helping it appear more three-dimensional on a two-dimensional surface.
Finalizing and Finishing Up Your Fish Drawing
Finishing Touches
Finishing Touches
After you have a complete drawing, it’s time to add the finishing touches. This could include enhancing the fish’s outline, adding in water details, or even creating a background. Adding these final aspects to your drawing would provide it with the context and depth, enhancing the overall look of your creation.
Cleaning Up Your Drawing
Cleaning up your drawing involves correcting any possible mistakes, rubbing out any unnecessary guidelines, and checking over the shading to make sure it's smooth. This step is crucial in professionalism, ensuring your final artwork is polished and presentable.
Presenting Your Work
Finally, once you’re confident with your artwork, it’s ready for presentation. This could be as simple as signing your name at the corner, or as complex as adding a matte and frame to make your artwork ready for display. Regardless of how you present it, remember that the process is just as important, if not more, than the final result. So, be proud of your creation, knowing that you have acquired a new skill effectively.