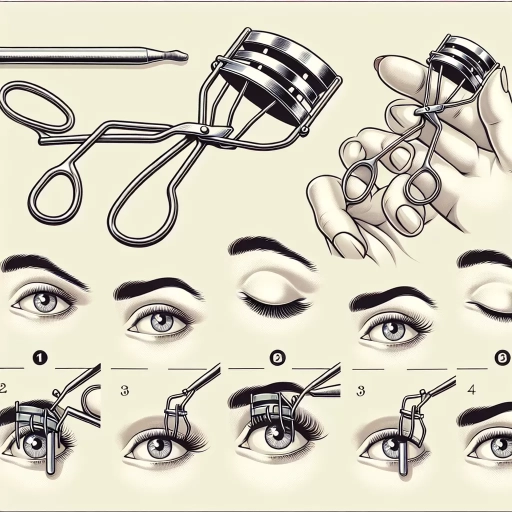
How To Use An Eyelash Curler
Achieving beautifully curled eyelashes can dramatically enhance your overall look, making your eyes appear larger and more captivating. While mascara can work wonders, an eyelash curler is a game-changing tool that can take your lash game to the next level. Whether you're a makeup novice or a seasoned beauty enthusiast, mastering the art of using an eyelash curler can elevate your daily beauty routine. This comprehensive guide will walk you through the essential steps to achieve perfectly curled lashes, focusing on three key aspects: preparing your eyelashes and curler, mastering the curling technique, and enhancing and maintaining your curled lashes. By following these expert tips and tricks, you'll be able to create a stunning, eye-opening effect that lasts throughout the day. With practice and patience, you'll soon become proficient in using this indispensable beauty tool, transforming your lashes from flat to fabulous in just minutes. Let's begin by exploring the crucial first step: preparing your eyelashes and curler for optimal results.
Preparing Your Eyelashes and Curler
Achieving beautifully curled eyelashes is an art that can elevate your entire look, framing your eyes and creating an alluring, wide-awake appearance. However, the key to stunning lashes lies not just in the act of curling itself, but in the preparation process. This often-overlooked step can make all the difference between lackluster results and show-stopping lashes that turn heads. In this comprehensive guide, we'll delve into the essential techniques for preparing both your eyelashes and your curler to ensure optimal results. We'll explore three crucial aspects of lash preparation: thoroughly cleansing and drying your lashes to create a clean canvas, selecting the perfect eyelash curler that complements your unique eye shape, and the game-changing trick of warming up your curler for enhanced performance. By mastering these foundational steps, you'll set the stage for lashes that are not only beautifully curled but also healthy and resilient. So, let's dive into the world of eyelash preparation and discover how to transform your lash game with expert techniques for Preparing Your Eyelashes and Curler.
Cleanse and dry your lashes thoroughly
Cleansing and drying your lashes thoroughly is a crucial step in preparing your eyelashes for curling. This process not only ensures optimal results but also promotes the health and longevity of your natural lashes. Begin by gently removing any traces of makeup, oils, or debris from your eyelashes using a mild, oil-free eye makeup remover. This step is essential as residual products can interfere with the curling process and potentially damage your lashes. For a thorough cleanse, use a lint-free cotton pad or a clean, soft cloth soaked in the makeup remover. Gently press it against your closed eyelids for a few seconds to allow the product to break down any makeup. Then, carefully wipe downward and outward, following the natural direction of your lash growth. Be sure to pay extra attention to the base of your lashes where mascara and other products tend to accumulate. After cleansing, it's equally important to ensure your lashes are completely dry before using an eyelash curler. Wet or damp lashes are more susceptible to damage and breakage when curled. Additionally, moisture can cause your lashes to lose their curl more quickly. To dry your lashes, you can gently pat them with a clean, soft towel or use a handheld fan on its lowest setting. Avoid rubbing your eyes, as this can cause irritation and potentially damage your delicate lash hairs. For those with oily eyelids, an extra step may be necessary to ensure your lashes are free from excess oils that can hinder the curling process. Use a small amount of oil-free toner on a cotton swab and lightly run it along your lash line to remove any remaining oils. While cleansing and drying your lashes, take this opportunity to inspect them closely. Look for any signs of irritation, infection, or excessive lash loss. Healthy lashes are essential for achieving the best curling results and maintaining overall eye health. If you notice any concerns, it's best to address them before proceeding with curling. By thoroughly cleansing and drying your lashes, you're creating the ideal canvas for curling. This preparation not only enhances the effectiveness of your eyelash curler but also helps protect your natural lashes from potential damage. Clean, dry lashes are more responsive to curling and will hold their shape longer, giving you that coveted wide-eyed, awakened look that beautifully framed eyes provide.
Choose the right type of eyelash curler for your eye shape
Choosing the right type of eyelash curler for your eye shape is crucial for achieving beautiful, lifted lashes without causing damage or discomfort. Not all eyelash curlers are created equal, and finding the perfect match for your unique eye structure can make a significant difference in your makeup routine. For those with almond-shaped eyes, which are characterized by a slight upward tilt at the outer corners, a classic curved curler is typically the best choice. These curlers have a gentle arc that matches the natural curve of almond eyes, allowing for even pressure distribution along the lash line. Brands like Shu Uemura and Shiseido offer excellent options for this eye shape. If you have round eyes, which appear more circular and have visible white all around the iris, opt for a flatter curler with less curve. This type of curler will help you reach the outer and inner corner lashes more easily, providing a more uniform curl. The Kevyn Aucoin eyelash curler is a popular choice for round eyes due to its wider opening and flatter curve. Those blessed with hooded eyes, where the eyelid appears to be partially covered by skin, should look for curlers with a deeper curve and a wider opening. This design allows you to get closer to the lash line without pinching the delicate skin of the hood. The Tweezerman Pro Master Lash Curler is an excellent option for hooded eyes, as it features a deeper curve and a wider pad. For individuals with monolid eyes, characterized by the absence of a visible crease, a curler with a flatter curve and a smaller pad is ideal. This type of curler can help you get closer to the lash line without interfering with the unique eye shape. The Surratt Beauty Relevée Lash Curler is highly recommended for monolids due to its ergonomic design and precision. If you have deep-set eyes, where the eyes appear to be set further back in the socket, look for a curler with a more pronounced curve and a larger pad. This will help you reach all of your lashes, even those closer to the inner corner. The Lancôme Le Curler is an excellent choice for deep-set eyes, thanks to its pronounced curve and wide opening. For those with protruding eyes, where the eyes appear to bulge slightly, a curler with a gentler curve and a smaller pad is preferable. This will help you avoid pinching the delicate skin around the eyes while still providing an effective curl. The Chanel Eyelash Curler is a great option for protruding eyes due to its gentle curve and precise design. Remember, regardless of your eye shape, it's essential to choose a high-quality curler made from durable materials like stainless steel. Look for curlers with silicone pads, as they provide a gentle yet effective curl without damaging your lashes. Additionally, consider trying heated eyelash curlers, which can provide longer-lasting results for some individuals. By selecting the right eyelash curler for your unique eye shape, you'll be well on your way to achieving beautifully curled lashes that enhance your natural beauty.
Warm up your eyelash curler for better results
Warming up your eyelash curler is a game-changing technique that can significantly enhance your lash curling experience and results. This simple yet effective trick can transform your everyday lash routine into a salon-worthy treatment. The concept behind warming your eyelash curler is to make it more pliable and gentle on your lashes while increasing its ability to hold a curl for longer periods. To begin, you'll need a hair dryer or a cup of warm water. If using a hair dryer, hold the curler about 6 inches away from the nozzle and blast it with warm air for about 10-15 seconds. Be cautious not to overheat the curler, as this could potentially damage your lashes or skin. Alternatively, you can dip the curler in a cup of warm water for a few seconds, then dry it thoroughly with a clean towel. Both methods work well to gently warm the metal, making it more flexible and responsive to your lashes. Before applying the warmed curler to your lashes, it's crucial to test the temperature on the back of your hand or wrist. This step ensures that the curler isn't too hot and prevents any potential discomfort or injury to your delicate eye area. The ideal temperature should feel comfortably warm but not hot to the touch. The benefits of using a warmed eyelash curler are numerous. Firstly, the heat helps to soften and mold your lashes more effectively, resulting in a more dramatic and long-lasting curl. The warmth also helps to set the curl faster, reducing the time you need to hold the curler in place. Additionally, the gentle heat can help to activate any lash serums or conditioning treatments you may have applied beforehand, potentially enhancing their effectiveness. It's important to note that while warming your eyelash curler can yield fantastic results, it should be done with care and moderation. Overheating or using this technique too frequently could potentially weaken your lashes over time. As with any beauty routine, it's best to use this method in moderation and pay attention to how your lashes respond. For those with particularly straight or stubborn lashes, this warming technique can be a real game-changer. It can help achieve that coveted upward sweep that opens up the eyes and creates the illusion of longer, more voluminous lashes. When combined with the right mascara application, warmed curled lashes can give you a wide-eyed, awake look that lasts throughout the day. Remember, the key to success with this method is gentle application and careful temperature control. With practice, you'll find the perfect warmth and technique that works best for your unique lashes, elevating your everyday makeup routine to new heights.
Mastering the Curling Technique
Mastering the art of curling your eyelashes can transform your entire makeup routine, elevating your look from ordinary to extraordinary. Whether you're a makeup novice or a seasoned beauty enthusiast, perfecting the curling technique is an essential skill that can dramatically enhance your eyes' appearance. This article will guide you through the intricacies of achieving beautiful, long-lasting curls that open up your eyes and make them appear larger and more alluring. We'll explore three key aspects of the curling process: positioning the curler correctly at the base of your lashes, applying gentle pressure and holding for the optimal duration, and utilizing the "pumping" method for a more natural-looking curl. By mastering these techniques, you'll be able to create stunning, eye-catching lashes that complement any makeup look. But before we dive into the specifics of curling, it's crucial to understand the importance of properly preparing your eyelashes and curler. Let's begin by exploring the essential steps to ensure your lashes and tools are primed for the perfect curl.
Position the curler correctly at the base of your lashes
Positioning the curler correctly at the base of your lashes is a crucial step in achieving that perfect, eye-opening curl. This seemingly simple task requires precision and care to ensure optimal results and prevent any potential damage to your delicate lashes. To begin, open the curler wide and bring it close to your eye, positioning it parallel to your lash line. Gently place the curler at the base of your upper lashes, as close to the root as possible without pinching your eyelid. This placement is essential because it allows you to curl from the very beginning of your lash line, creating a more dramatic and long-lasting effect. As you position the curler, make sure your lashes are evenly distributed between the curler's pads. This even distribution prevents any lashes from being left out or bent at odd angles. To achieve this, you can use a clean mascara wand or a lash comb to separate and align your lashes before curling. Additionally, ensure that the curler's curve matches the natural curve of your eyelid. This alignment helps create a more natural-looking curl that follows the shape of your eye. One common mistake to avoid is placing the curler too far from the lash base or at an angle. This can result in an awkward, kinked appearance rather than a smooth, upward sweep. To prevent this, use a mirror placed slightly below eye level, allowing you to look down and see the precise placement of the curler. This perspective also helps you avoid accidentally catching any skin in the curler, which can be painful and potentially harmful. For those with hooded eyes or monolids, positioning the curler may require a slightly different approach. In these cases, try tilting your head back slightly and looking down into the mirror. This position can help you access the base of your lashes more easily and ensure proper placement of the curler. Remember that patience and practice are key when mastering the art of positioning your eyelash curler. Take your time to adjust and readjust until you feel confident that the curler is placed correctly. With repeated use, you'll develop muscle memory and find it easier to position the curler quickly and accurately. Lastly, always ensure your curler is clean and in good condition before use. A well-maintained curler with intact rubber pads will provide better grip and more even pressure, making it easier to position correctly and achieve those beautifully curled lashes you desire. By paying close attention to the placement of your curler, you'll set the foundation for stunning, eye-enhancing results that will elevate your entire makeup look.
Apply gentle pressure and hold for the right amount of time
Applying gentle pressure and holding for the right amount of time is a crucial step in mastering the eyelash curling technique. This delicate process requires patience and precision to achieve the desired results without damaging your lashes. When using an eyelash curler, it's essential to strike a balance between applying enough pressure to create a beautiful curl and avoiding excessive force that could lead to lash breakage or an unnatural-looking bend. To begin, position the eyelash curler at the base of your upper lashes, ensuring that all lashes are captured between the curler's pads. Gently close the curler, applying steady but moderate pressure. It's important to note that the amount of pressure needed may vary depending on your lash type and the curler you're using. Those with naturally straight or stubborn lashes may require slightly more pressure, while those with already curved lashes might need a lighter touch. The duration for which you hold the curler in place is equally important. A common mistake is clamping down too quickly or for too short a time, which can result in a sharp, unnatural-looking kink rather than a smooth, elegant curl. Generally, holding the curler in place for 10 to 15 seconds is ideal for most lash types. However, you may need to experiment to find the perfect timing for your unique lashes. For those seeking a more dramatic curl, consider using a technique called "pumping." This involves gently opening and closing the curler a few times while maintaining its position at the base of your lashes. Be cautious not to overdo this technique, as it can stress your lashes if done too vigorously or too often. It's also worth noting that the condition of your lashes can affect how well they hold a curl. Applying a lash primer or using a heated eyelash curler can help enhance the curling effect and make it last longer. However, if using a heated curler, be extra cautious with the pressure and holding time to avoid heat damage. Remember that practice makes perfect when it comes to mastering the right pressure and timing. Pay attention to how your lashes respond and adjust your technique accordingly. With time and experience, you'll develop an intuitive sense of what works best for your unique lash type and desired look. Lastly, always ensure that your eyelash curler is clean and in good condition. Replace the rubber pads regularly to maintain optimal performance and prevent any potential damage to your lashes. By focusing on gentle pressure, appropriate holding time, and proper curler maintenance, you'll be well on your way to achieving beautifully curled lashes that enhance your natural beauty.
Use the "pumping" method for a more natural curl
The "pumping" method is a game-changer when it comes to achieving a more natural and long-lasting curl for your eyelashes. This technique involves gently squeezing the eyelash curler multiple times along the length of your lashes, rather than applying a single, prolonged squeeze at the base. The pumping method mimics the natural curve of your lashes, resulting in a softer, more graduated curl that looks effortlessly beautiful. To execute the pumping method effectively, start by positioning the eyelash curler at the base of your upper lashes, as close to the lash line as possible without pinching your eyelid. Gently close the curler and hold it for about 3-5 seconds. Then, instead of releasing the curler completely, slightly loosen your grip and move it a tiny bit upward along your lashes. Squeeze again for another 3-5 seconds. Repeat this process 2-3 more times, moving the curler slightly upward each time until you reach the tips of your lashes. This gradual curling approach offers several advantages over the traditional single-squeeze method. Firstly, it distributes the curl more evenly along the entire length of your lashes, preventing that harsh, right-angled bend that can sometimes occur with a single squeeze at the base. Secondly, it helps to create a more natural-looking curl that follows the natural shape of your eye, enhancing your overall eye appearance without looking overly dramatic or artificial. The pumping method is particularly beneficial for those with straight or stubborn lashes that tend to resist curling. By applying multiple gentle squeezes, you're effectively "training" your lashes to hold the curl for longer periods. This can be especially useful if you have trouble maintaining a curl throughout the day or if you live in a humid climate where lashes tend to droop quickly. To maximize the effectiveness of the pumping method, consider warming your eyelash curler slightly before use. You can do this by holding it under warm running water for a few seconds or blasting it with your hair dryer on low heat for a moment. The warmth helps to set the curl more effectively, much like using a heated curling iron on your hair. Just be sure to test the temperature on the back of your hand before applying it to your delicate eye area to avoid any discomfort or potential damage. Remember, patience and gentle pressure are key when using the pumping method. Avoid applying too much force, as this can lead to lash breakage or an unnatural-looking curl. With practice, you'll find the perfect balance of pressure and positioning that works best for your unique lash type and desired curl effect.
Enhancing and Maintaining Your Curled Lashes
Achieving and maintaining beautifully curled lashes is a coveted beauty goal for many, as it can instantly open up the eyes and create a more awake and youthful appearance. While the process may seem straightforward, there are several tips and techniques that can significantly enhance the longevity and effectiveness of your curled lashes. This article will explore three key strategies to elevate your lash game: applying mascara after curling for longer-lasting results, using a heated eyelash curler for stubborn lashes, and properly cleaning and maintaining your eyelash curler. By incorporating these methods into your beauty routine, you'll be able to achieve stunning, eye-catching lashes that stay curled throughout the day. Whether you're a makeup enthusiast or simply looking to enhance your natural beauty, mastering these techniques will help you make the most of your lashes. Before delving into these expert tips, it's essential to understand the importance of properly preparing your eyelashes and curler for the best possible outcome. Let's begin by exploring the crucial steps in preparing your lashes and tools for optimal curling results.
Apply mascara after curling for longer-lasting results
Applying mascara after curling your lashes is a crucial step in achieving longer-lasting, more dramatic results. This technique not only enhances the curl but also helps to set it in place, ensuring your lashes remain beautifully lifted throughout the day. When you apply mascara to freshly curled lashes, you're essentially "locking in" the curl, creating a more pronounced and eye-opening effect that can truly transform your entire look. To maximize the benefits of this approach, it's essential to choose the right mascara formula. Opt for a waterproof or long-wearing formula, as these tend to hold the curl better than regular mascaras. These formulas are designed to resist moisture and humidity, which can cause lashes to droop and lose their shape. Additionally, look for mascaras with conditioning ingredients like vitamin E or keratin, which can help nourish and strengthen your lashes over time. The application technique is equally important when applying mascara to curled lashes. Start by gently wiggling the wand at the base of your lashes, working your way up to the tips in a zigzag motion. This method helps to separate the lashes and distribute the product evenly, preventing clumping and ensuring each lash is coated. For added volume and length, apply a second coat, focusing on the outer corners of your eyes to create a subtle cat-eye effect. One common mistake to avoid is applying mascara before curling your lashes. This can lead to sticky, clumped lashes that are difficult to curl effectively. Moreover, the added weight of the mascara can cause the curl to fall flat more quickly. By curling first and then applying mascara, you're working with clean, dry lashes that are more receptive to shaping and hold the curl better. For those with particularly straight or stubborn lashes, consider using a lash primer before applying mascara. Lash primers create a base that helps the mascara adhere better and can even provide additional nourishment to your lashes. Apply the primer immediately after curling and allow it to dry for a few seconds before following up with your mascara. To further enhance the longevity of your curled and mascara-coated lashes, avoid touching or rubbing your eyes throughout the day. If you need to refresh your look, gently press a clean spoolie brush against your lashes to separate and fluff them up, rather than applying more mascara, which can lead to clumping and weigh down the curl. By following these tips and incorporating mascara application after curling into your routine, you'll be able to enjoy beautifully curled, voluminous lashes that last all day long. This simple yet effective technique can elevate your eye makeup game and give you the confidence to face the day with a wide-eyed, alluring gaze.
Use a heated eyelash curler for stubborn lashes
Using a heated eyelash curler can be a game-changer for those with stubborn lashes that resist traditional curling methods. This innovative tool combines the curling action of a regular eyelash curler with gentle heat, providing a more intense and longer-lasting curl. The heat helps to reshape the lash proteins, much like how a hair curler works on your hair, resulting in a more dramatic and sustained lift. To use a heated eyelash curler effectively, start by ensuring the device is fully charged or plugged in, depending on the model. Most heated curlers have temperature settings, so choose one that suits your lash type and sensitivity. It's crucial to test the temperature on the back of your hand before applying it to your lashes to avoid any potential burns or discomfort. Once you've confirmed a safe temperature, gently press the heated curler at the base of your lashes for about 10-15 seconds. Unlike traditional curlers, you don't need to pump or squeeze repeatedly; the heat does most of the work. For best results, work in sections, moving from the inner corner of your eye outward. This approach ensures that all lashes are evenly curled and prevents any missed spots. After curling, you can apply your favorite mascara to set the curl and add volume. Many users find that their mascara applies more smoothly and evenly after using a heated curler, as the lashes are already lifted and separated. While heated eyelash curlers can be highly effective, it's essential to use them with care. Overuse or excessive heat can potentially damage your lashes, so it's recommended to limit use to special occasions or a few times a week. Additionally, always ensure your lashes are clean and free from any makeup residue before using the heated curler to prevent sticking or clumping. For those with particularly resistant lashes, consider using a lash primer before curling. This can help to condition the lashes and make them more receptive to curling. After curling, a waterproof mascara can help to lock in the curl, especially in humid conditions or for all-day wear. Remember, while heated eyelash curlers can provide dramatic results, they're not suitable for everyone. If you have very fine or fragile lashes, or if you're prone to eye sensitivity, you might want to stick with traditional curling methods. As with any beauty tool, it's important to listen to your body and discontinue use if you experience any irritation or discomfort. With proper use and care, a heated eyelash curler can be a valuable addition to your beauty routine, helping you achieve those coveted, eye-opening curled lashes that last throughout the day.
Properly clean and maintain your eyelash curler
Properly cleaning and maintaining your eyelash curler is crucial for both its longevity and your eye health. A well-maintained curler not only performs better but also reduces the risk of eye infections and lash damage. To begin, make it a habit to clean your eyelash curler after each use. This simple step prevents the buildup of mascara, oils, and other debris that can compromise its effectiveness and harbor bacteria. Start by gently wiping the curler's pad and metal components with a cotton swab or soft cloth dampened with makeup remover or rubbing alcohol. Pay special attention to the rubber pad, as this is where most residue accumulates. For a deeper clean, soak the curler in warm, soapy water for a few minutes, then scrub gently with an old, clean toothbrush to remove stubborn buildup. Rinse thoroughly and dry completely before storing or using again. It's essential to replace the rubber pad regularly, typically every 3-6 months or sooner if you notice any wear, tear, or loss of springiness. A worn-out pad can lead to uneven curling and may even damage your lashes. Many eyelash curlers come with replacement pads, but you can also purchase them separately. When replacing the pad, ensure it's securely attached and aligned properly to maintain the curler's effectiveness. Additionally, inspect your curler's metal components periodically for any signs of rust, bending, or misalignment. These issues can affect the curler's performance and potentially harm your lashes or skin. If you notice any damage, it's best to replace the entire curler rather than risk injury. Proper storage is another crucial aspect of maintaining your eyelash curler. Keep it in a clean, dry place, preferably in a protective case or pouch to prevent dust accumulation and maintain its shape. Avoid storing it in humid environments like bathrooms, as this can promote bacterial growth and rust formation. Lastly, be mindful of sharing your eyelash curler with others, as this can lead to the spread of bacteria and eye infections. If you must share, ensure thorough cleaning and disinfection between users. By following these maintenance practices, you'll extend the life of your eyelash curler, ensure consistent performance, and protect your eye health, allowing you to enjoy beautifully curled lashes for years to come.