How To Draw A Wolf Step By Step
Drawing a wolf can be a fun and rewarding experience, especially when you have a clear guide to follow. With a few simple steps, you can create a realistic and captivating wolf drawing that showcases your artistic skills. To get started, it's essential to understand the basics of drawing a wolf, including its body proportions, facial structure, and overall anatomy. Once you have a solid foundation, you can move on to sketching the wolf's body and facial structure, paying attention to the subtle details that bring your drawing to life. Finally, adding details and texture to your wolf drawing can make it truly stand out, from the softness of its fur to the sharpness of its claws. In this article, we'll take you through each of these steps, starting with the fundamentals. Let's begin by understanding the basics of drawing a wolf.
Understanding the Basics of Drawing a Wolf
Drawing a wolf can be a fun and rewarding experience, but it requires a good understanding of the basics. To get started, it's essential to familiarize yourself with wolf anatomy, including the shape and proportions of the body, head, and limbs. This knowledge will help you create a realistic and accurate drawing. In addition to understanding wolf anatomy, it's also crucial to choose the right drawing tools and materials, such as pencils, paper, and erasers, to ensure that your drawing turns out the way you want it to. Furthermore, setting up your drawing space for comfort and efficiency is vital to help you stay focused and avoid distractions. By mastering these fundamental aspects of drawing a wolf, you'll be well on your way to creating a stunning piece of art. So, let's start by taking a closer look at wolf anatomy and how it can help you create a more realistic drawing.
Familiarizing Yourself with Wolf Anatomy
Familiarizing yourself with wolf anatomy is a crucial step in drawing a realistic wolf. A wolf's body is composed of several key components, including the head, neck, torso, legs, and tail. The head is shaped like a triangle, with a flat forehead, a narrow muzzle, and a distinctive black nose. The ears are triangular and pointed, and are usually held erect. The neck is long and muscular, connecting the head to the torso. The torso is made up of the chest, abdomen, and back, and is covered in a thick layer of fur. The legs are long and powerful, with the front legs being slightly shorter than the back legs. The paws are oval-shaped and have five toes, with the front paws having a distinctive "thumb" that is actually a modified wrist bone. The tail is long and bushy, and is used for balance and communication. Understanding the proportions and relationships between these different body parts is essential for drawing a realistic wolf. By studying the anatomy of a wolf, you can gain a deeper appreciation for the animal's unique characteristics and develop the skills needed to draw a convincing and detailed portrait.
Choosing the Right Drawing Tools and Materials
Choosing the right drawing tools and materials is crucial for creating a realistic and detailed wolf drawing. To start, you'll need a few basic drawing tools, including a pencil, eraser, and sharpener. A graphite pencil (#2) is ideal for sketching and shading, while a charcoal pencil can add depth and texture to your drawing. A blending stump or tortillon can help smooth out transitions and create subtle gradations of tone. For more detailed work, consider using a fine-tip pen or marker, such as a Micron or Copic. When it comes to paper, look for a high-quality, smooth surface that can handle a range of media. Bristol board or hot press watercolor paper are excellent choices for drawing a wolf. Additionally, having a range of reference images and a comfortable drawing surface can help you stay focused and inspired throughout the drawing process. By investing in the right tools and materials, you'll be well on your way to creating a stunning and realistic wolf drawing.
Setting Up Your Drawing Space for Comfort and Efficiency
Setting up your drawing space for comfort and efficiency is crucial for creating a productive and enjoyable drawing experience. To start, choose a quiet and dedicated area with good lighting, preferably natural light, to minimize eye strain. Invest in a comfortable and ergonomic chair, as well as a drawing table or desk that allows you to work at a comfortable height. Consider using a drawing board or lap desk to provide a stable and smooth surface for your paper. Organize your drawing tools and supplies within easy reach, such as pencils, erasers, sharpeners, and paper, to save time and reduce distractions. Additionally, keep a trash can and a cup of water nearby to stay hydrated and maintain a clean workspace. To further enhance your drawing experience, consider playing calming music or nature sounds in the background to promote focus and relaxation. By setting up your drawing space with comfort and efficiency in mind, you'll be able to focus on the creative process and produce your best work, including drawing a wolf with precision and detail.
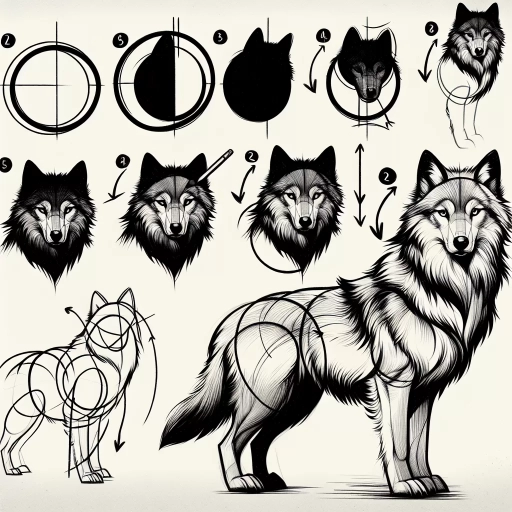
Sketching the Wolf's Body and Facial Structure
Sketching a wolf's body and facial structure requires attention to detail and a deep understanding of its anatomy. To create a realistic and captivating drawing, it's essential to break down the process into manageable steps. First, we'll explore the overall body shape and proportions, including the wolf's muscular build and agile physique. Next, we'll delve into the intricacies of sketching the facial features and expressions, capturing the wolf's piercing gaze and emotive demeanor. Finally, we'll add the finishing touches by drawing the ears, eyes, and nose, bringing the wolf's portrait to life. By mastering these fundamental elements, artists can create a stunning and lifelike representation of this majestic creature. Let's begin by examining the overall body shape and proportions, the foundation of a successful wolf drawing.
Drawing the Overall Body Shape and Proportions
When drawing the overall body shape and proportions of a wolf, it's essential to capture its athletic and agile physique. Start by sketching a rough outline of the body, using simple shapes such as circles, ovals, and rectangles to help you get the proportions right. The body of a wolf can be divided into three main sections: the head, neck, and body. The head is roughly one-quarter of the way down from the top of the body, and the neck is about one-third of the way down. The body itself is roughly twice as long as the head and neck combined. Pay attention to the wolf's posture, as it often carries its head high and its tail low. The shoulders are slightly sloping, and the back is straight, with a subtle curve at the base of the tail. The front legs are slightly shorter than the back legs, which gives the wolf its distinctive gait. When sketching the body, use gentle, flowing lines to capture the wolf's muscular physique and fluid movement. Remember to keep your lines loose and expressive, as this will help you achieve a more dynamic and lifelike drawing. By paying attention to the wolf's overall body shape and proportions, you'll be able to create a convincing and engaging drawing that captures the essence of this majestic animal.
Sketching the Facial Features and Expressions
Sketching the facial features and expressions of a wolf is a crucial step in capturing its essence and personality. Start by drawing the eyes, which are almond-shaped and slanted, with the outer corner slightly higher than the inner corner. The eyes should be spaced about one-third of the way down from the top of the head, and the pupils should be small and rounded. The eyebrows are thin and slightly curved, following the shape of the eyes. The nose is small and rounded, with a slight upturn at the tip, and the mouth is a thin, curved line that follows the shape of the jaw. To capture the wolf's expression, pay attention to the shape of the eyes and the position of the eyebrows. A relaxed wolf will have a soft, open expression, while a tense wolf will have a more angular, alert expression. You can also add texture and detail to the facial features, such as the individual hairs around the eyes and mouth, to give your drawing more depth and realism. By carefully sketching the facial features and expressions, you can bring your wolf drawing to life and capture its unique personality and spirit.
Adding the Ears, Eyes, and Nose for Realism
To add realism to your wolf drawing, focus on the ears, eyes, and nose. Start by sketching the ears, which should be triangular in shape and slightly rounded at the tips. The ears should be positioned on the top of the head, with the base of the ears aligned with the eyes. The inner edges of the ears should be slightly curved, giving the wolf a more natural and relaxed appearance. Next, draw the eyes, which should be almond-shaped and slanted upwards slightly. The eyes should be positioned on either side of the head, with the top of the eyes aligned with the top of the ears. The eyes should be detailed with a small circle for the pupil and a curved line above the eye to indicate the eyebrow. Finally, sketch the nose, which should be small and rounded, with two small nostrils. The nose should be positioned at the front of the head, slightly below the eyes. To add texture and depth to the nose, add a few short lines to indicate the nostrils and a small curved line to indicate the mouth. By adding these details, you can create a more realistic and engaging wolf drawing.
Adding Details and Texture to Your Wolf Drawing
When it comes to drawing a wolf, it's the little details that can make all the difference between a good drawing and a great one. Adding texture and details to your wolf drawing can help bring it to life and make it more engaging for the viewer. To achieve this, there are several key elements to focus on. First, creating realistic fur texture and patterns is crucial in capturing the wolf's natural appearance. This involves understanding the different types of fur and how they interact with light. Additionally, adding claws, teeth, and other essential details can help add depth and dimension to the drawing. Finally, enhancing the drawing with shading and highlights can help create a sense of volume and atmosphere. By incorporating these elements, you can take your wolf drawing to the next level. In this article, we'll explore how to create realistic fur texture and patterns, and provide you with the tools and techniques you need to get started.
Creating Realistic Fur Texture and Patterns
To create realistic fur texture and patterns, start by observing the natural texture and patterns of wolf fur. Notice how the fur is longest on the back and shoulders, with a distinctive saddle-shaped pattern of darker fur running along the spine. The fur on the belly and chest is typically shorter and lighter in color. Use a range of pencils, from 2H to 6B, to create a variety of textures and shading. Start by blocking in the overall shape and texture of the fur, using gentle, sweeping strokes to suggest the direction of the fur. Then, use a sharp pencil to add more detail and texture, creating individual hairs and strands. To create a realistic pattern, use a combination of hatching and cross-hatching techniques, building up layers of shading and texture to create a sense of depth and dimension. Pay particular attention to the areas where the fur is longest, such as the ruff around the neck and the tail, and use a range of pencils to create a soft, fluffy texture. Finally, use a blending stump or tortillon to smooth out the texture and create a more subtle, natural-looking effect. By following these steps and paying close attention to the natural texture and patterns of wolf fur, you can create a realistic and engaging drawing that captures the beauty and majesty of these amazing animals.
Adding Claws, Teeth, and Other Essential Details
Adding claws, teeth, and other essential details is a crucial step in bringing your wolf drawing to life. Start by adding the claws, which should be sharp and curved, with a slight hook at the end. You can draw the claws as small triangles or ovals, depending on the desired level of detail. Make sure to space them evenly apart and vary their size to create a natural look. Next, focus on the teeth, which should be sharp and pointed, with a slight curve to follow the shape of the jaw. You can draw the teeth as small triangles or rectangles, and add some texture to give them a more realistic appearance. Don't forget to add the tongue, which should be long and thin, and slightly curled at the end. You can also add some texture to the tongue to give it a more lifelike appearance. Additionally, you can add some details to the eyes, such as eyelashes or a reflective glint, to give your wolf a more expressive and realistic look. Finally, you can add some texture to the fur, such as individual strands or a soft, fluffy texture, to give your wolf a more detailed and realistic appearance. By adding these essential details, you can bring your wolf drawing to life and create a more engaging and realistic piece of art.
Enhancing the Drawing with Shading and Highlights
To enhance the drawing with shading and highlights, start by identifying the light source in your scene. This will help you determine where the shadows and highlights should fall. For a wolf drawing, you can assume the light source is coming from the top left or right, which will create a sense of depth and dimension. Use a range of pencils, from 2H to 6B, to create a gradual transition from light to dark. Begin by shading the areas that are farthest from the light source, such as the underside of the wolf's body, the ears, and the tail. Use gentle, smooth strokes to build up the shading, gradually increasing the pressure and darkness as you move towards the edges. For the highlights, use a white or light-colored pencil to create subtle, soft highlights on the wolf's fur, particularly on the tips of the ears, the nose, and the paws. You can also use a blending stump or tortillon to smooth out the shading and create a more even transition between light and dark. To add depth and dimension to the drawing, use a range of shading techniques, such as hatching, cross-hatching, and stippling. Hatching involves creating parallel lines that follow the contours of the wolf's body, while cross-hatching involves layering lines at different angles to create a more textured, three-dimensional effect. Stippling involves creating a pattern of small dots to create a sense of texture and depth. By combining these techniques, you can create a rich, detailed, and engaging drawing that captures the beauty and majesty of the wolf.