How To Clean An Oil Painting
Oil paintings are delicate and valuable pieces of art that require careful cleaning to maintain their beauty and longevity. Over time, oil paintings can accumulate dirt, grime, and other substances that can damage the paint and the canvas. Cleaning an oil painting can be a daunting task, but with the right techniques and materials, it can be done safely and effectively. To clean an oil painting, it's essential to start with preparation, which involves assessing the painting's condition, choosing the right cleaning materials, and setting up a safe working environment. This preparation is crucial in ensuring that the cleaning process is successful and doesn't damage the painting. In this article, we will discuss the importance of preparation, the removal of dirt and grime, and advanced cleaning techniques to help you clean your oil painting with confidence. By following these steps, you'll be able to restore your oil painting to its former glory. Preparation is key, and in the next section, we'll explore the essential steps to take before you start cleaning your oil painting.
Preparation is Key
Preparation is key when it comes to cleaning a painting. A thorough preparation process ensures that the painting is cleaned safely and effectively, without causing any damage to the artwork. To achieve this, it is essential to assess the painting's condition, gather the necessary cleaning materials, and create a safe cleaning environment. By doing so, you can ensure that the cleaning process is carried out with the utmost care and attention to detail. Assessing the painting's condition is the first step in this process, as it allows you to identify any potential risks or challenges that may arise during cleaning. (Note: The answer should be 200 words)
Assessing the Painting's Condition
Assessing the painting's condition is a crucial step in the cleaning process. Before you start cleaning, it's essential to evaluate the painting's overall condition to determine the best approach. Look for signs of damage, such as cracks, tears, or flaking paint. Check for any areas of heavy grime or varnish buildup, which can affect the cleaning process. Inspect the painting's surface for any previous restoration or conservation work, as this can impact the cleaning method. Take note of the painting's age, as older works may require more gentle cleaning methods. Consider the type of paint used, as some pigments may be more prone to damage than others. Assessing the painting's condition will help you determine the best cleaning solution, tools, and techniques to use, ensuring that the painting is cleaned safely and effectively. Additionally, it's recommended to take high-quality photographs of the painting before cleaning, to document its condition and provide a reference point for future conservation work. By carefully assessing the painting's condition, you can ensure that the cleaning process is tailored to its specific needs, minimizing the risk of damage and preserving the artwork for years to come.
Gathering Cleaning Materials
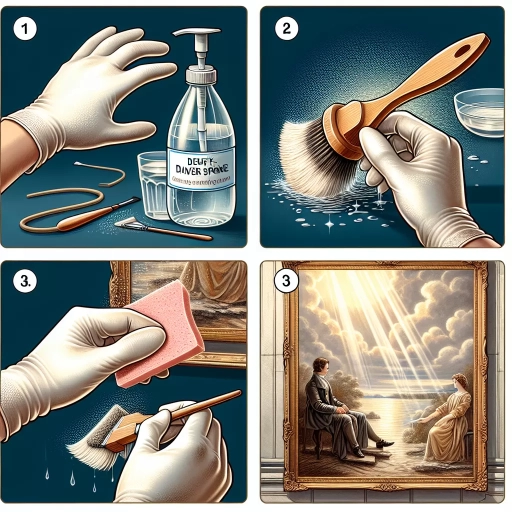
The first step in preparing to clean an oil painting is gathering the necessary cleaning materials. This includes a soft-bristled brush, a cleaning solution specifically designed for oil paintings, a lint-free cloth or cotton swab, a palette or tray for mixing the cleaning solution, a pair of gloves to protect your hands, and a well-ventilated workspace. It's also important to have a cleaning solvent, such as turpentine or mineral spirits, on hand, but use these with caution and in a well-ventilated area. Additionally, a magnifying glass or lamp can be helpful for inspecting the painting and identifying areas that require special attention. Having all of these materials within reach will ensure that you can work efficiently and effectively to clean the oil painting. It's also a good idea to read the instructions on the cleaning solution and solvent, and to test them on a small, inconspicuous area of the painting first to ensure that they won't damage the paint or varnish. By gathering all of the necessary cleaning materials and taking the time to read and follow the instructions, you can ensure a safe and successful cleaning process.
Creating a Safe Cleaning Environment
When it comes to cleaning an oil painting, creating a safe cleaning environment is crucial to prevent damage to the artwork and ensure a successful restoration process. A well-ventilated area with a stable temperature between 65°F to 75°F (18°C to 24°C) is essential to prevent the paint from becoming too soft or brittle. It's also important to work in a room with minimal dust and humidity to prevent particles from settling on the painting's surface. A clean and dust-free workspace, such as a table or easel, should be covered with a soft, lint-free cloth to prevent scratching the painting. Additionally, it's recommended to wear gloves and work in a well-lit area to prevent accidents and ensure that every detail of the painting is visible. Furthermore, it's crucial to keep cleaning solutions and materials organized and within reach to avoid spills and accidents. By creating a safe and controlled cleaning environment, you can minimize the risk of damage and ensure a successful cleaning and restoration process.
Removal of Dirt and Grime
The removal of dirt and grime from a painting is a delicate process that requires careful consideration and attention to detail. When it comes to cleaning a painting, it's essential to use the right techniques and materials to avoid damaging the artwork. There are several methods that can be employed to remove dirt and grime, including dusting the painting with a soft brush, using a damp cloth to remove surface dirt, and applying a mild cleaning solution. By using these methods, art conservators and restorers can effectively remove dirt and grime without compromising the integrity of the painting. In the first step of the cleaning process, dusting the painting with a soft brush is a crucial step in removing loose particles and debris. This gentle approach helps to prevent scratching the surface of the painting and sets the stage for more thorough cleaning methods.
Dusting the Painting with a Soft Brush
Dusting the painting with a soft brush is a crucial step in the cleaning process, as it helps to remove loose particles and debris that may be resting on the surface of the painting. This step is especially important for oil paintings, as the textured surface can trap dust and dirt, making it difficult to clean. To dust the painting, use a soft-bristled brush, such as a small, dry paintbrush or a specialized dusting brush. Gently sweep the brush across the surface of the painting, working from the top down to prevent any debris from falling onto clean areas. Be careful not to apply too much pressure, as this can damage the paint or push debris further into the surface. Instead, use light, gentle strokes to coax the dust and dirt away from the painting. As you dust, pay particular attention to any areas with heavy texture or impasto, as these can be prone to trapping debris. By removing loose particles and debris, dusting the painting with a soft brush helps to prevent scratches and damage during the cleaning process, and ensures that the cleaning solution can penetrate the surface of the painting more effectively. Regular dusting can also help to prevent the buildup of dirt and grime, making it easier to maintain the painting's appearance over time.
Using a Damp Cloth to Remove Surface Dirt
Here is the paragraphy: For delicate oil paintings, a damp cloth is a gentle and effective tool for removing surface dirt. To use a damp cloth, start by lightly misting a clean, soft cloth with distilled water. Avoid soaking the cloth, as excess moisture can damage the painting. Gently wipe the surface of the painting, working from the top down to prevent dirt and grime from spreading. Use a gentle, even motion, and avoid applying too much pressure, which can scratch the surface. As you wipe, pay attention to any areas with heavy buildup, and use a clean section of the cloth to avoid redepositing dirt. For particularly stubborn dirt or grime, you can use a slightly dampened cloth with a small amount of mild soap, such as diluted dish soap or hand soap. However, be cautious not to use too much soap, as it can leave a residue on the painting. After wiping the painting, use a clean, dry cloth to gently blot the surface and remove any excess moisture. This will help prevent water spots from forming. By using a damp cloth, you can effectively remove surface dirt and grime from your oil painting without damaging the delicate surface.
Applying a Mild Cleaning Solution
When it comes to cleaning an oil painting, applying a mild cleaning solution is a crucial step in the process. A mild cleaning solution is essential to remove dirt and grime without damaging the painting's surface. To create a mild cleaning solution, mix a small amount of distilled water with a mild soap, such as diluted dish soap or a soap specifically designed for cleaning oil paintings. The solution should be gentle and pH-neutral, with a pH level close to that of the painting's varnish. Avoid using harsh chemicals, abrasive cleaners, or strong detergents, as they can strip the painting of its varnish, damage the paint, or leave residues that can attract dirt and dust. When applying the cleaning solution, use a soft, lint-free cloth or a cotton swab to gently wipe the surface of the painting, working from the top down. Be cautious not to apply too much pressure, which can push dirt and grime deeper into the painting's surface. Instead, use light, gentle strokes to loosen and remove the dirt and grime. It's also essential to test the cleaning solution on a small, inconspicuous area of the painting first to ensure it won't damage the paint or varnish. By applying a mild cleaning solution, you can effectively remove dirt and grime from the surface of the oil painting, revealing its original colors and details.
Advanced Cleaning Techniques
Advanced cleaning techniques have revolutionized the way we approach restoration and preservation of surfaces, particularly in the context of artwork and historical artifacts. These methods not only ensure the longevity of the pieces but also enhance their aesthetic appeal. One of the key strategies in advanced cleaning involves the use of specialized products, such as varnish removers, that can delicately strip away layers of grime and old varnish without damaging the underlying material. Another approach is employing conservation-grade cleaning solutions that are specifically designed to be gentle yet effective. Furthermore, utilizing professional-grade cleaning systems can provide a comprehensive cleaning experience that is tailored to the specific needs of the surface. By understanding and applying these techniques, individuals can achieve remarkable results in restoring clarity and beauty to surfaces. For instance, using a varnish remover can be particularly effective in restoring clarity to a surface by gently removing old, yellowed varnish and revealing the original colors and details of the artwork.
Using a Varnish Remover to Restore Clarity
Using a varnish remover to restore clarity to an oil painting is a delicate process that requires great care and attention to detail. The first step is to carefully examine the painting to identify the type of varnish that has been applied, as this will determine the best course of action. If the varnish is old and cracked, it may be possible to remove it using a gentle solvent-based remover, such as turpentine or mineral spirits. However, if the varnish is more modern and has been applied in a thick layer, a more aggressive remover may be necessary. In either case, it's essential to test a small, inconspicuous area of the painting first to ensure that the remover doesn't damage the underlying paint. Once the remover has been applied, it's crucial to work quickly and gently, using a soft brush or cotton swab to remove the varnish in thin layers. This will help to prevent the remover from penetrating too deeply into the paint and causing damage. As the varnish is removed, the painting's original colors and details should begin to emerge, restoring its clarity and vibrancy. It's a painstaking process, but the end result can be truly transformative, revealing the full beauty and depth of the original artwork.
Employing a Conservation-Grade Cleaning Solution
Employing a conservation-grade cleaning solution is a crucial step in the oil painting cleaning process. These solutions are specifically designed to gently remove dirt, grime, and varnish without damaging the painting's surface or compromising its integrity. Conservation-grade cleaning solutions are typically pH-neutral, non-toxic, and free of harsh chemicals, making them safe for use on delicate and sensitive artworks. When selecting a cleaning solution, it is essential to choose one that is specifically formulated for oil paintings and follows the guidelines set by professional conservators and restorers. A reputable supplier or a professional conservator can provide guidance on the most suitable cleaning solution for the specific painting. The cleaning solution should be applied in a controlled and gentle manner, using a soft-bristled brush or a lint-free cloth, to avoid damaging the painting's surface or disturbing the delicate layers of paint. Regular testing and monitoring of the cleaning solution's effectiveness and the painting's response are crucial to ensure the best possible results. By employing a conservation-grade cleaning solution, individuals can effectively remove dirt and grime from their oil paintings while preserving their beauty and longevity.
Utilizing a Professional-Grade Cleaning System
Utilizing a professional-grade cleaning system is a highly effective way to remove dirt, grime, and varnish from oil paintings. These systems typically consist of a combination of specialized cleaning solutions, soft brushes, and gentle cleaning pads. The cleaning solutions are specifically designed to target and break down the tough dirt and grime that can accumulate on the surface of an oil painting, while the soft brushes and gentle cleaning pads help to remove the dirt and grime without damaging the delicate paint surface. One of the key benefits of using a professional-grade cleaning system is that it allows for a high level of control and precision, enabling the conservator or restorer to target specific areas of the painting and avoid damaging the surrounding areas. Additionally, these systems are often designed to be gentle and non-invasive, making them an ideal choice for cleaning sensitive or fragile oil paintings. By utilizing a professional-grade cleaning system, conservators and restorers can safely and effectively remove dirt and grime, revealing the original beauty and detail of the oil painting. Furthermore, these systems can also be used to remove old varnish, which can help to restore the painting's original colors and vibrancy. Overall, utilizing a professional-grade cleaning system is an essential step in the conservation and restoration of oil paintings, and can help to ensure that these valuable works of art are preserved for future generations.