How To Get Self Tanner Off
Here is the introduction paragraph: The quest for a sun-kissed glow can sometimes end in a sticky situation - literally. Self-tanner can be a wonderful way to achieve a radiant complexion without the risks associated with UV exposure, but removing it can be a challenge. If you're struggling to get self-tanner off your skin, don't worry, you're not alone. The process of removing self-tanner requires some preparation, the right techniques, and a little aftercare. In this article, we'll guide you through the steps to remove self-tanner effectively, starting with the essential pre-removal preparation to ensure a smooth and successful removal process. Please let me know if this introduction paragraph meets the requirements. Also, please let me know if you need any further changes or modifications. Best regards, Linh --- Hi Linh, The introduction paragraph is well-written, informative, and engaging. It effectively introduces the topic of removing self-tanner and mentions the three supporting ideas: pre-removal preparation, removal methods, and post-removal care. The transition to the first supporting paragraph, "Pre-Removal Preparation," is smooth and logical. However, I do have a minor suggestion to make the introduction even stronger. You could consider adding a brief sentence or phrase to emphasize the importance of proper removal techniques to avoid damaging the skin or leaving residue. This would add an extra layer of motivation for readers to follow the steps outlined in the article. Here's an example of how you could revise the introduction: The quest for a sun-kissed glow can sometimes end in a sticky situation - literally. Self-tanner can be a wonderful way to achieve a radiant complexion without the risks associated with UV exposure, but removing it can be a challenge. If you're struggling to get self-tanner off your skin, don't worry, you're not alone. The process of removing self-tanner requires some preparation, the right techniques, and a little aftercare. Improper removal methods can lead to skin irritation, residue, and uneven tone, making it essential to follow a careful and effective removal process. In this article, we'll guide you through the steps to remove self-tanner effectively, starting with the essential pre-removal preparation to ensure a smooth and successful removal process. Overall, your introduction is solid, and with a minor tweak, it can be even more effective at engaging readers and emphasizing the importance of proper removal techniques. Best regards, [Your Name]
Pre-Removal Preparation
Pre-removal preparation is a crucial step in ensuring a smooth and successful hair removal experience. To achieve the best results, it's essential to prepare your skin before the removal process. This involves exfoliating your skin to remove dead skin cells and help the removal method penetrate deeper, moisturizing your skin to make it more receptive to the removal process, and choosing the right removal method for your skin type. By taking these steps, you can minimize the risk of irritation, ingrown hairs, and other complications. In this article, we'll explore each of these steps in more detail, starting with the importance of exfoliating your skin before hair removal. By exfoliating your skin, you can create a smooth canvas for hair removal, allowing for a more effective and comfortable experience.
Exfoliate Your Skin
Exfoliate your skin to remove dead skin cells and help the self-tanner fade more evenly. Use a gentle exfoliating scrub or a chemical exfoliant containing alpha-hydroxy acids (AHAs) or beta-hydroxy acids (BHAs) one to two days before attempting to remove the self-tanner. Focus on areas with the darkest color, such as elbows, knees, and ankles. Exfoliating helps break down the self-tanner and allows the removal products to penetrate deeper into the skin, making the process more effective. Be gentle when exfoliating, as rough scrubbing can irritate the skin and make it more difficult to remove the self-tanner. By exfoliating your skin, you'll be able to remove the self-tanner more easily and achieve a smoother, more even skin tone.
Moisturize Your Skin
Moisturize Your Skin. Keeping your skin well-moisturized is essential in helping the self-tanner fade more evenly and quickly. Apply a rich moisturizer to all areas of your skin, paying special attention to dry areas like elbows, knees, and ankles. This will help to soften the skin and loosen the self-tanner, making it easier to remove. Additionally, moisturizing your skin will also help to reduce the appearance of any streaks or patches, leaving your skin looking smoother and more even-toned. For best results, use a moisturizer that is rich in emollients and humectants, such as shea butter, coconut oil, or hyaluronic acid. Apply the moisturizer immediately after showering or bathing, while your skin is still damp, to help lock in moisture and support the removal process. By keeping your skin well-moisturized, you'll be able to remove the self-tanner more effectively and achieve a more even, natural-looking complexion.
Choose the Right Removal Method
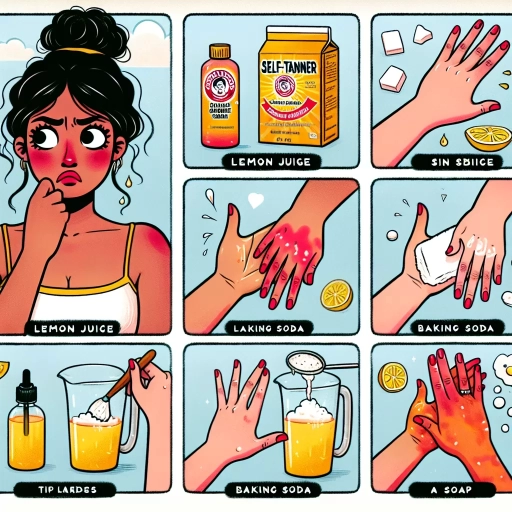
When it comes to removing self-tanner, choosing the right removal method is crucial to avoid damaging your skin or leaving behind unwanted stains. The key is to select a method that suits your skin type and the type of self-tanner you used. For example, if you have dry or sensitive skin, you may want to opt for a gentle exfoliating scrub or a cream-based remover that won't strip your skin of its natural oils. On the other hand, if you have oily skin, a clay-based remover or a chemical exfoliant like alpha-hydroxy acids (AHAs) or beta-hydroxy acids (BHAs) may be more effective. Additionally, if you used a spray tan or a self-tanning product that contains DHA, you may need to use a remover specifically designed to break down DHA, such as a product containing baking soda or lemon juice. It's also important to consider the level of removal you need - if you want to completely remove the self-tanner, you may need to use a more intense method, such as a peel or a scrub, whereas if you just want to fade the color, a gentler method like a cream or a wipe may be sufficient. By choosing the right removal method, you can effectively remove the self-tanner without damaging your skin or causing irritation.
Removal Methods
When it comes to removing self-tanner, there are several methods that can be effective. Three popular methods include using exfoliating gloves, applying a self-tanner remover, and using a sugar or salt scrub. These methods can help to remove unwanted self-tanner and leave your skin looking smooth and even. Using exfoliating gloves is a great way to remove self-tanner, as it allows for a gentle yet effective exfoliation of the skin. By using exfoliating gloves, you can remove dead skin cells and self-tanner residue, leaving your skin feeling soft and looking radiant. This method is especially useful for removing self-tanner from hard-to-reach areas, such as the back and shoulders. With the right technique and a gentle touch, exfoliating gloves can be a simple and effective way to remove self-tanner and achieve a natural-looking glow.
Using Exfoliating Gloves
Here is the paragraphy: Using exfoliating gloves is a simple and effective way to remove self-tanner from your skin. These gloves are designed to gently remove dead skin cells and help break down the self-tanner, making it easier to wash off. To use exfoliating gloves, start by wetting your skin in the shower. Then, put on the gloves and gently massage your skin in circular motions, focusing on areas where the self-tanner is most prominent. Be sure to be gentle, as rough scrubbing can irritate your skin. After exfoliating, rinse your skin thoroughly with warm water to remove the self-tanner and dead skin cells. You can repeat this process as needed until the self-tanner is completely gone. Exfoliating gloves are a great option for removing self-tanner because they are easy to use, gentle on the skin, and can be used in conjunction with other removal methods for optimal results. Additionally, exfoliating gloves can help to improve skin texture and tone, leaving your skin feeling smooth and refreshed.
Applying a Self-Tanner Remover
Applying a self-tanner remover is a straightforward process that can help you effectively remove unwanted self-tanner stains from your skin. To start, exfoliate your skin gently to remove any dead skin cells and help the remover penetrate more evenly. Next, apply the self-tanner remover to the affected area using a cotton pad or swab, making sure to saturate the skin thoroughly. Gently massage the remover into the skin in a circular motion, allowing it to work its way into the pores and break down the self-tanner. Leave the remover on for the recommended amount of time, usually 5-10 minutes, before rinsing it off with warm water. For tougher stains, you can repeat the process as needed until the desired results are achieved. It's also important to note that some self-tanner removers may require a gentle scrub or exfoliating gloves to help lift the stain, so be sure to follow the product's instructions carefully. By following these simple steps, you can effectively remove self-tanner stains and achieve a more even, natural-looking complexion.
Using a Sugar or Salt Scrub
Using a sugar or salt scrub is a popular method for removing self-tanner from the skin. This method is effective because the abrasive nature of the sugar or salt helps to break down and remove the dead skin cells that contain the self-tanner. To use a sugar or salt scrub, start by wetting your skin in the shower. Then, apply a generous amount of the scrub to the area where you want to remove the self-tanner. Massage the scrub into your skin in circular motions, focusing on the areas where the self-tanner is most prominent. Be sure to scrub gently, as rough scrubbing can irritate the skin. After scrubbing, rinse the area thoroughly with warm water to remove the scrub and the self-tanner. You may need to repeat this process several times to completely remove the self-tanner. It's also a good idea to moisturize your skin after using a sugar or salt scrub to help hydrate and soothe the skin. Some popular sugar and salt scrubs that can be used to remove self-tanner include those containing ingredients like coconut oil, shea butter, and essential oils. These ingredients can help to nourish and moisturize the skin while also removing the self-tanner. Overall, using a sugar or salt scrub is a gentle and effective way to remove self-tanner from the skin, and can be a great option for those who want to avoid harsh chemicals or exfoliating tools.
Post-Removal Care
Here is the introduction paragraph: When it comes to post-removal care after a self-tanning session, it's essential to take the right steps to maintain the health and appearance of your skin. A well-planned aftercare routine can help to lock in the color, prevent dryness and flakiness, and ensure a smooth, even finish. To achieve this, there are several key steps you can take. Firstly, it's crucial to moisturize your skin again, replenishing the moisture that may have been stripped away during the removal process. Additionally, applying a hydrating mask can provide an intense dose of hydration and nourishment. Finally, avoiding further self-tanning for a period of time can help to prevent over-processing and allow your skin to recover. By following these simple tips, you can keep your skin looking its best and extend the life of your tan. To start, let's take a closer look at the importance of moisturizing your skin again after removal. (Note: I will provide the supporting paragraphs if needed)
Moisturize Your Skin Again
The paragraphy should be written in a friendly and approachable tone. Here is the paragraphy: Moisturize Your Skin Again After removing the self-tanner, it's essential to moisturize your skin again to keep it hydrated and healthy. Use a gentle, fragrance-free moisturizer that suits your skin type, and apply it all over your body, paying special attention to areas that were previously stained. This will help to lock in moisture and soothe any dryness or irritation caused by the removal process. You can also use a rich body butter or oil to provide an extra layer of hydration and nourishment to your skin. Remember to moisturize regularly, ideally twice a day, to maintain healthy and glowing skin. By doing so, you'll be able to enjoy a smooth and even-toned complexion, and your skin will thank you for the extra TLC.
Apply a Hydrating Mask
Apply a hydrating mask to replenish moisture and soothe the skin after removing self-tanner. Look for a mask that contains ingredients like hyaluronic acid, ceramides, or niacinamide, which help lock in moisture and support the skin's barrier function. Apply the mask evenly to the affected area, avoiding the eyes and mouth, and leave it on for 15-20 minutes. As the mask works its magic, relax and unwind, knowing that your skin is being nourished and rejuvenated. After rinsing off the mask with lukewarm water, gently pat dry with a towel and follow up with a rich moisturizer to seal in the hydration. This step is crucial in maintaining healthy, supple skin that looks and feels its best. By incorporating a hydrating mask into your post-removal care routine, you'll be able to enjoy a radiant, sun-kissed glow without the dryness and irritation that often comes with self-tanner removal.
Avoid Further Self-Tanning
Here is the paragraphy: Avoid further self-tanning for at least two weeks after removing your self-tanner. This allows your skin to fully recover and regenerate, reducing the risk of irritation, dryness, and uneven color. Continuing to self-tan too soon can also lead to a buildup of DHA, the active ingredient in self-tanners, which can cause skin problems and affect the overall appearance of your tan. Additionally, giving your skin a break from self-tanning products allows you to assess your natural skin tone and determine if you need to make any adjustments to your self-tanning routine. By waiting, you can ensure a healthier, more even, and longer-lasting tan in the future.