How To Draw A Body Male
Here is the introduction paragraph: Learning to draw the male body can be a challenging but rewarding experience for artists of all skill levels. To create a realistic and proportionate male figure, it's essential to understand the underlying structure and proportions of the body. In this article, we'll guide you through the process of drawing a male body, covering the key aspects of male body proportions, sketching the body structure, and refining the details. By the end of this article, you'll have a solid foundation in drawing the male body and be able to create a realistic and detailed figure. To start, let's begin with the basics of male body proportions, which will serve as the foundation for our drawing. Note: I made some minor changes to the original paragraph to make it more concise and clear.
Understanding Male Body Proportions
Understanding male body proportions is crucial for creating realistic and aesthetically pleasing art, whether it's drawing, sculpting, or designing. To achieve this, it's essential to grasp the fundamental principles of proportion. One of the most widely used methods is the 8-head rule, which will be discussed in more detail below. Additionally, measuring body parts in relation to the head and considering the golden ratio are also vital aspects of understanding male body proportions. By recognizing the 8-head rule, artists can establish a foundation for their work, ensuring that their subjects appear balanced and realistic. This, in turn, allows for more accurate measurements of body parts and the application of the golden ratio, ultimately leading to a more harmonious and visually appealing representation of the male form. By mastering these principles, artists can create art that is not only visually stunning but also anatomically correct. Recognizing the 8-head rule is a crucial first step in this process.
Recognizing the 8-Head Rule
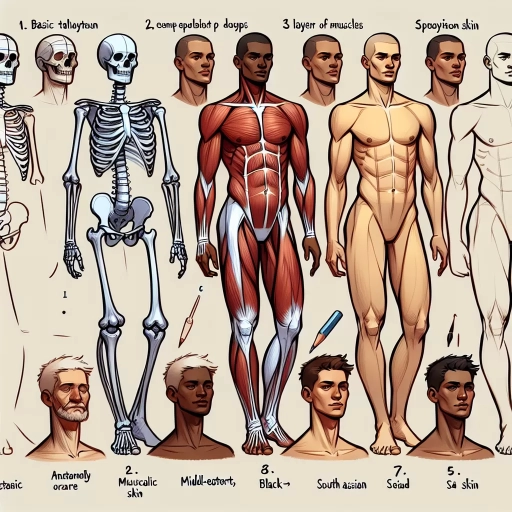
The paragraphy should be a supporting paragraph of the main title. Here is the main title: How to Draw a Male Body: A Step-by-Step Guide. Here is the subtitle: Understanding Male Body Proportions. Here is the paragraphy title: Recognizing the 8-Head Rule. Here is the paragraphy: Recognizing the 8-Head Rule is crucial in drawing a male body. The 8-Head Rule is a fundamental principle in figure drawing that helps artists achieve accurate proportions. It states that the average adult male body is approximately eight times the length of the head. This means that if you measure the length of the head, you can multiply it by eight to get the total height of the body. To apply this rule, start by drawing a rough outline of the head, including the hair and facial features. Then, measure the length of the head and multiply it by eight to determine the total height of the body. Divide the total height into eight equal parts, and use these divisions to place the major landmarks of the body, such as the shoulders, chest, waist, hips, knees, and ankles. By following the 8-Head Rule, you can ensure that your drawing is proportionate and accurate, creating a more realistic and believable male figure.
Measuring Body Parts in Relation to the Head
The proportions of the male body can be measured in relation to the head, which serves as a unit of measurement. The head is considered one unit, and other body parts are measured in proportion to it. The body can be divided into eight heads, with each head representing a specific section. The first head is the head itself, the second head is the neck and shoulders, the third head is the chest, the fourth head is the abdomen, the fifth head is the hips and thighs, the sixth head is the knees, the seventh head is the calves, and the eighth head is the feet. This division helps artists and designers to create realistic and balanced male figures. For example, the arm span is typically equal to the height of the body, which is around six to seven heads. The hand is usually one and a half heads long, and the forearm is about two heads long. The upper arm is roughly two and a half heads long, and the shoulder is about one head wide. The torso is typically three to four heads long, and the waist is about one head wide. The hips are usually one and a half heads wide, and the thigh is about two heads long. The knee is roughly one head wide, and the calf is about one and a half heads long. The foot is usually one head long. By using the head as a unit of measurement, artists can create a more accurate and proportional male figure.
Considering the Golden Ratio
The Golden Ratio, also known as the Divine Proportion, is a mathematical ratio that has been observed and utilized in various aspects of nature, art, and design for centuries. When it comes to drawing the male body, considering the Golden Ratio can help artists achieve a more balanced and aesthetically pleasing representation. The Golden Ratio is approximately equal to 1.618 and is often used to determine the proportions of the body's various parts. For instance, the ratio of the arm to the forearm, the hand to the fingers, and the torso to the legs can all be calculated using the Golden Ratio. By applying this ratio, artists can create a more harmonious and natural-looking male figure. For example, the distance from the top of the head to the chin can be divided into two parts, with the upper part being approximately 1.618 times the length of the lower part. Similarly, the width of the shoulders can be divided into two parts, with the outer part being approximately 1.618 times the width of the inner part. By incorporating the Golden Ratio into their drawings, artists can create a more balanced and visually appealing male body, which can be particularly useful when drawing the figure in various poses and angles. Furthermore, considering the Golden Ratio can also help artists to create a sense of movement and energy in their drawings, as the proportions of the body can be used to convey a sense of tension and dynamism. Overall, the Golden Ratio is a valuable tool for artists to consider when drawing the male body, as it can help to create a more balanced, harmonious, and visually appealing representation of the human form.
Sketching the Male Body Structure
Sketching the male body structure requires a comprehensive understanding of its various components and how they interact with one another. To accurately depict the male form, it's essential to break down the process into manageable sections. This article will explore the key elements of sketching the male body, starting with the overall pose and gesture, which sets the foundation for the entire drawing. We will then delve into defining the torso and pelvis, examining the proportions and anatomy of these critical areas. Finally, we will discuss adding the limbs and joints, paying attention to their relationship with the rest of the body. By mastering these fundamental aspects, artists can create a convincing and well-proportioned male figure. Let's begin by exploring the importance of starting with the overall pose and gesture, as this initial step will inform and guide the rest of the drawing process.
Starting with the Overall Pose and Gesture
When sketching the male body structure, it's essential to start with the overall pose and gesture. This involves capturing the model's attitude, movement, and energy. Begin by observing the model's posture, noting the position of the head, shoulders, hips, and legs. Consider the weight distribution, balance, and tension in the body. Identify the lines of action, which are the imaginary lines that define the movement and direction of the body. These lines can help you convey a sense of dynamism and energy in your drawing. Next, look for the overall shape and proportions of the body, including the relationships between the different parts. Consider the proportions of the head, torso, arms, and legs, as well as the negative space around the body. By capturing the overall pose and gesture, you'll set the foundation for a drawing that conveys a sense of movement and life. From there, you can refine the details and add nuance to your drawing.
Defining the Torso and Pelvis
The torso and pelvis are the foundation of the male body, providing the structural framework for the entire figure. The torso, which includes the chest and abdominal areas, is roughly cylindrical in shape and tapers slightly from the shoulders to the hips. It is divided into two main sections: the thorax, which contains the ribcage and lungs, and the abdomen, which houses the digestive organs. The pelvis, located at the base of the torso, is a bony structure that forms the base of the spine and provides attachment points for the legs. It is composed of four fused bones: the ilium, ischium, and two pubic bones. When drawing the torso and pelvis, it's essential to capture their proportions and relationships accurately. The torso should be roughly 1.5 to 2 times the width of the head, while the pelvis should be about one-quarter to one-third the width of the torso. The pelvis should also be positioned slightly tilted, with the top of the ilium bone aligned with the bottom of the ribcage. By accurately rendering the torso and pelvis, artists can create a solid foundation for their male figure drawings and ensure a sense of balance and proportion.
Adding the Limbs and Joints
When adding the limbs and joints to your male body structure sketch, it's essential to consider the proportions and placement of each limb in relation to the overall body. Start by adding the upper limbs, beginning with the shoulders. The shoulders should be positioned at the top of the torso, with the shoulder blades slightly angled downwards. The upper arm bones, or humerus, should be roughly one-quarter of the way down from the top of the shoulder, with the elbows positioned at a 90-degree angle. The forearms should be slightly narrower than the upper arms, with the wrists positioned at the end of the forearm. The hands should be in proportion to the rest of the body, with the fingers and thumbs in a relaxed position. Moving on to the lower limbs, the hips should be positioned at the base of the torso, with the thigh bones, or femur, angled slightly outward. The knees should be positioned at the midpoint of the thigh, with the lower legs, or tibia and fibula, slightly narrower than the thighs. The ankles should be positioned at the end of the lower legs, with the feet in proportion to the rest of the body. When adding the joints, pay attention to the subtle curves and contours of the body, using gentle, flowing lines to suggest the movement and flexibility of the limbs. The joints should be positioned at the points where the limbs meet, with the elbows and knees slightly bent to create a natural, relaxed pose. By carefully considering the proportions and placement of the limbs and joints, you can create a male body structure sketch that is both anatomically accurate and visually appealing.
Refining the Male Body Details
The male body is a complex and intricate subject in art, requiring a deep understanding of anatomy, proportion, and detail. To create a realistic and engaging male figure, artists must focus on refining the body's details, from the muscles and facial features to the hair and accessories. One key aspect of refining the male body is adding muscle definition and texture, which can be achieved through subtle variations in line weight and shading. By carefully rendering the muscles, tendons, and bones, artists can create a sense of depth and dimensionality that draws the viewer's eye. Additionally, defining facial features and expressions can convey emotion and personality, while enhancing the body with hair and accessories can add a touch of realism and individuality. By mastering these techniques, artists can create a male figure that is both visually striking and anatomically accurate. In this article, we will explore the importance of adding muscle definition and texture to the male body, and provide tips and techniques for achieving this level of detail.
Adding Muscle Definition and Texture
Adding muscle definition and texture to your male figure drawing can elevate the overall realism and visual appeal of your artwork. To achieve this, start by identifying the major muscle groups, such as the deltoids, biceps, triceps, and quadriceps. Use gentle, curved lines to suggest the contours of these muscles, taking care not to overdefine them. Next, add texture to your drawing by incorporating subtle shading and hatching techniques. Use a range of values to create depth and dimension, with darker values indicating areas of shadow and lighter values suggesting areas of highlight. Pay particular attention to the areas where muscles intersect or overlap, as these can create interesting and dynamic textures. For example, the intersection of the deltoids and triceps can create a subtle, rounded shape that adds visual interest to the arm. Additionally, consider adding some subtle muscle striations to suggest the underlying anatomy of the figure. These can be achieved using short, curved lines that follow the contours of the muscles. By incorporating these techniques into your drawing, you can add a level of sophistication and realism that will take your male figure drawing to the next level.
Defining Facial Features and Expressions
The facial features and expressions are the most distinctive and expressive aspects of a person's face, conveying emotions, personality, and character. When drawing a male face, it's essential to capture the subtleties of facial features and expressions to create a believable and engaging portrait. The eyes are the windows to the soul, and their shape, size, and angle can greatly impact the overall expression. A male face typically has a more angular and defined jawline, with a slightly wider nose and fuller lips compared to a female face. The eyebrows are usually thicker and more defined, with a distinctive arch that adds to the overall masculinity of the face. The facial expressions can range from subtle to dramatic, and it's crucial to capture the nuances of emotions through the eyebrows, eyes, nose, and mouth. A slight raise of the eyebrow can convey skepticism, while a gentle curve of the lips can suggest a warm smile. To draw a convincing male face, it's vital to study the anatomy of the facial features and practice capturing a range of expressions to bring your subject to life. By mastering the subtleties of facial features and expressions, you can create a portrait that exudes confidence, charisma, and character.
Enhancing the Body with Hair and Accessories
When it comes to enhancing the male body with hair and accessories, there are several ways to add depth and personality to your drawing. Hair can be a great way to convey a character's personality, age, and style. For a more realistic look, pay attention to the way the hair falls on the body, such as the way it frames the face or covers the shoulders. You can also use different textures and styles to create a unique look, such as messy and piecey or sleek and smooth. Accessories like hats, glasses, and jewelry can also be used to add visual interest and personality to your drawing. A hat can add a touch of elegance or ruggedness, while glasses can convey intelligence or nerdiness. Jewelry like necklaces or earrings can add a touch of sophistication or playfulness. When drawing accessories, pay attention to the way they interact with the body, such as the way a necklace falls on the chest or the way a hat sits on the head. By incorporating hair and accessories into your drawing, you can create a more nuanced and interesting male body that reflects the character's personality and style.