How To Use Transfer Paper Tattoo
Temporary tattoos have become increasingly popular in recent years, and one of the most effective ways to achieve a realistic and long-lasting design is by using transfer paper. This innovative technique allows individuals to create intricate and detailed designs that can be easily applied to the skin. However, to ensure a successful and satisfying experience, it's essential to understand the process involved in using transfer paper tattoos. In this article, we will delve into the world of transfer paper tattoos, exploring the crucial steps necessary to achieve a stunning and realistic design. From preparation to application and aftercare, we will cover it all. To start, preparation is key to a successful transfer paper tattoo experience. In the next section, we will discuss the importance of preparation and how it sets the stage for a flawless transfer process.
Preparation is Key
Preparation is key when it comes to getting a tattoo. Before you sit down in the tattoo artist's chair, there are several things you can do to ensure that your experience is positive and that you get the tattoo you want. Choosing the right transfer paper, preparing your skin, and designing your tattoo are all crucial steps in the process. By taking the time to get these things right, you can avoid common mistakes and ensure that your tattoo turns out exactly as you envisioned it. In this article, we'll take a closer look at each of these steps, starting with the importance of choosing the right transfer paper.
Choose the Right Transfer Paper
When it comes to choosing the right transfer paper for your tattoo design, there are several factors to consider. First and foremost, you need to select a paper that is specifically designed for tattoo transfers. This type of paper is coated with a special layer that allows the ink to adhere to the skin without smudging or fading. Look for paper that is labeled as "tattoo transfer paper" or "thermal transfer paper." You should also consider the size of the paper, as you'll want to choose a sheet that is large enough to accommodate your design. Additionally, think about the type of printer you'll be using to print your design. Some transfer papers are designed specifically for inkjet printers, while others are better suited for laser printers. It's also important to choose a paper that is compatible with your tattoo machine and needles. Some papers may be too thin or too thick, which can affect the quality of the transfer. Finally, consider the brand and quality of the paper. Look for reputable brands that specialize in tattoo transfer paper, and read reviews from other artists to get a sense of the paper's performance. By taking the time to choose the right transfer paper, you can ensure that your tattoo design turns out crisp, clear, and professional-looking.
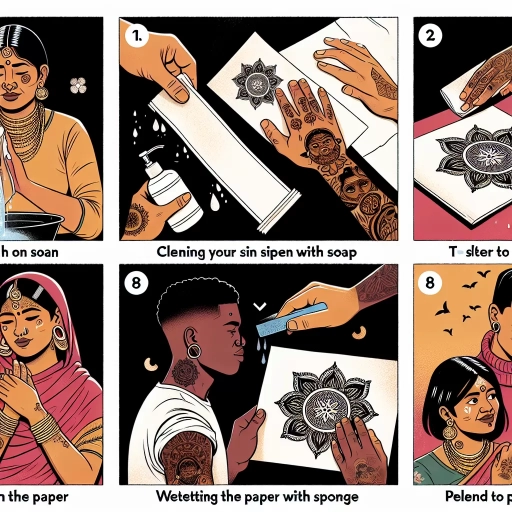
Prepare Your Skin
Here is the paragraphy: Preparing your skin is a crucial step before applying a transfer paper tattoo. It's essential to ensure your skin is clean, dry, and free of any lotions or oils. Wash the area with soap and water, and gently pat it dry with a towel. Avoid using any harsh chemicals or exfoliating products, as they can irritate the skin and affect the tattoo's adhesion. If you have sensitive skin, consider doing a patch test on a small area before applying the tattoo to check for any adverse reactions. Additionally, remove any hair from the area using a razor or wax, as this will help the tattoo adhere better. By preparing your skin properly, you'll be able to achieve a smooth, even application and ensure your transfer paper tattoo looks its best.
Design Your Tattoo
Designing your tattoo is a crucial step in the tattooing process. It's essential to take your time and create a design that you'll love for years to come. Start by brainstorming ideas and researching different styles, such as traditional, realism, or minimalist. Consider the placement of your tattoo and how it will look in that area. Think about the size, color, and level of detail you want. You can also look for inspiration online, in books, or by talking to other tattoo enthusiasts. Once you have a clear idea of what you want, sketch out your design and refine it until you're happy with the result. It's also a good idea to consult with a tattoo artist to get their input and ensure that your design is feasible and will translate well to your skin. By taking the time to design your tattoo carefully, you'll be able to create a unique and meaningful piece of body art that you'll cherish forever.
The Transfer Process
The transfer process is a crucial step in applying temporary tattoos, nail art, or other designs to your skin. To achieve a successful transfer, it's essential to follow a few simple steps. First, you'll need to apply the transfer paper to your skin, making sure to align it correctly and smooth out any air bubbles. Next, you'll use a squeegee or credit card to apply pressure, ensuring the design adheres evenly to your skin. Finally, you'll peel off the paper to reveal the design, and with a little patience and practice, you'll be able to achieve professional-looking results. By following these steps, you can ensure a successful transfer and enjoy your temporary tattoo or design for days to come. So, let's start with the first step: Apply the Transfer Paper to Your Skin.
Apply the Transfer Paper to Your Skin
Apply the transfer paper to your skin by gently placing it on the desired area, making sure to align it with the design you want to achieve. Start by peeling off the backing paper from the transfer paper, exposing the adhesive side. Place the transfer paper on your skin, smoothing it out with your fingers or a credit card to remove any air bubbles or wrinkles. Make sure the transfer paper is securely attached to your skin, as this will ensure a clear and even transfer of the design. If necessary, use a little bit of water to help the transfer paper adhere to your skin, but be careful not to soak the paper. Once the transfer paper is in place, use a gentle pressing motion to ensure the design is transferred evenly onto your skin. You can use a cloth or a sponge to apply gentle pressure, making sure not to press too hard, which can cause the design to blur or distort. After a few minutes, carefully peel off the transfer paper to reveal your temporary tattoo design.
Use a Squeegee or Credit Card to Apply Pressure
When applying pressure to the transfer paper, it's essential to use the right tools to ensure a smooth and even application. A squeegee or a credit card can be used to apply pressure to the transfer paper, helping to remove any air bubbles and excess ink. Start by placing the transfer paper on the skin, with the image facing down. Then, take the squeegee or credit card and apply gentle to moderate pressure, starting from the center of the image and working your way outwards. Make sure to apply even pressure, using long, smooth strokes to cover the entire image. This will help to prevent any air bubbles from forming and ensure that the image is transferred evenly. As you apply pressure, you may see the image start to appear on the skin, which is a good indication that the transfer is working. Continue to apply pressure until the entire image has been transferred, then remove the transfer paper to reveal your new temporary tattoo.
Peel Off the Paper to Reveal the Design
The transfer process is a crucial step in creating a temporary tattoo using transfer paper. To begin, peel off the paper to reveal the design. This is the most exciting part of the process, as you get to see your chosen design in all its glory. The paper backing should be removed slowly and carefully to avoid any creases or air bubbles that may distort the image. Once the paper is removed, you'll be left with a thin, transparent sheet with the design printed on it. This sheet is coated with a special adhesive that allows it to stick to your skin. Make sure to handle the sheet by the edges to avoid touching the adhesive, as the oils from your skin can interfere with the transfer process. With the design revealed, you're now ready to apply it to your skin and complete the transfer process.
Aftercare and Touch-ups
After getting a tattoo, it's essential to take good care of your skin to ensure the ink heals properly and looks its best. Aftercare and touch-ups are crucial steps in maintaining the quality and appearance of your tattoo. To keep your tattoo looking vibrant and healthy, it's vital to moisturize your skin to prevent dryness, touch up any fading or smudging, and remove the tattoo when desired. By following these simple steps, you can enjoy your tattoo for years to come. In this article, we'll explore the importance of aftercare and touch-ups, starting with the first step: moisturizing your skin to prevent dryness.
Moisturize Your Skin to Prevent Dryness
To maintain the health and appearance of your temporary tattoo, it's essential to keep the skin moisturized, especially after the transfer process. Dry skin can cause the tattoo to fade faster, peel off, or even crack, which can be painful and unsightly. To prevent dryness, apply a fragrance-free and non-comedogenic moisturizer to the tattooed area several times a day, ideally after bathing or showering. Look for a moisturizer rich in natural ingredients like aloe vera, coconut oil, or shea butter, which can help lock in moisture and soothe the skin. Gently massage the moisturizer into the skin, making sure to cover the entire tattooed area. Be careful not to over-moisturize, as this can cause the tattoo to become sticky or greasy. By keeping your skin well-moisturized, you can help extend the life of your temporary tattoo and keep it looking vibrant and healthy. Additionally, moisturizing can also help reduce the risk of skin irritation or allergic reactions, which can occur if the skin becomes too dry or sensitive. By incorporating moisturizing into your aftercare routine, you can enjoy your temporary tattoo for a longer period and maintain the overall health and appearance of your skin.
Touch Up Any Fading or Smudging
When it comes to maintaining the vibrancy and longevity of your temporary tattoo, touch-ups are essential. Over time, the ink may start to fade or smudge, especially if you've been exposing your skin to water, soap, or other harsh chemicals. To touch up any fading or smudging, start by gently cleaning the area with soap and water. Then, use a cotton swab or a small brush to apply a small amount of temporary tattoo ink or touch-up solution to the affected area. Be careful not to over-saturate the skin, as this can cause the ink to spread or become uneven. If the fading is more pronounced, you may need to reapply the entire design using a new sheet of transfer paper. To prevent smudging, make sure to let the ink dry completely before touching or handling the area. Regular touch-ups can help keep your temporary tattoo looking fresh and vibrant for a longer period.
Remove the Tattoo When Desired
When you decide to remove your tattoo, there are several options available. Laser tattoo removal is a popular method that uses high-intensity light beams to break up the pigment in the tattoo, allowing your body to absorb and remove it. This process can take several sessions, spaced several weeks apart, and may cause some discomfort and temporary side effects such as redness and swelling. Another option is surgical excision, where the tattoo is surgically removed and the skin is stitched back together. This method is typically used for smaller tattoos and may leave a scar. Intense pulsed light therapy is also used to remove tattoos, and it works similarly to laser removal but is less effective for darker ink colors. Additionally, some people opt for tattoo removal creams, which can be applied at home, but these are often less effective and may take longer to produce results. It's essential to consult with a professional before attempting to remove a tattoo to determine the best course of action for your individual situation.