How To Screen Record On Iphone 11
 In this universally connected era, where digital communication is the norm, the ability to record and share your screen activity can be an invaluable tool. Whether you are creating a how-to guide, demonstrating an application, documenting practices for troubleshooting, or even capturing a superb gaming session, screen recording can make it significantly easier. In this context, if you're an iPhone 11 user, you're in luck! Apple has robustly equipped this handset with a powerful but exceedingly simple to use screen recording feature. This article will unravel how you can leverage this functionality, through a three-step guide. It starts with showing you how to kick off your journey with 'Getting Started with Screen Recording on iPhone 11', followed by more detailed instructions under 'Recording Your iPhone 11 Screen', and lastly, we shall guide you on 'Editing and Sharing Your Screen Recordings' for optimal utilization and easy sharing. Our first area of exploration will focus on getting you started with this dynamic feature. So let's dive in and get yourself adept at screen recording on your iPhone 11.
Getting Started with Screen Recording on iPhone 11
The ability to capture live activities directly from your device’s screen has become an elemental feature for numerous purposes, including facilitating productive work, social sharing, or diagnosis of problems. This comprehensive guide is designed to walk you through getting started with screen recording on your iPhone 11, providing step-by-step instructions in three major aspects: understanding the basics of screen recording, setting up your iPhone 11 for screen recording, and choosing the right screen recording settings. We begin with understanding the basics of screen recording, which presents detailed insights on what screen recording entails, its functions, and how it can be beneficial in various scenarios. Next, we'll delve into how to set up your iPhone 11 for screen recording, a simplistic procedure that further empowers the device's usability. Lastly, choosing the right screen recording settings provides essential tips to optimize your recording experience. Armed with these insights, you'll have all the information needed to become a proficient iPhone screen recorder. Let us start by understanding the basics of screen recording.
Understanding the Basics of Screen Recording
Screen recording is a profoundly effective tool that allows you to document all the action unfolding on your screen. Whether it's a gameplay video, a tutorial, or a live stream, screen recordings provide a medium to capture, share, and review these moments exactly as they happened on your screen. This feature especially finds its relevance for iPhone 11 users who want to document their screen time. First and foremost, it's crucial to understand that screen recording works by capturing your digital interactions in real time, functioning similarly to a 'print screen' feature, but for video. The feature records whatever is happening on your iPhone 11's screen, from scrolling through social media feeds to playing a high-speed game, and builds it into a video that can be saved, shared or edited. Before starting with a screen recording, users must ensure they have ample storage, as videos can quickly consume a significant amount of space. Additionally, adjusting your device's screen brightness prior to recording can produce a better quality video. Since a screen recording captures both visuals and audio, users must be aware of ambient noise levels and potential privacy concerns. Always remember that every sound, notification, and even the smallest piece of confidential information visible on your screen will be recorded. It's also worth noting that screen recording can have some impact on your device's performance, especially while using resource-heavy apps. This is because the process uses up a considerable amount of processing power, making it a power-intensive task. During a screen recording, the iPhone may be slower to respond to inputs, or the battery might deplete more quickly. To provide the most dynamic experience, iPhone 11 offers advanced functionality such as annotating recordings, integrating audio commentary, and many more. However, knowing the limitations and the amount of control you have over the process is critical for effective screen recording. In conclusion, while screen recording on your iPhone 11 is an incredibly straightforward task, understanding the basics behind it can help you optimize your use of this feature. With this knowledge, you'll be well-equipped to create high-quality screen recordings, regardless of the content. Once grasped, the feature opens a world of possibilities, from creating tutorials and product demos to sharing gameplay footage and live-streaming. Understanding its functionalities and their impact on your device's performance will arm you with the power to maximize your screen recording experience to its fullest potential.
Setting Up Your iPhone 11 for Screen Recording
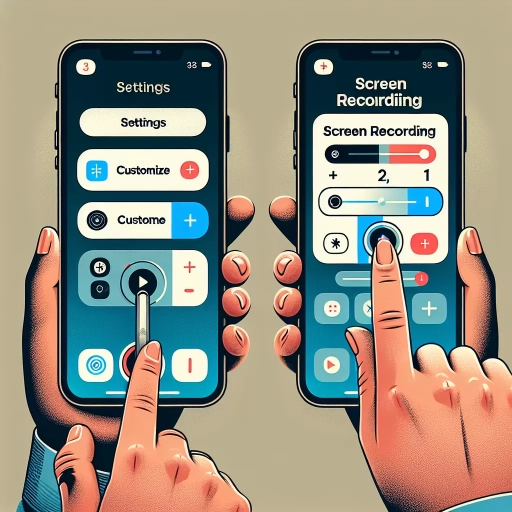
Using your iPhone 11 to create screen recordings may initially appear complex, but once you understand the process, it becomes second nature. Let’s kick things off by setting up your iPhone 11 for screen recording. To successfully initiate screen recording, you need to add it to your Control Center first as it's not there by default. Start by accessing your iPhone settings, represented by a gear symbol on your screen. Scroll down and select 'Control Center' which will lead you to a new menu. Here, select the 'Customize Controls' option. Within this feature, you'll find a list of functions that you can add to your Control Center. Scroll down until you come across 'Screen Recording' and click on the green '+' button beside it. Once this is done, the Screen Recording function will be accessible directly from your Control Center, eliminating the need for you to navigate through your settings every time you want to record your screen. To check if it's been successfully added, swipe up from the bottom of your screen (or swipe down from the top-right corner if you're using an iPhone with Face ID) to access the Control Center. You should see a new icon that resembles a filled circle with a ring surrounding it – that's your Screen Recording button. Before you start recording, it's important to adjust your recording settings according to your preferences. You can choose to record with or without sound by pressing and holding the Screen Recording button. This action will open a pop-up window where you will find a 'Microphone Off/On' option. If you want to record sound while capturing screen activities, make sure to turn it on. If you're doing a voice-over while recording, this setting is crucial. In addition to this, you can choose where your recordings get saved. Head over to 'Settings', select 'Camera', then 'Record Video'. Here, you'll be able to choose your preferred resolution and whether or not you want to save your videos to iCloud or your iPhone. To start screen recording, simply navigate to the Control Center and press the Screen Recording button. You will see a three-second countdown before the recording begins, allowing you time to prepare your screen. To stop recording, either click on the red status bar at the top of your screen or return to the Control Center and press the Screen Recording button again. It's pertinent to note that screen recording won't capture phone calls or FaceTime video calls in respect to privacy regulations. Otherwise, this versatile functionality can be used across all applications on your iPhone 11. Keep these steps handy as you explore screen recording, they’ll prove an invaluable resource. Whether you’re looking to create a tutorial, showcase a bug, or capture a memorable gaming moment, your iPhone 11 is perfectly equipped to support your screen recording needs.
Choosing the Right Screen Recording Settings
Choosing the right screen recording settings is a vital determinant in obtaining a high-quality video output. It's not enough just to know how to screen record on your iPhone 11 - understanding the device's capabilities and configuring the right settings is equally crucial. For starters, access the Control Centre and add the Screen Recording icon if it's not already there. It's as simple as going to Settings > Control Centre > Customise Controls > + Screen Recording. Next, let's focus on the options within the screen recording feature. Long-press on the Screen Recording button, and you'll see the Microphone Audio setting. iPhone 11 boasts excellent audio quality, recording crisp audio even without an external microphone. However, you can toggle the Microphone Audio on or off based on your need. If you wish to provide an explanatory voiceover, ensure the microphone is turned on. Another key consideration is the resolution at which you record your screen. iPhone 11 offers a massive range of high resolutions, including 4K. Remember, the higher the resolution, the larger the video file gets. Hence, it's essential to match your intended resolution with the device's available storage capacity. Considering the nature of your video content, like text readability and graphic details, is also essential. A lower resolution may be just fine for an online meeting, but for intricate gaming features or an elaborate tutorial, a higher resolution is necessary. Don't overlook your device's orientation either; portrait for vertical configuration or landscape for horizontal. The screen recording will commence in the orientation that the phone is in when started. Hence, set the right orientation before you start. Finally, zoom-in and zoom-out features can be handy; just pinch in and out of the screen to manipulate the viewing size appropriately. Lastly, iPhone's iOS 14 version has an added feature - it can hide the noticeable red bar that typically pops up at the top of your screen while screen recording. To hide it, go to Settings > Control Centre > Screen Recording > Start Broadcast. Remember to close all the private applications, notifications or sensitive emails beforehand, as the recording function will capture everything in its view. Selecting the best-suited screen recording settings on your iPhone 11 requires a careful understanding of the device's capabilities and intended video content. In a nutshell, by harmonizing your device's traits and your recording objectives, you can deliver a superior and sincerely engaging viewing experience to your audience.
Recording Your iPhone 11 Screen
The iPhone 11 showcases an impressive array of features and capabilities, one of which is the capacity to record your screen seamlessly. Our factual guide aims to provide comprehensive insights into this specific functionality - presenting three key elements; Utilizing the Built-in Screen Recording Feature, Recording a Specific App or Window, and Recording with or without Audio - to aid you in capturing every crucial moment on your phone screen. The Built-in Screen Recording Feature is a quick and easy way to record all the actions happening on your device's screen, a handy tool for creating tutorials or simply sharing an intriguing game-play. Should you wish to zoom in and focus on a specific App or Window, iPhone 11 gives you the flexibility. You can also customize your recording settings and decide whether you want to include audio or proceed in silence. Now buckle up as we navigate through the utilization of iPhone 11's Built-in Screen Recording Feature.
Using the Built-in Screen Recording Feature
Using the built-in screen recording feature on your iPhone 11 is simple, intuitive, and requires no additional hardware or software. This handy feature offers a smooth and efficient experience for users who want to record their screen activities in real-time. Perhaps you want to capture a memorable conversation, share a tutorial, or record gameplay. Whatever your reason, utilizing the onboard screen recording tool on your iPhone 11 makes the process hassle-free. To begin recording, you need to go to the control center. You access this by swiping down from the upper right corner of your iPhone 11 screen if you are using iOS 13 or later. In the control center, you'll find an icon for screen recording. If it's not readily visible, you can add it by going into settings, control center, and then customize controls. After the feature has been added, you just need to tap the screen recording icon, and a three-second countdown will start, indicating the beginning of the screen recording. Notably, this feature also records sounds from your device by default, but you can turn off the audio before you start recording by long-pressing the screen recording icon and then tapping the microphone icon. Should you wish to capture your commentary or reactions, keeping the microphone on will ensure that your voiceovers accompany the video recording. During the process of recording, you will notice a red bar at the top of your screen. This serves as an indicator that the recording is ongoing. When you are finished recording, just tap this red bar, and a window will pop up asking if you want to stop recording. The recorded content will automatically save to your photos app for easy review and management. In conclusion, the built-in screen recording feature on the iPhone 11 provides a straightforward and effective solution for capturing screen activities. This functionality's availability directly in the interface of your device eliminates the need for external apps or tools, making screen recording a seamless experience for every iPhone 11 user.
Recording a Specific App or Window
Screen recording on an iPhone, specifically the iPhone 11, provides an efficient tool for capturing specific on-screen activities that can be shared or saved for later use. However, you may not always want to record your entire screen; there might be instances when you only need to record a specific app or window. You will be relieved to know that iOS facilitates this to perfection, ensuring that privacy and specific content focus are never compromised. This supporting paragraph aims to educate users about the efficient recording of a specific app or window on the iPhone 11. This feature is useful in several scenarios including recording a step-by-step software tutorial, demonstrating a new game, troubleshooting, documenting bugs for technical support, or even simple day-to-day interaction with apps on your iPhone 11. To begin, you need to access the Control Center on your iPhone 11. This can be done by swiping downwards from the top-right corner of your screen. You should be able to see a circular icon that represents the Screen Recording feature. Before pressing 'Record', ensure that the app or window you want to record is open and ready to use. Once you hit the 'Record' button, a three-second countdown will appear, giving you time to navigate to the app or window you want to record. When the countdown ends, recording begins. The iPhone 11 does not record any activities outside the app or window that was active when the countdown concluded. Therefore, your privacy is never compromised as no notifications or other screen activities are captured in the recording. To stop recording, you can either tap the red time indicator at the top of your screen or revisit the Control Center and tap the circular icon again. Once you stop recording, the video is automatically saved to your Photos app. You can edit or share it directly from there. It is important to note that depending on the app or screen you are recording, the audio might not be captured. If you need to record sound alongside the video, make sure to long-press the Record button, then turn on the switch for 'Microphone Audio'. With the ability to record a specific app or window on your iPhone 11, you can create high-quality, informative, and engaging content with ease. Whether you are demonstrating how to navigate through tricky game levels, guiding your friends on how to use a new app, or exhibiting your master skills in a design program, screen recording of a specific app or window offers innumerable possibilities.
Recording with Audio or Without Audio
Capturing your screen activities in your iPhone 11 can be accomplished with or without recording audio, depending on your preference or requirement. This feature is quite useful for various situations, be it for creating a detailed walkthrough, recording a gaming session, or demonstrating how to use a certain application. However, the kind of media you intend to produce will determine your choice of recording with or without audio. When recording with audio in iPhone 11, for instance, you're able to capture not only the visual activities happening on your screen but also any sounds or voiceovers pertinent to the recording. This is especially crucial where verbal explanations or authentic sound effects are required, such as tutorial videos where instructions are given vocally. The audio can also add a personal touch or lend authenticity to your recorded content, particularly for vlogs or live gaming videos where real-time reactions are heard. Additionally, recording with audio aids in jogging your memory if you're recording something that you need to remember later on, like an online meeting or webinar. Conversely, recording without audio can be a go-to option if there are issues with privacy or disruptive background noise present during recording. This approach is handy when you don't wish to distract your audience with unrelated or unnecessary noise, or when recording in locations where it's impossible to control the ambient sound. Similarly, if what's being demonstrated on the screen doesn't require vocal instructions or comments, you may opt to screen record without audio. For instance, clear, self-explanatory procedures or actions often require no verbal commentary, and thus, no audio recording might be the best choice. Your iPhone 11's screen recording feature thus provides you with flexibility according to the nature and demand of your content. Whether it's with audio or without, you can ensure that the essence of your screen activities is aptly captured and presented. But it's essential to remember that your choice to record with audio or without should align with the purpose of your screen recording, the message you want to convey, and the needs of your audience.
Editing and Sharing Your Screen Recordings
Screen recordings are an efficient method to share ideas, provide guidance or deliver information online. While they are beneficial, to significantly enhance their usefulness, three critical steps need to be adhered to, which include trimming and editing your screen recordings, adding annotations and text to your screen recordings, and sharing your screen recordings on social media platforms. Trimming and editing screen recordings ensures unnecessary parts of the recording are eliminated, resulting in a succinct and focused video. With annotations and text, you can emphasize or highlight key points, making the recording more informative and engaging for viewers. Lastly, sharing your screen recordings on social media extends their reach, making it possible to engage a wider audience. Let's delve deeper by discussing the first step—trimming and editing your screen recordings to create high-quality and precise content.
Trimming and Editing Your Screen Recordings
When it comes to streamlining your screen recordings, the process of trimming and editing is of significant importance. This crucial step enables you to create a precise and well-polished video that not only delivers key information in a concise manner but is also appealing to the audiences. As recorded videos often include inadvertent content - such as unnecessary sections at the beginning or end of the recording, or some off-topic portions during the session, editing is the process that allows you to remove these superfluous parts, leading to a well-packaged final product. An iPhone's inbuilt video editing tools make this process seamless and user-friendly. To trim your screen recordings, simply select the recording from your gallery and tap on the 'Edit' button. A yellow frame will appear along the timeline of the video. Drag either end of the frame to adjust the start and finish of the clip. Upon satisfaction with your selection, tap 'Done' and your trimmed video will replace the original one in your gallery. If you wish to discard the changes and go back to the full-length recording, you can always choose 'Revert to Original'. Editing your iPhone screen recordings can involve more than just trimming. You can also add filters, adjust audio levels, and even insert texts. Furthermore, you can splice various recordings together, creating a cohesive narrative from different clips. Most advanced editing, however, will need the help of third-party applications available on the App Store, such as iMovie or Adobe Premiere Clip. These apps offer an array of editing features that can turn your raw screen recordings into a professional-grade video output. An important reason to trim and edit your screen recordings is that it saves your viewer's time from watching unnecessary content and helps them focus on what is important. It also portrays a sense of professionalism and respect for viewer's time, which can contribute to better engagement and interaction. It is also crucial to remember to maintain the quality of your video during the trimming and editing process. Often, robust editing can compromise the video quality, but this is where high-quality apps like iMovie or Adobe Premiere Clip can greatly help. In a nutshell, trimming and editing your screen recordings turn them into potent communication tools. It helps to eliminate unnecessary portions, highlight main points, and package your information engagingly and concisely. This upgraded functionality of screen recording in iPhone 11 takes the concept of screen recording a notch higher and makes it a valuable asset for presentation, demonstration, and instructional purposes. The ability to trim, edit, and enrich your screen recordings with this level of ease and sophistication puts a new dynamic into the hands of iPhone 11 users.
Adding Annotations and Text to Your Screen Recordings
In today's digital era, screen recordings have become a staple of online communication, particularly for instructional or explanatory purposes. As part of the recording process, especially when using an iPhone 11 device, you may consider adding annotations and text to your screen recordings to further enhance the understanding and overall experience of your audience. Annotations and text additions act as guideposts that facilitate seamless navigation through your content, spotlight crucial insights, and amplify comprehension. You can add annotations and texts during or post-recording. To add them while recording, you can use the markup tools provided by the device's operating side - iOS. These tools include pencils, highlighters, and erasers, which you can use directly on the screen to underline or circle important information. If you wish to add texts, there are numerous third-party applications that allow you to integrate text into your recordings. For the post-editing stage, you may be required to transfer your files to a PC or Mac for refinement using more sophisticated software like iMovie, Filmora, or Adobe Premiere Pro. With these programs, you can add dynamic texts to specific sections, lay arrows, highlights, and callouts, thereby marking vital elements seamlessly. Personalizing your recording with unique branding elements can also be achieved with such advanced tools. Moreover, they allow you to manage the timing and positioning of your annotation inputs accurately, ensuring they match the screen action. You can experiment with the varied customization options in font style, size, color, and the positioning of your text to create a clear, engaging, and effective video tutorial or demonstration. Always remember, the ultimate goal of adding annotations and text is to improve the viewer's comprehension of your recording. Consequently, they should not distract or obscure important content. Correct utilization of these features can lead to a significant leap in the quality of your presentations, tutorials, or guides, enhancing your communication and educational efforts dramatically. Use them strategically, and you're bound to produce top-notch and effective screen recordings. As a general guide, prioritize clarity and simplicity in your annotations. They should ideally be legible and concise, offering only necessary information to bolster your audience's understanding effectively. Furthermore, verify that your additions do not overwhelm or confuse your viewers—less is more. The more user-friendly your annotations are, the more compelling and engaging your content becomes. The beauty of annotations lies in their ability to transform a simple screen recording filmed with an iPhone 11 into a highly informational and engaging piece of content, handy in various sectors, ranging from e-learning to online marketing. By carefully planning the use of annotations and text features, you can take full advantage of your screen recording capabilities, developing materials that are both instructive and interactive. Therefore, adding annotations and text to your screen recording should be an essential part of your screen recording procedure.
Sharing Your Screen Recordings on Social Media
Sharing Your Screen Recordings on Social Media
Once your screen recordings are carefully edited and polished to perfection, it's time to share them on social media. Sharing your screen recordings over platforms like Facebook, Instagram, YouTube, Twitter, or Snapchat can prove to be immensely beneficial, especially if you're aiming to educate, engage, or entertain your followers more effectively. Not only does this form of content have the potential to be highly engaging, but it also makes complex concepts or instructions easier to follow and understand. Begin by selecting the social platform that suits your content the best. If your screen recording is longer than a few minutes, YouTube might be an excellent platform to share it because it allows longer video uploads. On the other hand, Instagram might be more effective for shorter, snappier clips, and Facebook is an often-used platform for a variety of content lengths and types. Twitter also provides a handy way to share videos, albeit with a somewhat restrictive time limit, while Snapchat provides short-lived video options ideal for flash sales, quick tips, or engaging teasers. Before posting your screen recording, ensure that the format is compatible with your chosen platform as each platform has specific requirements on video dimensions, size, and format. For instance, Instagram prefers square or vertical videos, while YouTube generally prefers landscape mode. Be prepared to make changes to your video's dimensions, crop, or even redo the entire recording in a worst-case scenario. Today, however, many screen recording software gives you the option to save in different formats to fit the requirements of various platforms. When you're ready to post, don't forget to write an engaging caption to entice your audience to watch your video. Pair it with relevant hashtags to increase its visibility. Consider tagging any involved parties or including a call-to-action such as requesting likes, shares, or comments to boost engagement rates further. For business-specific pages, also ensure that the video aligns with your overall branding and messaging strategy. While it might seem like there's a lot to consider while sharing your screen recordings on social media, it's an excellent way to increase your reach, enhance your social media presence, improve engagement, and provide valuable content for your audience. Remember that practice makes perfect - don't be disheartened if your first few tries aren't perfect. Be persistent, learn from your mistakes, and continuously strive to improve your screen recordings and how you share them to enjoy the significant benefits they bring.