How To Paint Shoes
Here is the introduction paragraph: Painting shoes is a fun and creative way to give your footwear a personalized touch. With a little practice and patience, you can transform a pair of plain shoes into a unique work of art. To achieve professional-looking results, it's essential to follow a step-by-step approach. This article will guide you through the process, covering the crucial steps of preparation, painting techniques, and sealing and finishing touches. By understanding these key elements, you'll be able to unlock your creativity and produce stunning, one-of-a-kind shoes. So, let's get started by laying the groundwork for a successful project - preparation is key.
Preparation is Key
Preparation is key to achieving success in various aspects of life, including work, education, and personal projects. To ensure a smooth and efficient workflow, it is essential to prepare the right tools and environment. This includes choosing the right shoes, preparing your workspace, and gathering essential materials. By doing so, individuals can minimize distractions, stay focused, and maximize their productivity. In this article, we will explore the importance of preparation and provide tips on how to get started. First, let's start with the basics - choosing the right shoes.
Choose the Right Shoes
Choosing the right shoes to paint can make all the difference in the outcome of your project. Not all shoes are created equal, and some are better suited for painting than others. When selecting shoes to paint, consider the material, color, and style. Leather shoes are ideal for painting because they provide a smooth surface for the paint to adhere to. Suede and nubuck shoes can also be painted, but they require special preparation and may not produce the same results as leather. Avoid painting shoes made of synthetic materials, such as plastic or vinyl, as they may not hold the paint well. The color of the shoes is also important to consider. Light-colored shoes are best for painting because they provide a clean canvas for your design. Dark-colored shoes can be painted, but the color of the paint may not show up as well. The style of the shoes is also important to consider. Shoes with intricate designs or patterns may be more challenging to paint than plain shoes. Additionally, shoes with a lot of stitching or embellishments may require more preparation and paint to cover. When choosing shoes to paint, it's also important to consider the size and shape. Make sure the shoes are comfortable to wear and fit well, as this will affect the overall look and feel of the finished product. Finally, consider the purpose of the shoes. If you plan to wear the shoes frequently, choose a pair that is durable and can withstand the wear and tear. If you plan to display the shoes, choose a pair that is visually appealing and can be showcased. By considering these factors, you can choose the right shoes for your painting project and achieve professional-looking results.
Prepare Your Workspace
Here is the paragraphy: To prepare your workspace, start by covering your work surface with newspaper, a plastic tablecloth, or a drop cloth to protect it from paint spills and stains. Next, gather all the necessary materials, including your shoes, paint, paintbrushes, and any additional decorations you plan to use. Make sure you have good ventilation in the area, as paint fumes can be hazardous to your health. If you're working in a small space, consider opening a window or using a fan to circulate the air. It's also a good idea to wear old clothes or an apron to protect your clothing from stains. Finally, remove any laces or insoles from your shoes to prevent them from getting in the way of the painting process. By taking the time to prepare your workspace, you'll be able to focus on the creative process of painting your shoes without worrying about making a mess.
Gather Essential Materials
To gather essential materials for painting shoes, start by collecting the necessary supplies. You will need a pair of shoes made from a material that can be painted, such as leather, suede, or canvas. Next, choose your paint, selecting a type specifically designed for use on shoes, such as acrylic or fabric paint. Make sure to pick a color that you like and that will complement the original color of the shoes. In addition to paint, you will also need a paintbrush or foam brush to apply the paint, as well as a sealant to protect the paint and extend the life of the shoes. Other materials you may want to consider include a primer, a paint tray or palette, and a cloth or paper towels for cleaning up spills. If you want to add additional details or designs to your shoes, you may also want to gather materials such as stencils, stickers, or rhinestones. Finally, make sure you have a well-ventilated workspace and a surface to work on that can get messy. By gathering all of these essential materials, you will be well-prepared to start painting your shoes and creating a unique and personalized design.
Painting Techniques and Tips
When it comes to painting, having the right techniques and tips can make all the difference in achieving a professional-looking finish. Whether you're a seasoned artist or a DIY enthusiast, mastering various painting techniques can help you unlock your full creative potential. In this article, we'll explore three essential painting techniques to take your skills to the next level. First, we'll discuss the importance of applying a base coat for better adhesion, which sets the foundation for a smooth and even finish. We'll also delve into the benefits of using thin coats to avoid dripping, a common mistake that can ruin an otherwise perfect paint job. Additionally, we'll examine the art of experimenting with different brushstrokes, which can add texture, depth, and visual interest to your work. By incorporating these techniques into your painting practice, you'll be well on your way to creating stunning pieces that showcase your unique style and flair. So, let's start by exploring the first technique: applying a base coat for better adhesion.
Apply a Base Coat for Better Adhesion
Applying a base coat is a crucial step in the shoe painting process that can make all the difference in the final result. A base coat serves as a primer, creating a smooth surface for the paint to adhere to, ensuring a strong bond between the paint and the shoe material. This is especially important when working with materials like leather, suede, or nubuck, which can be notoriously difficult to paint. By applying a base coat, you can create a uniform surface that allows the paint to spread evenly and prevents it from pooling or running. Additionally, a base coat can help to fill in any imperfections or scratches on the shoe surface, creating a smooth canvas for your design. When choosing a base coat, look for a product that is specifically designed for use on shoes and is compatible with the type of paint you will be using. Some popular options include acrylic-based primers, which work well with most types of paint, and specialized primers designed for use on specific materials like leather or suede. To apply a base coat, simply use a soft brush to apply a thin, even layer to the entire shoe surface. Make sure to follow the manufacturer's instructions for application and drying times, as this can vary depending on the product. Once the base coat is dry, you can proceed with painting your design, confident that it will adhere well and last for a long time. By taking the time to apply a base coat, you can ensure a professional-looking finish and extend the life of your painted shoes.
Use Thin Coats to Avoid Dripping
When painting shoes, it's essential to use thin coats to avoid dripping. Dripping can lead to unevenness, mess, and a lot of frustration. To achieve a smooth and even finish, apply thin coats of paint, allowing each coat to dry completely before adding the next. This technique is especially important when working with leather shoes, as the paint can pool and drip easily. By using thin coats, you can maintain control over the paint and ensure a professional-looking finish. Additionally, thin coats help prevent the paint from building up too quickly, reducing the risk of drips and runs. To apply thin coats, use a small brush and work in small sections, building up the color gradually. This approach may take more time, but the end result will be well worth the effort. By mastering the technique of using thin coats, you can achieve a flawless and long-lasting finish on your painted shoes.
Experiment with Different Brushstrokes
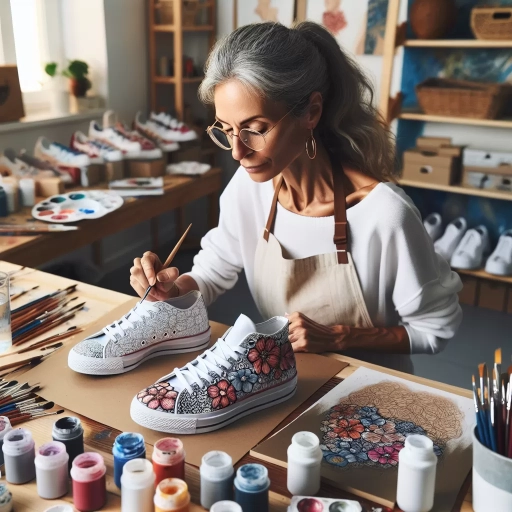
Experimenting with different brushstrokes is a great way to add texture, depth, and visual interest to your painted shoes. By varying the direction, pressure, and speed of your brushstrokes, you can create a wide range of effects, from smooth and subtle to bold and expressive. To get started, try practicing different brushstrokes on a piece of scrap paper or a test shoe. You can use a variety of brushes, including flat brushes, round brushes, and filbert brushes, to achieve different effects. For example, flat brushes are great for creating broad, sweeping strokes, while round brushes are better suited for detail work and fine lines. Filbert brushes, which have a flat edge and a rounded tip, are versatile and can be used for a variety of techniques. Some common brushstrokes to try include hatching, cross-hatching, stippling, and drybrushing. Hatching involves creating a series of closely spaced parallel lines, while cross-hatching involves layering lines at different angles to create a textured, grid-like effect. Stippling involves creating a pattern of small dots, which can be used to create detailed, high-contrast images. Drybrushing involves dragging a almost-dry brush across the surface of the shoe to create a rough, textured effect. By experimenting with different brushstrokes and techniques, you can add unique character and personality to your painted shoes. Don't be afraid to try new things and make mistakes – they can often lead to unexpected and exciting results. With practice and patience, you can master a range of brushstrokes and techniques, and take your shoe-painting skills to the next level.
Sealing and Finishing Touches
Once you've applied your paint, it's time to add the sealing and finishing touches. This is a crucial step in ensuring your design lasts and looks its best. To start, you'll want to apply a clear topcoat for protection, which will help shield your artwork from fading, chipping, and other forms of damage. Additionally, you can add extra details with a small brush, allowing you to refine your design and add intricate touches. Finally, be sure to allow the paint to fully dry before wearing, as this will help prevent smudging and smearing. By following these steps, you'll be able to achieve a professional-looking finish that will make your artwork stand out. Now, let's take a closer look at the first step in the sealing and finishing process: applying a clear topcoat for protection.
Apply a Clear Topcoat for Protection
Applying a clear topcoat is a crucial step in protecting your newly painted shoes from wear and tear. A clear topcoat acts as a barrier between the paint and the environment, shielding it from scratches, fading, and water damage. It also helps to lock in the colors and prevent them from bleeding or running. When choosing a clear topcoat, make sure to select one that is specifically designed for use on shoes and is compatible with the type of paint you used. Apply a thin, even layer of topcoat to the entire shoe, making sure to cover all surfaces evenly. Allow the topcoat to dry completely according to the manufacturer's instructions, which can range from a few minutes to an hour, depending on the type of topcoat. For added protection, you can apply multiple thin layers of topcoat, allowing each layer to dry before applying the next. This will provide an extra layer of defense against the elements and extend the life of your painted shoes. By applying a clear topcoat, you can enjoy your beautifully painted shoes for a longer period while maintaining their vibrant colors and glossy finish.
Add Additional Details with a Small Brush
To add additional details with a small brush, start by selecting a small, high-quality brush that is specifically designed for detail work. Look for a brush with synthetic or natural fibers that are tightly packed and have a fine tip, as this will allow for precise control and smooth strokes. Once you have your brush, dip it in a small amount of paint and wipe off any excess on the rim of the paint container. This will help prevent the brush from becoming too saturated and making a mess. With your brush loaded with paint, carefully begin adding details to your shoe design. Use light, gentle strokes to build up layers of color and create subtle shading and texture. Pay attention to the size and shape of the details you are adding, as well as the overall balance and harmony of the design. It's also a good idea to use a reference image or a sketch of your design to ensure that your details are accurate and proportional. As you work, be sure to clean your brush frequently to prevent paint from building up and causing streaks or unevenness. By taking your time and working carefully, you can use a small brush to add intricate details and textures to your shoe design, giving it a professional-looking finish.
Allow the Paint to Fully Dry Before Wearing
After applying a sealant, it's essential to allow the paint to fully dry before wearing your newly painted shoes. This step is crucial in ensuring the paint adheres properly to the shoe material and prevents it from chipping or flaking off quickly. The drying time may vary depending on the type of paint and sealant used, as well as the environmental conditions. Generally, it's recommended to wait at least 24 hours before wearing your shoes. This allows the paint to fully cure and harden, making it more durable and long-lasting. If you're using a fast-drying sealant, you may be able to wear your shoes within a few hours, but it's still important to follow the manufacturer's instructions and wait the recommended amount of time. Additionally, it's a good idea to avoid exposing your shoes to water or moisture during the drying process, as this can cause the paint to become discolored or damaged. By allowing the paint to fully dry, you'll be able to enjoy your newly painted shoes for a longer period and ensure they remain looking their best.