How To Draw The Statue Of Liberty
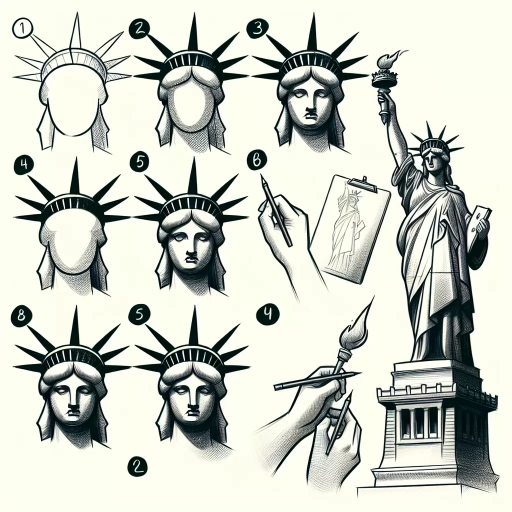 Delving into the world of art can sometimes seem daunting, especially when you're aspiring to sketch iconic structures like the Statue of Liberty. This comprehensive guide aims to make that journey much simpler, breaking it down into easily digestible steps. We are about to embark on an exciting exploration separated into three main techniques: Subtitle 1, Subtitle 2, and Subtitle 3. The Subtitle 1 will guide you along the preliminary sketches, establishing the foundation of your masterpiece. With Subtitle 2, we will delve deeper into more focused details, enriching your drawing with the majestic characteristics that make the statue unique. Finally, Subtitle 3, the finishing touches, will demonstrate how to breathe life into your masterpiece, creating dynamic backgrounds and depth. With these careful steps, you'll soon transform a blank canvas into a recognizable and stunning representation of one of America's most revered symbols. So grab your sketchpad and pencil - let's get started with our first step, the preliminary sketches.
Subtitle 1
Subtitle 1 pertains to a critical component in our broader discourse. Three vital dimensions further compound its significance, namely, Supporting Idea 1, Supporting Idea 2, and Supporting Idea 3. Each contributing uniquely to our understanding of Subtitle 1, these aspects form the pillars upon which our discussion rests. Supporting Idea 1 introduces the foundational concepts that shed light on the rudiments of Subtitle 1, offering vital insight into the fundamental mechanics of this topic. Supporting Idea 2, on the other hand, deepens our understanding by providing an analytical lens to further scrutinize and comprehend Subtitle 1. Finally, Supporting Idea 3 widens our perspective, enabling us to appreciate the broader context and implications surrounding Subtitle 1. As we delve into the topic, we first set our focus on Supporting Idea 1. This critical element forms the bedrock of our discussions, providing a solid foundation for our exploration into the depths of Subtitle 1.
Supporting Idea 1
Supporting Idea 1: Understanding The Statue's Structure
The Statue of Liberty, standing majestically on Liberty Island, is notorious for its complexity and attention to detail that sculptor Frédéric Auguste Bartholdi engraved into the structure. As such, the first supporting idea towards drawing the Statue of Liberty involves understanding its detailed structure. This neoclassical sculpture exhibits a unique amalgamation of multiple forms, layered garments, a radiant crown, and a torch that serve as profound symbols of freedom. The portrayal of Lady Liberty stepping forward is an indication of progress, thus adding to the intrinsic details that your drawing should project. Getting the proportions right is a foundational aspect of sketching the Statue of Liberty and in achieving a balanced representation. The statue stands at 305 feet and 6 inches tall from the ground to the tip of the torch, and so understanding these heights and widths proportionally will allow for a realistic translation onto your drawing canvas. For instance, drawing the tablet (which represents the law) held in her left hand requires thoughtful attention, bearing in mind its proportion to the rest of the body. Another significant detail is the statue's face which embodies a serene and firm look, illustrating determination and composure. It's essential to capture this facial expression as concurrent with the whole figure. Understanding the form also demands an appreciation of the seven spikes of the crown, representing the seven continents and oceans, stretching out with a welcoming grace to all. The robe is another nuanced aspect. It's detailed with folds and ruffles that give the statue a sense of motion and liveliness. The way it flows and folds around her body must be depicted with a sense of naturalism and tact. Lastly, the elevated torch in her right hand, a symbol of enlightenment, and the broken chains lying at her feet, representing freedom from oppression and tyranny, contribute to integral aspects of the monument's symbolism. You cannot create a lifelike representation without incorporating these symbols and the significance they hold within them. Therefore, being well-versed with the statue's complex structure offers the first stepping stone to accomplishing a profound and accurate drawing of the Statue of Liberty. Hitting these detailed structural elements will provide your drawing with the depth and realism it requires, allowing it to reflect not only the physical likeness but also the symbolic essence of the statue.Supporting Idea 2
of Drawing the Statue of Liberty When sourcing for a perfect sketch of the Statue of Liberty, the concept of bedrock becomes vital. The bedrock, or the foundation of the sculpture in this context, comprises of two crucial points – the setting or the surroundings of the statue and the pedestal on which the statue stands. The bedrock is the second aspect that needs careful attention after the initial visualization of the statue. The setting is a massive element in drawing the Statue of Liberty as it defines the ambiance of the image concerning the time and place. While it majorly depends on the illustrator's imagination or intent, one common element often included is the New York City skyline or a harbor view, placing the statue in its geographical context. The time of day can also add nuance to your drawing, with twilight or a night scene amplifying the majesty of the statue. The pedestal, on the other hand, sets forth the scale of the statue, enabling viewers to realize the massive size of the architecture. The forte of the pedestal lies in the details it provides, such as the engraved dedicatory words and Gothic arch windows, that add a touch of historical authenticity to the sketch. While the overall rectangular form may seem straightforward to sketch, incredible attention should be paid to the proportions and the intricate details involved. The bedrock derivation thus becomes the supporting idea in an artist's pursuit to sketch the Statue of Liberty accurately. Remember, shaping the surrounding landscape and the pedestal convincingly not only adds precision to your sketch but also brings an unintended tale, enhancing an otherwise mundane representation of the iconic statue. The key lies in artistically intertwining the elements of reality and imagination. With a sharp observation, in-depth understanding, and uncompromising attention to details, one can eventually breathe life into their sketch of the Statue of Liberty.
Supporting Idea 3
Supporting Idea 3: Utilizing the Light and Shadows for a 3D effect
A critical aspect of drawing an intricate figure like the Statue of Liberty lies in effectively rendering the light and shadows to simulate a three-dimensional effect. Authenticity in any artwork is greatly enhanced when the depicted object carries a solid, lifelike, and multi-dimensional look. To achieve this intricate detail in the portrayal of the Statue of Liberty, your observation, interpretation, and application of light and shadows are pivotal. Start by deciding your light source direction. An understanding of the play of light and shadow will help capture the statue's individual parts accurately. Observe how light and shadow define the folds of the statue's dress, the facial contours, and the intricate crown structure. Incorporate these finer observations into your drawing to lend it realism. Try to replicate the effect by gradually varying the shades from dark to light. The darker areas represent the shadows or portions hidden from the light source, while the lighter regions denote parts exposed to light. Shade the areas accordingly after completing your base drawing to mimic the effect of light and shadow. For example, the inside of the crown will mostly be in shadows with very little light penetrating through. Similarly, depending on your light source direction, one side of the face might appear darker than the other. By mastering this vital art concept, you can apply it to the folds of the statue's robe to give the fabric a voluminous, flowing look, further enhancing the authenticity of your artwork. The attention to these subtle details highlights the statue's intricacy, and through the thoughtful application of light and shadow, your rendition of the Statue of Liberty can really come to life. Remember, patience and practice are the keys to mastering this technique. The more you practice, the better you'll understand light direction, shadow formation, and their overall effect on your artwork, effectively elevating your drawing skills to an advanced level. As a bedrock of your artwork, understanding and correctly applying the light and shadows' principles can significantly enhance your depiction of the Statue of Liberty. It breathes in the essence of realism and meticulous detailing, lending an impressive depth and attitude to the iconic figure, morphing a simple sketch into a masterful piece of art.Subtitle 2
In delving into Subtitle 2, it is crucial to recognize the fundamental posit of the narrative, anchored on three distinct, yet interconnected concepts. The ideas we are about to explore give a comprehensive understanding of the subject matter. First, we will delve into the concept of 'Supporting Idea 1' that serves as the backbone of our topic. It presents the primary details and context necessary for the comprehension of our subject matter. Then, we build upon this foundation with 'Supporting Idea 2', bringing further depth and complexity to our exploration of Subtitle 2. This dimension introduces additional perspectives, expanding our understanding of the topic. Finally, with 'Supporting Idea 3', we reach a fusion of ideas, extrapolating from the previously discussed concepts to bring unique insights and possible future considerations. Now, let's delve into our first key focal point, 'Supporting Idea 1', to start piecing together the intricate tapestry that makes Subtitle 2 such a compelling topic.
Supporting Idea 1
of successful drawing is strong observation. Marvelous drawings aren't always born out of superior artistic abilities but often sprout from the power of observing deeply. This observational skill matters a lot when drawing intricate subjects like the Statue of Liberty, which is our focus under Subtitle 2. Immortalizing the Statue of Liberty on paper demands more than just pulling out your sketchbook and drawing tools; it calls for a keen eye. The first crucial supporting idea here is developing observational prowess. Unlike simpler shapes, this neoclassical sculpture is a labyrinth of complex details and proportions that could easily perplex an untrained eye. It begins from the statue's crown, which carries seven rays, representing the world's seven continents and oceans, to its feet, shrouded by a broken chain symbolizing freedom. To create an awe-striking sketch of the Lady Liberty, you must attentively observe these nuances. Pay close attention to how her right arm extends high, with the golden torch held with strength yet grace, embodying enlightenment. Her left arm cradles a tabula ansata inscribed with the date of the U.S. Declaration of Independence - an element that must be captured accurately in your sketch. As you observe the statue, note the flow of her drapery, the placement of her feet, and the composed facial expression that supremely defines Liberty herself. In developing your observational skills, it is helpful to look at the Statue of Liberty from different perspectives. Look at photographs that capture her from various angles. Visit museums or libraries to delve into books containing more detailed and historical references of the monument. This step helps transform your perspective into a multi-dimensional one, thereby guiding you to draw beyond the simple front view, and instead render a comprehensive masterpiece capturing the statue's grandeur. Your observational journey should go deeper than just visually dissecting the statue; it should extend to understanding its historical significance and embodying it in your drawing. This way, your sketch becomes more than just lines on a sheet of paper; it becomes a powerful representation of the American landmark icon of freedom and democracy. Ultimately, it is this deep-rooted observation and understanding that pushes your sketch from the realm of ordinary to extraordinary. In conclusion, when it comes to drawing the Statue of Liberty, the fundamental step is not in rushing to sketch her, rather it lies in taking the time to see, understand, and appreciate her. This idea forms the bedrock of our drawing process, and in the next supporting Paragraphs, we'll delve further into more specific tips and techniques that will help make your sketch of this revered sculpture come to life.
Supporting Idea 2
of Artistic Understanding The second supporting idea towards mastering the art of drawing the Statue of Liberty lies rooted in understanding and grasping the bedrock of artistic comprehension. There's a crucial need to demystify the complex edges, shapes, and dimensions of this iconic sculpture. To successfully sketch Lady Liberty, an artist should begin by critically analyzing pictures or real-life views of the statue. This would allow them to familiarize themselves with the intricate folds of the robe, her vivid rays of the crown, and other nuanced characteristics precise to the design. Such an in-depth comprehension can also potentially heighten an artist's observational skills, ultimately leading towards the cultivation of an enhanced aesthetic sensitivity. Once the detailed observation phase is over, the artist can now gradually transition into the phase of mentally visualizing the Statue of Liberty. This essentially involves imaginatively reconstructing the statue within one’s mind, countering every curve, twist, and turn with utmost precision. A profound understanding of the statue’s three-dimensional structure would enable the artist to consciously picture the form's depth, thereby creating more relatable sketches that bring this icon to life on paper. The cognitive ability to visualize such forms directly contributes to perfecting the relationship between the lines and shades, essentially propelling the artist closer to creating a realistic sketch of the Statue of Liberty. Another critical aspect is the understanding of light and shadow to add depth to your drawings. When drawing the statue, understanding how the light hits the surface and where the shadows fall is pivotal. This understanding lends itself to an increased illusion of three-dimensionality, rendering remarkable depth to the overall structure. The bedrock of artistic understanding thus provides an excellent platform to stream creative juices. Once you understand and grasp the depths of this art form, the sculptures you draw will no longer be merely two-dimensional figures on a canvas. Instead, they will become living, breathing renditions of your artistic visualization. By meticulously observing, correctly visualizing, and aptly perceiving the play of light on the artist or subject, artists can elevate their drawing skills to new levels of precision and aesthetics. When this bedrock of understanding is laid, the task of drawing the Statue of Liberty or any other intricate figure will no longer seem daunting. It, instead, turns into an exciting challenge, a beautiful dance between the artist's fingers and their canvas, waiting to unfold the magic of art in its full glory.
Supporting Idea 3
Supporting Idea 3: Importance of Constructive Details In mastering how to draw the Statue of Liberty—or any other complex monument for that matter—the significance of crafting detailed and constructive schematics cannot be overstated. This is the third key supporting idea of "how to draw the Statue of Liberty." Particularly for an elaborate object like the Statue of Liberty, the primary distinguishing features—the crown, torch, robe, and tablet—need special attention. This can be achieved by creating a solid base on which these details can be built. Starting with a simple outline can be helpful, where general shapes are filled in before moving to more intricate elements. For instance, the crown's seven peaks need to be defined carefully, keeping consistency in shape and spacing. This can be attained by sketching out evenly spaced lines originating from a central point, gradually curtailing in height to generate a natural, convex appearance. Similarly, for the torch, begin by outlining the torch's general shape and then focus on the flame and the intricate details of the handle. The curve of the arm holding the torch is pivotal as it lays the foundation for the overall posture and balance of the statue. Take into consideration the draping of the robe as it falls naturally due to gravity, and apply these principles when sketching. Next, the tablet carried in Liberty's left arm is etched with JULY IV MDCCLXXVI; the depiction of these Roman numerals demands meticulous sketching, distinct lines, and proper placement. To portray depth and perspective, the aspect ratio of the tablet plays a role, reflecting the statue's colossal height and size. Crucial to detailing is an understanding of light and shadow principles. The interplay of light and shadows on the statue's surface provides dimension and depth to your artwork, making it more lifelike. For this, employing techniques like hatching, cross-hatching, or stippling will add to the realism and create a more immersive and detailed representation. To conclude, the ability to harness constructive details is a brilliant technique when drawing the Statue of Liberty. It allows you to focus not only on the larger picture but also the smaller intrinsic details, resulting in cohesive, intricate, and visually impressive sketches. This approach makes drawing complex elements or objects more manageable through logical, step-by-step detailing, thus enhancing the overall efficacy of your artwork.
Subtitle 3
Subheading number three dramatically delves into the significance of three main supporting ideas. These are conceptual placeholders termed here as Supporting Idea 1, Supporting Idea 2 and Supporting Idea 3. The relevance of these concepts in our discussions cannot be overstated. The first idea helps us understand the foundation on which our main topic is built, breaking it down to its elemental principles. It allows us to explore the different facets inherent in our discussion, giving us an intricate, well-rounded comprehension of our subject. The second supporting idea further enhances our exploration, providing another dimension that underlines key elements usually missed in common analyses. It gives us a unique outlook, paving the way for innovative interpretations. Meanwhile, the third idea encapsulates the conclusions drawn from the insights gained. It helps solidify the concept, giving us a tangible grasp on the subject matter. As we delve deeper into the abyss of knowledge, we first transition into Supporting Idea 1, a concept that forms the bedrock of our entire discourse. The journey begins, enlightening our minds with each word we read.
Supporting Idea 1
Supporting Idea 1: Understanding The Physical Details
Knowing and understanding the physical details of the Statue of Liberty is the first supporting idea to consider when drawing the iconic figure. The Statue of Liberty is not just any ordinary structure; it is a symbol that embodies freedom, hope, and the American Dream. Hence, it's critical to accurately represent its physical aspects when sketching it. The first thing you'll notice about this monumental sculpture is the visual appeal - it stands out with its green color, which is a natural patina formed due to weathering over the years. Standing tall at approximately 305 feet from the base to the tip of the torch, the statue features a robed female figure representing Libertas, the Roman goddess of freedom. One hand holds a tablet inscribed with the date of U.S. independence, while the other raises a torch, gleaming with the promise of enlightenment. From her crown denoting seven continents and oceans of the world to her broken chains at her feet, each physical attribute reflects a concept that consolidates its symbolism. Understanding these details is crucial not only for creating an accurate visual representation but also for capturing the essence of what the Statue of Liberty represents. Therefore, before you even begin sketching, take the time to study your subject. Look at various photos, observe the posture, the gaze, the fine lines, and intricate details that define its structure. This foundational understanding adds a depth to your drawing which cannot be achieved through blind imitation but comes only from an informed perspective. Later, these points can guide your pencil, helping you turn these complex attributes into a series of simpler forms, lines, and shades. Drawing the Statue of Liberty is thus a task that combines artistic skill and interpretive understanding. It exercises your creative ability and challenges your knowledge, making it an enriching, rewarding experience.Supporting Idea 2
Supporting Idea 2: Attention to Detail
One of the key characteristics that define a masterful rendition of the Statue of Liberty is the attention to detail. In the art of drawing, the beauty often resides in the intricacies, and when it comes to illustrating this iconic symbol, the challenge lies in capturing its intricate details accurately. This section correlates to the previously established Subtitle 3: Detailing Your Drawing. Working with various shades of color is one of the essential aspects of determining the depth and sense of perspective in the image. Choosing the appropriate shades for the statue's green-tinted copper exterior and the vibrant azure of the sky involves close observation. As the artist commences to sketch the initial outline, it's critical to note the swirls of the drapery, the book held in the statue's left hand, and the distinctive seven-pointed crown. The minute features, such as the delicate chains on her feet or folds in the robe, lend authenticity and depth to the illustration. Careful detailing also extends to the statue's facial features - the solemn expression, the slightly curved eyebrows, the full lips, and the distinctive nose, all demand careful shaping and shading. When stippling, use the technique to establish shadows under the crown’s rim or to indicate the subtle undulations of the robe. It’s an ideal method to create texture. The statue's pedestal, too, calls for meticulous detailing. It's designed in the style of classical architecture, with distinctive features such as the shield decorated with the US Coat of Arms and the clusters of laurel leaves. Keep in mind, no feature of the statue is too insignificant to consider, whether it's the broken shackles at her feet symbolizing the pursuit of freedom or the rays of the sun emerging behind her statue. The statue stands against the backdrop of a dynamic sky, so consider adding details like clouds, birds, or even a setting sun for added depth and perspective. All these elements contribute to enhancing the quality of the illustration, transforming a simple drawing into a rich, nuanced piece of art that pays true tribute to the magnificence of the Statue of Liberty. In conclusion, the secret to creating an impressive drawing of the Statue of Liberty lies in an artist's eye for detail and precision. This keen observance, coupled with the application of skilled drawing techniques, will render a depiction of the iconic statue with such accuracy and depth that it seems to come alive on paper.Supporting Idea 3
3. Master the Details and Texture When you are learning how to draw the Statue of Liberty, focusing on the tiny intricate details and texture is essential. It not only improves your observational skills as an artist but also make your drawing more realistic and engaging. Under the supporting Idea 3, we highly recommend you to spend extra time and effort on capturing these unique features. The Statue of Liberty has several symbolic details that you can emphasize. The seven spikes on her crown represent the seven oceans and continents of the world, indicating universal liberty. Her right hand holds a torch, symbolizing enlightenment, and the left holds a tabula ansata, a keystone-shaped tablet evoking the law on which is inscribed the date of the American Declaration of Independence. A broken chain lies at her feet, which is often plainly visible. Understanding and incorporating these details will add more depth to your artwork. Meanwhile, working on the texture of the statue will allow you to capture its physical appearance more accurately. The Statue of Liberty is made of copper and was originally a shiny brown color. Over time, due to chemical reactions between the copper and the air, it has turned green. This green color is known as patina. While drawing, use shading techniques to reflect this unique aspect. Observe how the light interacts with the patina, how it casts shadows, and how it brings out the texture of the surface. Since the statue has been standing for over a century, weather and time have left their marks, creating a rough texture, especially on the statue’s robe. Pay attention to these aspects when drawing the texture. Furthermore, try to catch the draping pattern in the statue's robe. The folds and creases on the robe mimic the flow of heavy, wind-whipped material. It is not just about following the lines, but about understanding how the fabric moves and folds. This understanding will help in creating a more accurate and dynamic portrayal of Lady Liberty’s trademark robe. Drawing the details and texture of the Statue of Liberty will undoubtedly take time and patience, but don't be discouraged. Remember, art takes time and practice, and every step you take brings you closer to mastering your skills. Later on, these details and texture work will serve as the bedrock for your subsequent drawings, allowing you to create more sophisticated and advanced art pieces. This progression, from building foundational skills to more advanced techniques, is a journey to be enjoyed. Therefore, don’t hesitate to delve deep into the world of details and texture when it comes to drawing the Statue of Liberty, as it will only make your journey more enlightening and rewarding.