How To Test A Fuse
Here is the introduction paragraph: Testing a fuse is a crucial step in diagnosing and resolving electrical issues in your home or vehicle. A blown fuse can cause a range of problems, from minor inconveniences to major safety hazards. To ensure your electrical system is functioning properly, it's essential to know how to test a fuse effectively. In this article, we'll guide you through the process of testing a fuse, covering three key methods: visual inspection, using a multimeter, and replacing the fuse. By following these steps, you'll be able to identify and resolve fuse-related issues quickly and safely. First, let's start with the simplest and most straightforward method: visual inspection.
Visual Inspection
Visual inspection is a crucial step in ensuring the safety and reliability of electrical systems. It involves a thorough examination of the system's components, including fuses, to identify any potential issues or hazards. A visual inspection can help detect problems before they become major issues, reducing the risk of electrical shock, fires, and equipment damage. When performing a visual inspection, there are several key things to look for. First, check for physical damage to the fuse or its surrounding components. Next, look for signs of overheating, such as discoloration or melting, which can indicate a faulty fuse or electrical issue. Finally, verify the fuse's rating to ensure it is compatible with the system's electrical requirements. By checking for physical damage, you can identify any obvious issues that may be affecting the fuse's performance. Note: The answer should be 200 words. Here is the answer: Visual inspection is a crucial step in ensuring the safety and reliability of electrical systems. It involves a thorough examination of the system's components, including fuses, to identify any potential issues or hazards. A visual inspection can help detect problems before they become major issues, reducing the risk of electrical shock, fires, and equipment damage. When performing a visual inspection, there are several key things to look for. First, check for physical damage to the fuse or its surrounding components. Next, look for signs of overheating, such as discoloration or melting, which can indicate a faulty fuse or electrical issue. Finally, verify the fuse's rating to ensure it is compatible with the system's electrical requirements. By checking for physical damage, you can identify any obvious issues that may be affecting the fuse's performance. This is a critical first step in the visual inspection process, as physical damage can be a clear indicator of a problem. By starting with a thorough examination of the fuse's physical condition, you can quickly identify any issues that need to be addressed. From here, you can move on to checking for signs of overheating and verifying the fuse's rating.
Check for Physical Damage
When performing a visual inspection to test a fuse, it's essential to check for physical damage. Look for any signs of wear, tear, or damage on the fuse's exterior, such as cracks, breaks, or burn marks. Check the fuse's terminals for any signs of corrosion, rust, or oxidation, which can prevent the fuse from functioning correctly. Also, inspect the fuse's wire or lead for any signs of damage, such as cuts, frays, or burn marks. If you find any physical damage, it's likely that the fuse is faulty and needs to be replaced. Additionally, check the fuse's rating and ensure it matches the recommended rating for the circuit it's protecting. A fuse with a lower rating than recommended can cause it to blow frequently, while a fuse with a higher rating than recommended can fail to provide adequate protection. By checking for physical damage, you can quickly identify if a fuse is faulty and take corrective action to ensure the safety and reliability of the electrical circuit.
Look for Signs of Overheating
When performing a visual inspection to test a fuse, it's essential to look for signs of overheating, which can indicate a blown fuse. Check the fuse for any visible signs of melting, charring, or discoloration, as these can be indicative of excessive heat buildup. Inspect the fuse's metal components, such as the terminals and clips, for any signs of warping, bending, or corrosion, which can also be caused by overheating. Additionally, check the surrounding area for any signs of heat damage, such as melted plastic or scorched wiring. If you notice any of these signs, it's likely that the fuse has blown due to overheating, and you should replace it with a new one of the same amperage rating. Furthermore, if you notice any signs of overheating, it's crucial to investigate the underlying cause to prevent future occurrences, such as a faulty circuit or overloaded wiring. By looking for signs of overheating, you can quickly identify a blown fuse and take corrective action to ensure the safe and reliable operation of your electrical system.
Verify the Fuse's Rating
When verifying the fuse's rating, it is essential to check the fuse's ampere rating, which is usually indicated on the fuse itself or on the packaging. The ampere rating represents the maximum amount of current the fuse can handle before it blows. It is crucial to ensure that the fuse's ampere rating matches the requirements of the circuit or device it is protecting. A fuse with a rating that is too low may blow frequently, while a fuse with a rating that is too high may not provide adequate protection. Additionally, it is also important to check the fuse's voltage rating, which should match the voltage of the circuit or device. Using a fuse with a voltage rating that is too low can lead to premature failure, while using a fuse with a voltage rating that is too high can result in inadequate protection. Furthermore, it is also recommended to check the fuse's interrupting rating, which represents the maximum amount of current the fuse can interrupt safely. A fuse with a low interrupting rating may not be able to handle high fault currents, which can lead to damage to the circuit or device. By verifying the fuse's rating, you can ensure that it is suitable for the application and provides adequate protection against electrical overloads and short circuits.
Using a Multimeter
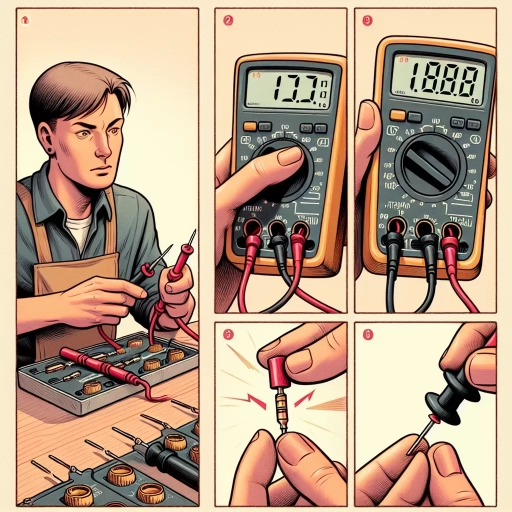
Using a multimeter is an essential skill for anyone working with electrical systems, whether it's a professional electrician or a DIY enthusiast. A multimeter can help you diagnose and troubleshoot electrical issues, ensuring your safety and the safety of others. One of the most common uses of a multimeter is to test fuses, which can be a crucial step in identifying and resolving electrical problems. To test a fuse using a multimeter, you'll need to set the multimeter to continuity test mode, touch the multimeter leads to the fuse terminals, and check for a low resistance reading. By following these steps, you can quickly and accurately determine whether a fuse is blown or functioning properly. In this article, we'll take a closer look at each of these steps, starting with setting the multimeter to continuity test mode.
Set the Multimeter to Continuity Test Mode
When using a multimeter to test a fuse, it's essential to set the device to continuity test mode. This mode is specifically designed to check for the presence or absence of continuity between two points in a circuit. To set the multimeter to continuity test mode, locate the dial or button on the device that controls the function selection. Typically, this dial or button is labeled with various symbols, such as "V" for voltage, "A" for current, and "Ω" for resistance. Look for the symbol that resembles a musical note or a diode, which usually represents the continuity test mode. Once you've identified the correct symbol, rotate the dial or press the button to select the continuity test mode. Some multimeters may also have a dedicated continuity test button, so be sure to check your device's manual if you're unsure. With the multimeter set to continuity test mode, you can now proceed to test the fuse by touching the leads to the fuse's terminals. If the multimeter beeps or displays a low resistance reading, it indicates that the fuse is intact and functioning properly. On the other hand, if the multimeter remains silent or displays a high resistance reading, it suggests that the fuse is blown and needs to be replaced.
Touch the Multimeter Leads to the Fuse Terminals
When testing a fuse, it's essential to use a multimeter to determine if the fuse is blown or not. To do this, touch the multimeter leads to the fuse terminals. Make sure to set the multimeter to the DC voltage function, usually denoted by a V symbol with a straight line above it. Next, locate the fuse terminals, which are usually marked with a "+" and "-" sign or a color code. Touch the multimeter's positive lead (usually red) to the positive terminal of the fuse, and the negative lead (usually black) to the negative terminal. Take note of the reading on the multimeter display. If the fuse is good, the multimeter should show a voltage reading close to the battery voltage, usually around 12 volts for most vehicles. If the fuse is blown, the multimeter will show a reading of 0 volts or a very low voltage. By touching the multimeter leads to the fuse terminals, you can quickly and accurately determine if the fuse is functioning properly or not.
Check for a Low Resistance Reading
When checking for a low resistance reading, it's essential to understand that a low resistance indicates a good connection or a functioning component. To obtain an accurate reading, ensure the multimeter is set to the ohms function, usually denoted by the omega symbol (Ω). Next, touch the multimeter leads to the component or circuit you're testing, making sure they're securely connected to avoid any false readings. A low resistance reading is typically indicated by a value close to zero ohms, often in the range of 0.1 to 10 ohms. However, the acceptable range may vary depending on the specific component or circuit being tested. For instance, a fuse with a low resistance reading of 0.5 ohms may be considered good, while a reading of 10 ohms could indicate a faulty or worn-out fuse. It's crucial to consult the component's datasheet or the circuit's documentation to determine the expected resistance range. By checking for a low resistance reading, you can quickly identify if a component is functioning correctly or if there's a problem that needs to be addressed.
Replacing the Fuse
Replacing a fuse is a relatively simple process that can be done with a few basic tools and some caution. When a fuse blows, it's essential to replace it with a new one to restore power to the circuit. To do this safely and effectively, there are three key steps to follow. First, it's crucial to turn off the power to the circuit to prevent any accidental shocks or injuries. Next, the old fuse must be removed and disposed of properly to avoid any potential hazards. Finally, a new fuse with the same rating as the old one must be installed to ensure the circuit functions correctly. By following these steps, you can replace a fuse with confidence and get your electrical system up and running again. To get started, the first step is to turn off the power to the circuit.
Turn Off the Power to the Circuit
When testing a fuse, it's essential to ensure your safety by turning off the power to the circuit. This step is crucial to prevent electrical shock or injury. To do this, locate the main electrical panel or breaker box in your home, usually found in the basement, garage, or utility room. Open the panel door and identify the circuit breaker or fuse that controls the circuit you're working on. Switch the breaker to the "off" position or remove the fuse from its socket. Verify that the power is off using a non-contact voltage tester, which will indicate if there's still electricity flowing to the circuit. If the tester lights up or beeps, it means the power is still on, and you need to double-check the breaker or fuse. Once you've confirmed the power is off, you can safely proceed with testing the fuse.
Remove the Old Fuse and Dispose of It
Here is the paragraphy: Once you have identified the blown fuse, it's essential to remove it carefully to avoid any damage or injury. Start by switching off the main electrical power supply to the circuit or the entire house, if necessary. Verify that the power is off using a non-contact voltage tester. Next, locate the blown fuse and grasp it firmly with a pair of needle-nose pliers or fuse pullers. Gently pull the fuse out of its holder, taking care not to touch any of the surrounding electrical components. If the fuse is stuck, do not force it, as this can cause damage to the holder or the surrounding wiring. Instead, use a fuse puller or consult a licensed electrician for assistance. Once the old fuse is removed, dispose of it properly. Do not attempt to reuse a blown fuse, as this can lead to a fire hazard or electrical shock. Wrap the old fuse in a non-conductive material, such as electrical tape or a plastic bag, and discard it in a safe location. Never touch electrical components or wiring with your bare hands, as this can cause injury or death. Always follow proper safety protocols when working with electrical systems.
Install a New Fuse with the Same Rating
When replacing a fuse, it's essential to install a new one with the same rating as the old one. This ensures that the electrical system operates safely and efficiently. The rating of a fuse is indicated by its amperage and voltage values, which are usually printed on the fuse itself or on the packaging. To install a new fuse with the same rating, start by identifying the amperage and voltage values of the old fuse. Then, purchase a replacement fuse that matches these values exactly. Installing a fuse with a higher or lower rating can lead to electrical shock, fires, or damage to appliances. For example, if a 15-amp fuse is replaced with a 20-amp fuse, it may not blow when it should, allowing excessive current to flow and potentially causing a fire. On the other hand, installing a 10-amp fuse in place of a 15-amp fuse may cause it to blow unnecessarily, leading to frequent replacements and inconvenience. Therefore, it's crucial to choose a replacement fuse with the same rating as the original to ensure safe and reliable operation of the electrical system.