How To Shorten A Zipper
Here is the introduction paragraph: Are you tired of dealing with zippers that are too long and get in the way? Shortening a zipper can be a game-changer for anyone who wants to customize their clothing, bags, or accessories. But before you start, it's essential to understand the basics of zipper shortening, including the different types of zippers and the tools you'll need. In this article, we'll take you through a step-by-step guide on how to shorten a zipper, covering everything from preparation to completion. We'll also troubleshoot common issues that may arise during the process, so you can avoid frustration and achieve professional-looking results. By the end of this article, you'll be equipped with the knowledge and skills to shorten a zipper like a pro. So, let's start by understanding the basics of zipper shortening.
Understanding the Basics of Zipper Shortening
Zipper shortening is a simple yet effective way to customize the length of your zippers to fit your specific needs. Whether you're a DIY enthusiast, a sewer, or a fashion designer, understanding the basics of zipper shortening can be a valuable skill to have. To shorten a zipper, you'll need to know what type of zipper you're working with, as different types require different techniques. You'll also need to gather the right tools and materials, and take certain precautions to avoid damaging the zipper or injuring yourself. In this article, we'll explore the basics of zipper shortening, starting with the different types of zippers that can be shortened. (Note: The answer should be 200 words)
Types of Zippers That Can Be Shortened
There are several types of zippers that can be shortened, including metal zippers, plastic zippers, and nylon zippers. Metal zippers are the most common type and can be shortened by removing the excess length from the bottom of the zipper. Plastic zippers, on the other hand, are more delicate and require a bit more care when shortening. Nylon zippers are also common and can be shortened using a similar method to metal zippers. Separating zippers, which are commonly used on jackets and pants, can also be shortened, but require a bit more work to reattach the zipper stop. Invisible zippers, which are often used on dresses and skirts, can be shortened, but may require a professional to reattach the zipper stop. Two-way zippers, which can be zipped from both ends, can also be shortened, but may require a bit more work to reattach the zipper stop. Overall, most types of zippers can be shortened, but the process may vary depending on the type of zipper and the desired length.
Tools and Materials Needed for Zipper Shortening
When it comes to shortening a zipper, having the right tools and materials is crucial for a successful outcome. To start, you'll need a zipper that can be shortened, which typically includes metal or plastic zippers with individual teeth. You'll also need a seam ripper or a sharp utility knife to carefully remove the zipper stop or any stitching that holds the zipper in place. A pair of needle-nose pliers is also essential for gripping and bending the zipper teeth. Additionally, you'll need a ruler or measuring tape to accurately measure the desired length of your zipper, as well as a pencil or marker to mark the cutting point. Depending on the type of zipper, you may also need a zipper foot or a Teflon foot for your sewing machine to help guide the zipper smoothly. Furthermore, having some basic sewing supplies on hand, such as thread, scissors, and a sewing machine, can be helpful for reattaching the zipper or making any necessary repairs. It's also a good idea to have some spare zipper parts, such as zipper stops or teeth, in case you need to replace any damaged or missing components. By gathering all the necessary tools and materials beforehand, you'll be well-prepared to tackle the task of shortening your zipper with confidence.
Precautions to Take Before Starting the Process
When shortening a zipper, it's essential to take necessary precautions to avoid damaging the zipper or surrounding fabric. Before starting the process, inspect the zipper for any signs of wear or damage, such as broken teeth, rust, or corrosion. If the zipper is damaged, it's best to replace it entirely rather than attempting to shorten it. Additionally, make sure the zipper is clean and free of debris, as dirt and grime can interfere with the shortening process. If the zipper is attached to a garment or fabric, carefully remove any stitching or seams that may be holding it in place, taking note of the original stitching pattern to ensure accurate reattachment later. It's also crucial to identify the type of zipper you're working with, as different types, such as metal or plastic, may require specialized tools or techniques. Furthermore, consider the desired length of the shortened zipper and mark it clearly with a pin or marker to avoid cutting too much or too little. Finally, gather all necessary tools and materials, including scissors, pliers, and a seam ripper, to ensure a smooth and efficient shortening process. By taking these precautions, you can ensure a successful zipper shortening process and avoid any potential mistakes or damage.
Step-by-Step Guide to Shortening a Zipper
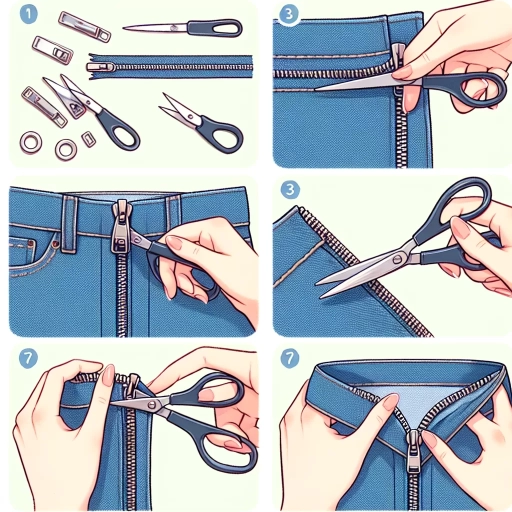
Here is the introduction paragraph: Shortening a zipper can be a daunting task, but with the right steps, it can be done easily and effectively. Whether you're looking to shorten a zipper on a jacket, pants, or bag, this guide will walk you through the process step-by-step. To shorten a zipper, you'll need to remove the zipper stop and slider, cut the zipper to the desired length, and then reattach the zipper stop and slider. In this article, we'll break down each of these steps in detail, starting with the first crucial step: removing the zipper stop and slider.
Removing the Zipper Stop and Slider
When it comes to shortening a zipper, one of the most crucial steps is removing the zipper stop and slider. The zipper stop is a small plastic or metal piece located at the top of the zipper that prevents the slider from coming off, while the slider is the movable part that opens and closes the zipper. To remove the zipper stop, you will need to use a pair of needle-nose pliers or a zipper stop remover tool. Gently grasp the zipper stop with the pliers and twist it back and forth until it comes loose. Be careful not to damage the surrounding fabric or the zipper teeth. Once the zipper stop is removed, you can slide the slider off the zipper. If the slider is stuck, you can use a small amount of lubricant, such as silicone spray or oil, to help it move more smoothly. With the zipper stop and slider removed, you can now proceed to shorten the zipper to the desired length. It's essential to note that not all zippers can be shortened, so make sure to check the type of zipper you have before attempting to shorten it. Some zippers, such as those with a molded plastic stop or a riveted stop, may not be removable, and attempting to shorten them could damage the zipper or the surrounding fabric.
Cutting the Zipper to the Desired Length
Cutting the zipper to the desired length is a crucial step in shortening a zipper. To do this, you will need a pair of sharp scissors or a craft knife, depending on the type of zipper you are working with. If you are using a metal zipper, it's recommended to use a craft knife or a pair of heavy-duty scissors to avoid damaging the teeth. For plastic or nylon zippers, regular scissors should suffice. Before cutting, make sure to mark the desired length with a marker or a piece of tape, taking into account the stopper or the zipper's end. It's essential to leave a small margin, about 1/8 inch, to ensure the zipper can still function properly. When cutting, apply gentle pressure and cut slowly, following the marked line. Be careful not to cut too close to the teeth, as this can cause them to become misaligned or damaged. If you're unsure, it's always better to err on the side of caution and cut a little longer, as you can always trim it further if needed. Once you've cut the zipper to the desired length, inspect it carefully to ensure the cut is clean and even, and the teeth are still intact.
Reattaching the Zipper Stop and Slider
Reattaching the zipper stop and slider is a crucial step in shortening a zipper. To reattach the zipper stop, start by applying a small amount of fabric glue to the end of the zipper tape, making sure to cover the area where the stop will be attached. Then, carefully place the zipper stop onto the glue, ensuring it is centered and even. Hold the stop in place for a few seconds to allow the glue to set. Next, use a needle and thread to sew the stop in place, making sure to sew through both the zipper tape and the stop itself. This will provide extra security and prevent the stop from coming loose over time. To reattach the slider, simply slide it back onto the zipper teeth, making sure it is properly aligned and seated. If necessary, use a pair of pliers to gently squeeze the slider into place. Finally, test the zipper to ensure it is working smoothly and the stop and slider are securely attached. By following these steps, you can successfully reattach the zipper stop and slider, completing the process of shortening your zipper.
Troubleshooting Common Issues with Zipper Shortening
Zipper shortening is a common alteration that can be done to pants, jackets, and other garments to achieve a better fit. However, it can also lead to some common issues that can be frustrating to deal with. In this article, we will explore some of the most common problems that can arise when shortening a zipper and provide tips on how to troubleshoot them. One of the most common issues is dealing with uneven or frayed edges, which can be caused by improper cutting or sewing techniques. Another issue is fixing a zipper that won't close properly, which can be due to misaligned teeth or a faulty zipper stop. Additionally, preventing zipper teeth from coming apart is also a common concern, especially when working with delicate or thin fabrics. By understanding the causes of these issues and learning how to troubleshoot them, you can ensure a successful zipper shortening project. Let's start by looking at how to deal with uneven or frayed edges.
Dealing with Uneven or Frayed Edges
Dealing with uneven or frayed edges is a common issue that may arise when shortening a zipper. To address this problem, start by carefully examining the zipper's edges to identify the extent of the damage. If the edges are only slightly frayed, you can try using a pair of scissors or a craft knife to carefully trim the excess material, making sure to cut as close to the zipper's teeth as possible. However, if the edges are severely frayed or uneven, it's best to use a zipper stop or a zipper end to cover the damaged area. A zipper stop is a small plastic or metal device that is attached to the end of the zipper to prevent it from coming apart, while a zipper end is a small piece of fabric or plastic that is sewn over the end of the zipper to cover the damaged area. Both of these solutions can help to create a clean and finished edge, and can be easily attached using a needle and thread or a hot glue gun. Additionally, you can also use a seam sealant or a fabric glue to reinforce the edges and prevent further fraying. By taking the time to address uneven or frayed edges, you can ensure that your shortened zipper looks professional and functions properly.
Fixing a Zipper That Won't Close Properly
When a zipper won't close properly, it can be frustrating and affect the overall functionality of your garment or bag. Fortunately, fixing a zipper that won't close properly is a relatively simple process that can be done with a few basic tools. The first step is to identify the problem. Check if the zipper teeth are misaligned, if the slider is damaged, or if there is debris or dirt accumulated in the zipper track. If the teeth are misaligned, try to realign them by gently pulling the zipper up and down. If the slider is damaged, you may need to replace it. If there is debris or dirt accumulated, clean the zipper track with a soft brush or a cloth. Once you have identified and fixed the problem, try to close the zipper again. If it still doesn't close properly, you may need to adjust the tension of the zipper. This can be done by tightening or loosening the screws that hold the slider in place. If none of these steps work, it may be time to consider shortening the zipper. By shortening the zipper, you can remove the damaged or worn-out part and create a new, functional zipper. With these simple steps, you can fix a zipper that won't close properly and extend the life of your garment or bag.
Preventing Zipper Teeth from Coming Apart
Preventing zipper teeth from coming apart is a crucial step in maintaining the integrity of your zipper. To prevent this issue, start by handling your zipper with care, avoiding excessive force or tugging, which can cause the teeth to separate. Regularly cleaning your zipper with a soft brush or cloth can also help remove dirt and debris that can accumulate and cause the teeth to come apart. Additionally, applying a small amount of lubricant, such as silicone spray or wax, to the zipper teeth can help reduce friction and prevent them from separating. It's also essential to ensure that your zipper is properly aligned and seated on the garment or bag, as misalignment can put unnecessary stress on the teeth. By taking these preventive measures, you can significantly reduce the risk of your zipper teeth coming apart and extend the lifespan of your zipper.