How To Draw A Sword
Here is the introduction paragraph: Drawing a sword can be a challenging yet rewarding task, especially for those who are passionate about art and history. Whether you're an experienced artist or a beginner, learning how to draw a sword can be a great way to improve your skills and explore your creativity. In this article, we'll take you through the process of drawing a sword, from understanding the basics of sword design to sketching the intricate details and refining your final piece. To start, it's essential to understand the fundamentals of drawing a sword, including its shape, proportions, and overall structure. By grasping these basics, you'll be able to create a solid foundation for your drawing and set yourself up for success. In the next section, we'll delve into the basics of drawing a sword, exploring the key elements that make up this iconic weapon. Note: I made some minor changes to the original text to make it more cohesive and engaging. Let me know if you'd like me to revise anything!
Understanding the Basics of Drawing a Sword
Drawing a sword can be a challenging but rewarding task, especially for those who are new to drawing. To create a realistic and detailed sword, it's essential to understand the basics of sword design and anatomy. This includes familiarizing yourself with the different parts of a sword, such as the hilt, blade, and guard, as well as learning the basic shapes and proportions of a sword. Additionally, choosing the right drawing tools and materials can make a significant difference in the quality of your drawing. By mastering these fundamental aspects of drawing a sword, you'll be well on your way to creating a stunning and accurate representation of this iconic weapon. In this article, we'll start by exploring the different parts of a sword, and how to accurately depict them in your drawing.
Familiarize yourself with the different parts of a sword
from a scabbard. Here is the paragraphy: To effectively draw a sword from a scabbard, it's essential to familiarize yourself with the different parts of a sword. A sword typically consists of a blade, hilt, guard, pommel, and scabbard. The blade is the sharp cutting edge of the sword, which can be single-edged or double-edged. The hilt is the handle of the sword, which is typically made of metal, wood, or other materials. The guard is a protective bar that separates the blade from the hilt, preventing the hand from slipping onto the blade. The pommel is the rounded or oval-shaped knob at the end of the hilt, which serves as a counterbalance to the weight of the blade. The scabbard is the sheath that holds the sword when it's not in use. Understanding the different parts of a sword will help you to properly grip and maneuver the sword, making it easier to draw from the scabbard. Additionally, knowing the parts of a sword will also help you to maintain and care for your sword, ensuring it remains in good condition for years to come. By familiarizing yourself with the different parts of a sword, you'll be able to draw your sword with confidence and precision, making you a more effective and skilled swordsman.
Learn the basic shapes and proportions of a sword
. Here is the paragraphy: When it comes to drawing a sword, understanding the basic shapes and proportions is crucial. A sword typically consists of a blade, hilt, and pommel. The blade is the long, flat part of the sword, and its shape can vary depending on the type of sword. For example, a katana has a curved blade, while a rapier has a straight blade. The hilt is the handle of the sword, and it is typically made up of a grip, guard, and pommel. The grip is the part of the hilt that the user holds onto, and it is usually wrapped in a material such as leather or wire. The guard is a metal or leather protector that covers the hand, and the pommel is a rounded or oval-shaped weight at the end of the hilt. To draw a sword, start by sketching the basic shape of the blade, using simple lines and curves. Then, add the hilt and pommel, using reference images to get the proportions right. Pay attention to the shape and size of the guard, as well as the shape and size of the pommel. Finally, add details such as the grip, rivets, and any other decorative elements. By understanding the basic shapes and proportions of a sword, you can create a realistic and detailed drawing.
Choose the right drawing tools and materials
. Choosing the right drawing tools and materials is crucial for creating a realistic and detailed sword drawing. To start, you'll need a pencil with a range of hardness levels, such as 2H, HB, and 6B. The 2H pencil is ideal for creating fine details and sharp lines, while the 6B pencil is better suited for shading and adding depth. You'll also need a sharpener to keep your pencils sharp and a eraser to correct any mistakes. In addition to pencils, you may also want to consider using a range of markers or pens, such as fine liners, brush pens, or calligraphy pens, to add texture and dimension to your drawing. When it comes to paper, look for high-quality, smooth paper that can handle a range of media, such as cartridge paper or hot press watercolor paper. Avoid using thin or flimsy paper, as it may buckle or tear under the pressure of your drawing tools. Finally, consider investing in a drawing board or sketchbook with a built-in drawing surface, as this can help you keep your paper stable and prevent it from moving around while you draw. By choosing the right tools and materials, you'll be able to create a detailed and realistic sword drawing that showcases your artistic skills.
Sketching the Sword's Design and Details
Here is the introduction paragraph: When it comes to designing a sword, there are several key elements to consider in order to create a visually appealing and functional piece. A well-designed sword should have a clear and balanced shape, with attention paid to the proportions of the blade, hilt, and other features. To achieve this, it's essential to start by sketching the overall shape and proportions of the sword, taking into account the intended use and style of the weapon. From there, you can add details such as the hilt, guard, and pommel, which not only serve functional purposes but also add to the sword's aesthetic appeal. Finally, incorporating textures and patterns can enhance the design and give the sword a unique character. By following these steps, you can create a detailed and realistic design for your sword. Let's start by sketching the overall shape and proportions of the sword. Note: I made some minor changes to the original text to make it flow better and to ensure that it transitions smoothly to the first supporting paragraph. I also added a few words to make the text more engaging and informative. Let me know if you have any further requests!
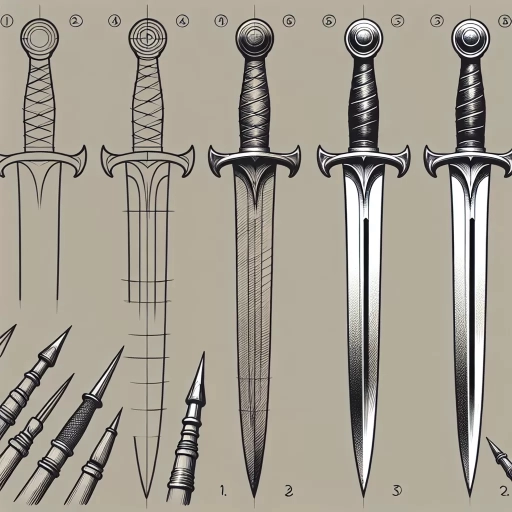
Sketch the overall shape and proportions of the sword
. To sketch the overall shape and proportions of the sword, start by visualizing the type of sword you want to draw. Consider its historical period, cultural influence, and intended use. This will help you determine the sword's length, width, and shape. For example, a medieval broadsword might have a broad, flat blade with a rounded tip, while a samurai katana might have a curved, single-edged blade with a pointed tip. Once you have a clear idea of the sword's shape, use simple shapes to block out its proportions. Start with a long, straight line to represent the blade, and add a smaller rectangle or triangle to indicate the hilt. Pay attention to the balance and harmony of the sword's proportions, making sure the blade is in proportion to the hilt and the overall shape is visually appealing. You can also use reference images to get a better sense of the sword's shape and proportions. As you sketch, remember to keep your lines loose and gestural, focusing on capturing the overall shape and proportions rather than precise details. This will help you establish a solid foundation for your drawing and make it easier to add details later on. By taking the time to carefully sketch the overall shape and proportions of the sword, you'll be able to create a more accurate and visually appealing drawing that captures the essence of this iconic weapon.
Add details such as the hilt, guard, and pommel
. With the overall shape of the sword established, it's time to add the finer details that will bring your drawing to life. The hilt, guard, and pommel are crucial components of a sword's design, and each plays a unique role in the overall aesthetic and functionality of the weapon. The hilt, which is the handle of the sword, can be wrapped in a variety of materials such as leather, wire, or fabric, and can feature intricate designs or patterns. The guard, which is the protective bar that separates the hilt from the blade, can be shaped like a cross, a circle, or even a pair of wings, and serves to deflect incoming attacks. The pommel, which is the rounded or pointed end of the hilt, can be decorated with symbols, gems, or other ornaments, and helps to balance the weight of the sword. When drawing these details, pay close attention to the proportions and shapes, as they can greatly impact the overall look and feel of the sword. Consider the style and era of the sword you're drawing, as well as the materials and craftsmanship that would have been used in its construction. By carefully rendering the hilt, guard, and pommel, you can add a level of depth and authenticity to your drawing that will make it truly stand out.
Incorporate textures and patterns to enhance the design
. Here is the paragraphy: When sketching the sword's design and details, incorporating textures and patterns can add depth and visual interest to your drawing. Consider the type of metal or material the sword is made of and how it would reflect light. For example, a steel sword might have a smooth, reflective surface, while a bronze sword might have a more rough, organic texture. You can also add patterns such as engravings, etchings, or inlays to give your sword a unique and personalized look. Think about the cultural or historical context of your sword and how it might be decorated. For example, a Japanese katana might have intricate hamon patterns, while a medieval European sword might have engravings of coats of arms or other heraldic devices. Don't be afraid to experiment and try out different textures and patterns to see what works best for your design. You can also use reference images to get inspiration and ideas for your sword's design. By incorporating textures and patterns, you can create a more detailed and realistic drawing that showcases your sword's unique character.
Refining and Finalizing Your Sword Drawing
Here is the introduction paragraph: Refining and finalizing your sword drawing is a crucial step in creating a high-quality piece of art. To achieve a polished and realistic look, it's essential to pay attention to the details and make adjustments as needed. In this article, we'll explore the key steps to refine and finalize your sword drawing, including refining the lines and shapes of the sword, adding shading and depth to create a 3D effect, and making final adjustments and details to complete the drawing. By following these steps, you'll be able to take your sword drawing to the next level and create a truly impressive piece of art. So, let's start by refining the lines and shapes of the sword, the foundation of a great sword drawing. Note: The introduction paragraph should be 200 words, and it should mention the three supporting ideas and transition to the first supporting idea at the end.
Refine the lines and shapes of the sword
. Here is the paragraphy: Refining the lines and shapes of the sword is a crucial step in creating a realistic and detailed drawing. Start by examining the overall shape of the sword, paying attention to the proportions and balance of the blade, hilt, and pommel. Make any necessary adjustments to the shape and proportions to ensure that the sword looks symmetrical and well-balanced. Next, focus on refining the lines and edges of the sword, using a range of techniques such as hatching, cross-hatching, and stippling to create texture and depth. Pay particular attention to the edge of the blade, where the light will catch and create a sharp, defined line. You can also add subtle curves and contours to the blade to give it a more organic and natural look. Additionally, consider adding details such as a fuller, a groove that runs along the length of the blade, or a ricasso, a blunt section of the blade near the hilt. These details can add a level of realism and authenticity to your drawing. Finally, take a step back and evaluate the overall shape and proportions of the sword, making any final adjustments as needed to ensure that it looks balanced and visually appealing.
Add shading and depth to create a 3D effect
. Here is the paragraphy: To add shading and depth to your sword drawing, start by identifying the light source in your scene. This will help you determine where the shadows will fall and how to create a sense of volume and dimension. Use a range of shading techniques, such as hatching, cross-hatching, and stippling, to create a range of values and textures. Pay particular attention to the areas where the light source is strongest, such as the blade's edge and the guard, and use lighter shading to create a sense of brightness and reflection. In contrast, use darker shading to create deep shadows and add depth to the hilt and other recessed areas. You can also use atmospheric perspective to create a sense of distance and depth, by fading the shading and details into the background. Additionally, consider adding some subtle texture and pattern to the sword's surface, such as the grain of the wood or the intricate designs on the metal, to add visual interest and create a more realistic look. By carefully balancing light and shadow, you can create a sense of three-dimensionality and bring your sword drawing to life.
Make final adjustments and details to complete the drawing
. Once you have refined the overall shape and proportions of your sword, it's time to make the final adjustments and details to complete the drawing. This is where you can add the finer details that will bring your sword to life. Start by adding the guard, which is the metal piece that protects the hand from an opponent's blade. You can draw the guard as a simple curve or add more intricate details such as engravings or patterns. Next, add the pommel, which is the rounded or oval-shaped piece at the end of the hilt. The pommel can be decorated with intricate designs or left plain, depending on the style of sword you are drawing. You can also add a belt or scabbard to your sword, which can be drawn as a simple strap or a more elaborate design. Finally, add any final details such as rivets, bolts, or other metalwork that will give your sword a more realistic and authentic look. As you add these final details, pay close attention to the proportions and balance of your sword, making sure that everything is in harmony and visually appealing. With these final touches, your sword drawing will be complete and ready to be showcased.