How To Take Shellac Off At Home Without Acetone
 Dispelling the myths around shellac manicures and introducing foolproof home-based removal methods is the key focus of this insightful article, designed to leave you feeling like a nail care pro. We delve into the world of shellac manicures, presenting a clear and comprehensive insight into their durability and unrivaled beauty. More importantly, we debunk the common misconception that acetone is the only solution to strip off this glossy charm. Despite its reputation, removing shellac at home can be done not only safely but also efficiently, using alternative methods. We walk you through each step, using commonly found household items, while giving paramount importance to the health of your nails. As a bonus, we wouldn't leave you hanging after the removal process. We've devoted special attention to crafting a guide on post-removal care and maintenance, offering invaluable tricks and tips to keep your nails healthy and vibrant. Let's embark on this nail care journey, starting with an understanding of what shellac manicures are and uncovering the secret behind their notable durability.
Understanding Shellac Manicures and Their Durability
Understanding Shellac Manicures and Their Durability is a trending topic among style-conscious individuals in search of a long-lasting nail polish solution. In this comprehensive article, we are about to explore three critical aspects of Shellac Manicures. Firstly, we will delve into the composition and benefits of Shellac Manicures, where you will discover the unique components and advantages that make it a game-changer in the nail industry. Then, we will discuss the long-lasting nature of Shellac Manicures, revealing why they have revolutionized the durability of nail enhancements. Finally, we will explore why removal of Shellac Manicures can be challenging without the use of acetone, an important piece of information for those venturing into using this fabulous product. This opening discourse should set the stage for an illuminating dip into the first area of focus: The Composition and Benefits of Shellac Manicures. Bear with us as we plunge into the fabulous world of Shellac and unravel the mysteries of its durability. Every nugget of knowledge you gain from this dive is guaranteed to arm you with the sophistication that comes with Shellac Manicures.
The Composition and Benefits of Shellac Manicures
Shellac manicures have revolutionized the beauty industry due to their composition and benefits that stand out among other types of nail treatments. Predominantly, Shellac manicures are extensively admired for their unique blend of ingredients, which contribute to their long-lasting and high-gloss finish. The composition is a hybrid of regular nail polish and UV gel polish, creating a superior, protective layer that significantly minimizes chipping and peeling, common problems associated with traditional manicures. It contains a photo-initiator component that triggers the curing process under the UV lamp, converting the liquid shellac polish into a shiny, solid film. One of the main benefits of a shellac manicure is its durability, ensuring nails look immaculate for up to two weeks or even longer, depending on individual nail growth and care. Unlike conventional nail polish that loses its shine and starts chipping within a few days, shellac manicures maintain their lustre and strength throughout the wear time. This becomes particularly advantageous for individuals with a busy lifestyle who have little to no time for frequent salon visits. It is also an excellent choice for those wanting to grow their natural nails, as the hard shellac layer provides a protective shield against breakage. Furthermore, the application process of shellac manicures is gentle and does not damage the natural nail bed. Unlike acrylic or hard gels, shellac does not require roughing up the nail surface for application. This helps maintain the health and integrity of your natural nails while giving them a glamorous finish. Additionally, the removal process, when done correctly, causes minimal harm to your nails. Moreover, the potential for customization with shellac manicures is vast – from opaque colors to sheer hues, shimmer and glitter to classy French tips. Such diversity enables a person to express their individuality through their manicure, thereby enhancing their overall aesthetic appeal. In conclusion, the composition and benefits of shellac manicures boil down to lasting durability, superior finish, nail protection, wide range of design possibilities, and minimal damage to the nail bed. This blend of advantages makes shellac manicures a popular choice among nail enthusiasts and an influential trend in the beauty sector.
The Long-lasting Nature of Shellac Manicures
Shellac manicures, known for their longevity and glossy finish, are considered a revolutionary development in the nail care industry. Opting for a shellac manicure means choosing a nail treatment that can withstand daily rigors for up to two entire weeks, or even more if properly maintained. Their staying power is due to a unique formulation which is a hybrid of traditional nail lacquer and gel polish - shellac. This blend is the secret to shellac nail polish's unfaltering durability. It works in synergy with UV light during application to create an incredibly resilient coat on nails. The use of UV light acts as a curing or hardening agent, responding with the chemicals in the shellac to produce what has been aptly named a ‘power polish.’ The result is a chip-resistant armor that can maintain its high-gloss finish for an impressively lengthy period, making shellac manicures an ideal solution for those seeking lasting beauty without daily upkeep. Moreover, shellac manicures not only excel in longevity but also in maintaining the health of your nails. Unlike traditional nail lacquers, shellac doesn’t require vigorous filing or buffing prior to application, minimizing damage to your natural nails. This is a crucial aspect of shellac’s durability, as the preservation of nail health ultimately leads to a more enduring manicure. Furthermore, the meticulous application process that shellac involves contributes to its long-lasting nature. The process includes several carefully layered coats - base, color, and top - with a meticulous curing time under UV light in between. This allows each layer to form a strong bond with the one below, creating a robust barrier that protects against chips and breaks. Yet, despite this toughness, shellac can be easily removed at home without acetone, further testifying to its practicality and appeal. In summary, the long-lasting nature of shellac manicures is a result of innovative chemical formulation and a uniquely thorough application technique. Delivered with the joint promise of durability and nail health preservation, shellac manicures fulfill the aspiration of time-bound individuals for consistently beautiful and low-maintenance nails.
Why Removal can be Challenging without Acetone
Embarking on the process of shellac removal without the commonly used chemical - acetone can undoubtedly be a challenging feat. This daunting task arises from the inherent properties of shellac manicures, known for their remarkable durability. A fundamental aspect that contributes to the longevity of shellac manicures is the unique formulation of its base. The polymer structure of shellac is inherently resistant to wear and tear, effectively preventing natural disintegration. This extraordinary resilience is a distinctive advantage, granting your nails a flawless finish for up to 14 days. However, this is simultaneously the reason why shellac removal can be a complex process, particularly without acetone. Acetone, a potent, universal solvent, is capable of penetrating and breaking down the robust shellac structure. It functions by infiltrating the complicated polymer chains within the shellac, causing it to weaken and eventually peel off from the nail surface. Removing shellac without acetone involves combating this chemically-tightened bond, which, by no means, is a breeze. Therefore, the absence of this powerful solvent undeniably presents a challenge. Without the mighty acetone, the removal process requires an extensive amount of patience and caution. A common alternative approach is mechanical removal, which involves careful filing down of the shellac layer. Yet, this method holds potential risks, as improper or aggressive filing can cause significant damage to the natural nail bed. Meanwhile, using alternative solvents or home remedies, while less aggressive, might not provide desired results, hence, extending the process further, leading to frustration and potential mishap. However, though the task may seem monumental, it is not entirely impossible to remove shellac without acetone. It requires meticulous technique, right resources, and a great deal of patience, transforming shellac removal into an intricate art in its own right. The key is to find a delicate balance, a method effective enough to disintegrate the enduring shellac, yet gentle enough not to inflict damage on the natural nail. Demonstrating an understanding of shellac manicures and their durability elevates the need for a suitable removal process. While resorting to acetone might present an expedited solution, exploring various ways around it can also offer successful removal without resorting to harsh chemicals, thus proving why removal can be challenging without acetone, yet feasible.
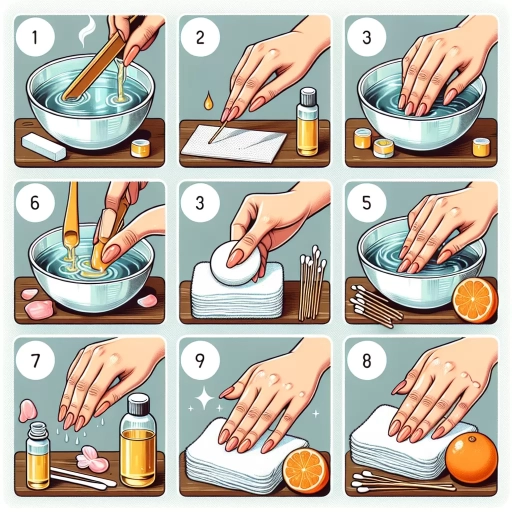
Alternative Methods for Safely Removing Shellac at Home
Engaging in home-based remedies for shellac removal has become increasingly popular, especially amidst the global health crisis, which limited access to salons. Such remedies offer the perfect blend of convenience, effectiveness, and safety. This article focuses on three key aspects: the use of common household chemicals, physical removal techniques, and the role of hydration in shellac removal. Each aspect is comprehensively elaborated to ensure you undertake this task safely and efficiently at home. Household chemicals such as acetone and vinegar, surprisingly, have proven to be quite effective in shellac removal. This effectiveness stems from their ability to break down the shellac's chemical structure, providing a quick and easy process. Broadening this discussion, we delve deep into the realm of household chemicals, looking at not only their effectiveness but also their safety and accessibility from an average homeowner's perspective. This comprehensive examination of common household chemicals used for shellac removal marks a starting point for our journey into the realm of DIY nail care.
Use of Other Common Household Chemicals
Other common household chemicals can also be employed in safely removing shellac at home, offering an alternative to using acetone. This offers users a breadth of options, allowing them to choose applications based on personal settings, availability, or sensitivity to certain substances. One example of these alternatives is rubbing alcohol or isopropyl alcohol, which, at 91%, is a highly effective solvent. The application method is similar to that of acetone. First, users need to douse a ball of cotton in alcohol, then place it on top of your shellac-covered fingernails, securing it with aluminum foil for a few minutes to soften the shellac layer. Afterward, the shellac comes off easily with a gentle scrub. However, just like other strong solvents, isopropyl alcohol can dry out your skin, so it is recommended to moisturize the hands after. Another common household item that can be used is vinegar, an acetic acid solution, mixed with lemon juice, a citric acid source. Combined, they provide the mild acidity needed to break down the shellac polish without extensively harming your skin and nails. To apply, heat the vinegar-lemon mixture in a bowl until it's comfortably warm and then soak your nails for about 20 to 30 minutes. The shellac should peel off afterward. Hydrogen peroxide combined with hot water can also be applied. This method takes longer, requiring about an hour of soaking, but it tends to be gentler on the skin. The mixture needs to be hot but comfortable to touch. Hydrogen peroxide is a more delicate solution, therefore it won't dry out or damage the skin and nails as much as stronger solvents like acetone or alcohol. Yet another option is toothpaste, preferably one that contains baking soda. The alkalinity of the baking soda along with the minor abrasive quality of toothpaste can help remove the shellac polish. Putting a thick layer of toothpaste on the nails and leaving it on for about ten minutes should allow the polish to be scrubbed off. Using these common household chemicals can be a safer, more skin-friendly way of removing shellac at home without resorting to acetone. However, these alternatives may require longer application times or more repetitive applications to achieve the desired result. Nonetheless, opting for these methods contributes to a less harmful, more natural approach to nail care. Each of these methods should be followed up with a good hand and nail moisturizer to replenish any lost moisture and the skin's natural oils.
Physical Removal Techniques for Shellac
Physical removal techniques present a viable alternative for safely removing shellac at home without using acetone. A popular method involves using a buffer or a nail file to gently abrade the shellac layer. It's important to be careful during this process and ensure just the glossy top layer is removed, as overdoing it can potentially harm the natural nail. Once you've carefully created a roughened surface area, this allows subsequent treatments to penetrate the shellac more easily. An additional approach is the use of dental floss or an orange stick to carefully lift the shellac coating. As you run either tool under the edge of the shellac, you can gently raise it off the nail bed. This technique calls for delicate handling so as to avoid causing any unintentional injury to the nail bed or cuticle. Another physical removal method incorporates hot water. Simply soaking your nails in hot (not boiling) water can expedite the removal process. The warmth aids in softening the shellac, making it easier to peel off with minimal damage to the underlying nail. Immersing your nails for 15-20 minutes followed by gently pushing the shellac off with an orange stick can result in effective and safe removal. All of these physical removal techniques for shellac are viable alternatives for those wary of using acetone, with its associated dryness and potential impact on nail health. These methods empower individuals to safely carry out shellac removal processes at home, focusing on maintaining their nail wellbeing. However, correct execution and a delicate touch are crucial to preventing damage during these shellac removal techniques.
The Role of Hydration in Shellac Removal
The Role of Hydration in Shellac Removal is a crucial factor that demands equal consideration as other methods of shellac removal at home. Hydration is not just essential for maintaining the health and vitality of your nails, but it also plays an instrumental role in the safe removal of shellac nail polish, reducing the inherent risks of damage to the nails and the surrounding skin. When nails are sufficiently hydrated, it aids in preventing them from peeling, cracking, or becoming excessively dry post shellac removal. By incorporating hydration within your shellac removal session, you create a safer and more effective home-based solution. You can start by immersing your fingers in warm water - a mini manicure bowl or even a basic bowl will suffice. The warmth from the water helps to soften the shellac polish making it easier to peel off, while the water itself helps to hydrate the nails. But the process doesn't stop there. Applying a rich, hydrating cream or oil to your nails post shellac removal is a key step. This fundamental practice replaces any lost moisture, ensuring the nail bed remains nourished and healthy. Olive oil, Vitamin E oil, or even a thick emollient cream, ensure that your nail doesn't just recover from the potential dryness caused during the shellac removal process, but also helps strengthen it for future applications. Leverage the repair and healing properties of such essential oils or creams to give your nails a much-deserved pampering session. Believe it or not, even your dietary habits influence nail hydration. Consuming water-rich fruits and vegetables and drinking ample water daily also amplify your hydration quotient from within. Since nail health is a reflection of your overall health, taking steps to ensure overall hydration can result in stronger, healthier nails. Bringing hydration into the equation while discussing shellac removal at home signals a step towards a comprehensive, well-rounded approach to nail care. It’s all about utilizing what nature offers us and turning it into a gentle, yet powerful aid for safe shellac removal. By exploring this method, you can enjoy the glam of shellac manicures without fearing extensive nail damage later on. In conclusion, hydration plays a significant role, not just for maintaining the general health of your nails, but also during the shellac removal process. It not only assists in easy peel-offs but also combats the after-effects of shellac removal, namely excessive dryness. So, the next time you think about removing your shellac nail polish at home, remember the power of hydration!
Post-Removal Care and Maintenance for Healthy Nails
Caring for your nails post-removal of nail treatments is a critical aspect of maintaining overall nail health. This comprehensive guide presents a plethora of information designed to educate on effective post-removal nail care, while maintaining the integrity of your nails. Delving into this vital topic, we will traverse through critical areas such as the importance of deep conditioning after shellac removal, actionable tips for strengthening nails post shellac removal, and expert-recommended nail care routines for robust, healthy nails. The focus is on maintaining nail health and preventing potential damage, resulting in beautiful and tough nails. Now, let us introduce you to the first significant step in post-removal nail care—deep conditioning. Often underestimated, deep conditioning can play a pivotal role in restoring the vitality of your nails after a shellac treatment. This process replenishes essential nutrients in your nails, counters dryness, and revives the healthy shine you love. Read on to learn more about the wonders of deep conditioning and how you can harness its benefits.
The Importance of Deep Conditioning after Shellac Removal
Deep conditioning is a critical step that cannot be underestimated in post-removal care and maintenance for healthy nails, especially after removing Shellac at home without the use of acetone. While acetone might effectively remove nail polish, it can often leave behind significant damage in the form of dry, brittle nails. And if you'd already adopted a non-acetone method, your nails will nevertheless have undergone the rigors of polish removal that can lead to similar nail conditions. This is where deep conditioning comes in, playing a critical role in replenishing essential moisture and nutrients to your nails. Imagine your nails going through a desert-like condition after shellac removal - deep conditioning is like the refreshing oasis they desperately need for restoration and revitalization. It works in three primary ways: to nourish, strengthen and protect your nails. Nutrition, in the form of vitamins and minerals, is essential in repairing any existing damage and promoting healthy nail growth. Deep conditioning treatments are typically packed with such vital nutrients, ensuring that your nails are fed with what they need. Much like how a good meal nourishes your body, deep conditioning feeds your nails with a hearty helping of the good stuff. Strength comes next, and it is at the heart of deep conditioning treatments. They work by penetrating the nail's surface to reinforce its natural structure, making your nails stronger from within. It is vital after shellac removal as it helps return your nails to their original strength levels. Imagine your nails as a fortress that's been slightly worn after a battle - Deep conditioning is the reinforcement brigade that quickly helps rebuild the walls, making them just as, if not more, robust than they were before. Lastly, protection is where deep conditioning moves beyond repair and proactively safeguards your nails against potential future damage. It accomplishes this by forming a protective barrier on the nail surface, shielding it from environmental aggressors and harmful daily practices that can cause nail breakage, spotting, or discoloration. In conclusion, the importance of deep conditioning after Shellac removal is manifold. Not only does it repair and replenish, it also effectively sets up a defensive line for your nails. Incorporating this into your post-removal nail care not only keeps your nails healthy and strong, but it also prepares them for their next rendezvous with paint and polish, ensuring that they always look and feel their best.
Tips for Nail Strengthening post Shellac Removal
Post-Removal Care and Maintenance for Healthy Nails is a significant aspect after successful removal of shellac from your nails without using acetone. The process leaves your nails vulnerable and compromised, making them susceptible to weakening and damage. However, you need not worry. With the right care and maintenance tips, you can regain your nail's strength and health. One of primary concerns to address after shellac removal is the strengthening of your nails. Our first tip is the consistent use of a high-quality nail hardener. This product helps fortify the nails by depositing minerals and vitamins that enhance and rebuild the nail structure. Remember, it's not about how quickly, but how well you restore your nails, so patience is a virtue in this process. Additionally, taking biotin supplements can offer a significant boost in your nail strengthening quest. As a Vitamin B complex, Biotin is renowned for improving the body's keratin infrastructure, promoting the growth and strength of hair and nails. However, before starting any supplementation, it's recommended to consult with a healthcare provider. Hydration is also key in maintaining robust nails. Regularly moisturizing your hands and nails will prevent peeling and splitting caused by dryness. Keep a good hand and nail cream nearby, especially after washing your hands, to ensure the nail bed and cuticles are sufficiently moisturized. Of course, a healthy diet cannot be overlooked in nail strengthening. Incorporate foods rich in protein, zinc, Vitamin E, and omega-3 fatty acids into your regular diet. Salmon, greens, eggs, and nuts are excellent choices for optimal nail health. Finally, while your nails are recovering, try to minimize the use of nail polish and artificial nails. These often contain harsh chemicals that can further weaken the nail structure. Opting for breathable, water-based polishes or going natural for a while can prove beneficial for your nails. In conclusion, post-shellac removal care and strengthening do not have to be complex. With the right tips and patient adherence to them, your nails can quickly regain and retain their health and strength.
Recommended Nail Care Routine for Maintaining Nail Health
Post-removal care and maintenance for healthy nails is crucial after safely removing your shellac at home, sans the acetone. The next step should be the implementation of a recommended nail care routine for maintaining optimal nail health. Preserving the vigor of your nails necessitates a vigilant strategy that incorporates daily, weekly, and monthly habits. Start with daily moisturizing. Your nails, much like your skin, require regular moisturization. Take a dime-sized dollop of any hand lotion or cuticle cream and massage it into your nails and cuticles. Make this routine as integral as brushing your teeth. Next, let’s focus on dietary improvements. For stronger nails, increase your biotin intake via foods rich in the vitamin, such as eggs, spinach, and sweet potatoes. This helps in nail thickness and hardness, research has emphasized. On a weekly basis, pamper your nails with a soak: a concoction of lukewarm water, a tsp of salt, a few drops of essential oils like lavender or olive, and a tablespoon of baking soda. This regimen not only ensures enhanced blood circulation around your nails but also aids in removing nail discoloration, making your nails look brighter. In addition, we suggest you invest in a glass nail file. Emery boards might be cheaper initially, but they wear down the edges of your nails, inadvertently causing breakage. Glass files seal the keratin layers at the edge of your nails, preventing any splits and chips. Monthly indulgence in a professional manicure is important too. Although maintenance can be done at home, an expert at a salon can ensure a meticulous cleanup preventing any cuticle damage or ingrown nails. Underpinning the entire routine, however, is the principle of minimalism. Your nails, especially post shellac removal, need time to recover. Avoid harsh nail products, and most importantly, let them breathe. Too many layers of polish, even if it's breathable, suffocate your nails, hindering their healthy regrowth. In sum, the goal is to holistically strengthen and fortify your nails. Implementing this recommended routine, you will note a marked improvement not only in the aesthetic appeal of your nails but also their resilience. A little commitment goes a long way in maintaining nail health, leaving them robust and ready for your favorite nail paint.