How To Draw A Rat
 Discovering how to draw a rat with the perfect blend of accuracy and creativity isn't as daunting as it may seem - it's all about nailing the fundamentals first! In this engaging guide, we delve into the fascinating world of drawing where every intricate detail matters. Our journey commences with understanding the importance of getting the basic shapes right when drawing a rat - the cornerstone of every great art piece. Then, we explore how to breathe life into your sketch by adding distinctive details specific to this small yet incredibly interesting mammal. Ultimately, the magic truly takes place when we give dimension to our artworks through the clever use of shading and shadows. Sharpen those pencils, prepare your erasers, and let's embark on this riveting artistic journey, beginning with the crucial aspect of getting the basic shapes right in a rat's drawing.
The Importance of Getting the Basic Shapes Right When Drawing a Rat
Understanding the importance of getting the basic shapes right when drawing a rat is crucial not only to enhance your artistic skillset but also to capture the natural essence of this agile creature. This article will take you on an informative journey to dissect the fundamentals of rat drawings: the anatomy, the structure, and the precision. The first stop on this journey will orientate you with the intriguing anatomy of a rat. You'll learn the different parts of a rat's body and how these components add up to make a unified, realistic depiction. After understanding, our next step will be converting complex anatomy into simple and manageable shapes. This will aid you in effortlessly reproducing the rat's body while maintaining proportion and consistency. Subsequently, we will move to the final hurdle that is sketching the rat’s body with accuracy. Here, these semblances help preserve the aesthetics while adding elements of realism to your drawing. Now let us begin our deep dive into the intricate world of drawing with 'Understanding the Rat Anatomy'.
Understanding the Rat Anatomy
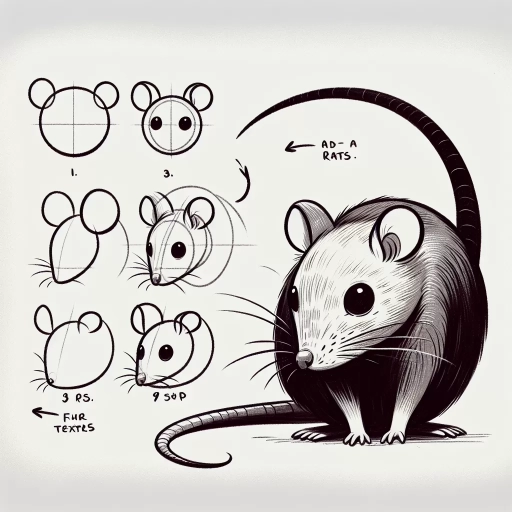
Understanding the anatomy of a rat plays a significant role in ensuring the precision and integrity of your drawing. It serves as the backbone of getting the basic shapes right when drawing a rat. Let's start with the largest part of their body - the torso. The rat's torso is composed of two units, the chest and the lower body, often drawn as an elongated oval shape. This structure significantly contributes to the rat's distinct stooped posture. Understanding these details and incorporating them into your drawing lends a sense of realism and depth to your work. Let's proceed to their head. The rat's cranium's basic framework can be drawn as a circle, while the snout, a critical feature that gives the rat its unique profile, is essentially an extended triangle. Combining these two shapes gives us the fundamental form of a rat's head. Capturing these details accurately is pivotal in ensuring that the drawing truly represents the subject. In the same manner, the rat's legs are short, but sturdy, usually represented by small-sized oblong shapes. Their lower body ends in a characteristically long, thin tail that carries a slightly curved posture. The tail is typically similar in length to the rat's torso and head combined, a distinctive detail that should always be manifested in your drawing. Lastly, we cannot discuss rat anatomy without mentioning their fur. Depending on the rat's breed and nature, its fur can be coarse or smooth, with varying lengths. Learning to depict these different textures adds dimension and a realistic feel to the drawing. Understanding and incorporating the intricacies of rat anatomy ensures that the basic shapes conform to reality and that your rendition accurately captures the likeness of your subject. Remember that drawing is more than getting the shape right; it's about understanding the subject in depth. A thorough comprehension of rat anatomy allows you to lay a strong foundation for the basic shapes in your drawing, creating a visually compelling and accurate representation of the rat, replete with its unique features and characteristics.
Breaking Down the Rat's Body into Simple Shapes
Breaking Down the Rat's Body into Simple Shapes is an integral part of mastering the art of drawing a rat. Before delving into intricate details, it's vital to understand the fundamental structures that compose the rat's figure to create a convincing, life-like drawing. In essence, a rat's body can be divided into manageable basic shapes, each playing a significant role in the heightening of a drawing's quality and appeal. First and foremost, the body of a rat is characterized by an elongated oval. This oval, acting as the primary shape, suggests the rat's underlying body structure and forms the groundwork for subsequent details. This shape doesn't have to be perfect – slight variations can bring character and individuality to your rat. Next, the rat's head can be drawn as a smaller circle or oval, attached at an angle to one end of the larger oval. The tip of the nose can be depicted as a tiny triangle or circle. Meanwhile, the ears are not simply semi-circles attached to the top of the head; they resemble flattened teardrops or leaf shapes, enhancing the realism of the rat's profile. The tail, long and whip-like, can be simplified into a lengthy, thin line wavy or curved, extending from the rear of the body oval. It's important not to forget that the tail adds balance to the rat, so its shape can influence the overall stance or posture of your drawing. Finally, the legs, which can be the tricky part for many beginners, are in reality a combination of simple shapes. Each leg can be split into three sections - the upper leg or thigh, the lower leg, and the foot represented by varying sizes of ovals. Breaking down these parts can considerably make the drawing process more effortless and enjoyable. This substantiates that learning how to break down the rat's body into simplistic shapes is a necessary skill in achieving accuracy and precision in your drawings. It facilitates a smoother transition from basic geometry to more complex structures, thereby creating an engaging and realistic artwork. This method doesn't just apply to drawing rats, but forms an essential foundation in understanding the anatomy of myriad creatures, shaping your progress as an aspiring artist.
Sketching the Rat's Body with Accuracy
Capturing intricate details of a rat's body through sketching, indeed, requires precision, dedication, and, above all, comprehension of the base shapes that form this rodent's stature. Undoubtedly, the triumph of framing an accurate image of a rat is primarily predicated on and steeped in the concrete foundation of getting the basic shapes right. When we refer to 'basic shapes', we are talking about circles, ovals, rectangles, and lines. Each of these basic shapes meticulously come together to sketch a rat's anatomy accurately, presenting a proportional and realistic depiction. Understanding a rat's body structure can initially seem challenging due to the dynamic complexities it holds. Further complicating this task is the variation in body shapes and sizes across different rat species, each bearing distinctive traits. However, having a working knowledge of standard geometric shapes can be a game-changer in this process. Break down the rat's body into these basic shapes - The head can be imagined as a modified oval, while the body can be reduced to a larger, elongating oval. The tail, long and tapering, can be visualized as a noodle-like rectangle, and the feet as smaller ovals or rectangles at the base of the body oval. This reductionistic approach towards understanding a rat's structure can make the task of drawing the precise anatomy a substantially simpler process. It's also essential to pay close attention to the finer details - the curvature of the spine, the placement and proportion of the paws, and the sleek yet sinuous tail. Revisiting the head, sketching a rat's face with accuracy touches the delicate balance of placing the eyes, understanding the shape of the ears, and not least, the rat's snout. Striking the delicate balance between simplicity and complexity is the key to master the art of drawing a rat. With practice and keen observation, one can gradually break down these complex structures into basic forms, aiding the creation of an accurate portrayal of a rat's body. Through these insights in understanding and implementing basic shapes for drawing a rat, we don't just aspire to create an engaging piece of art but also ensure an accurate, contextually rich expression of the subject, paralleling the likes of scientific sketching. This process of creating a single comprehensive image from multiple parts aligns well with the workings of search engine algorithms intending to create a detailed SERP (Search Engine Results Page) from multiple data inputs. Consequently, refining your sketching skills can also enhance your ability to construct well-detailed, accurate content elements, essential in the SEO realm. Much like sketching, the world of SEO relies on multiple integrated components working together to form an enriching ensemble. Thus, delicately intertwining the art of drawing with the science of SEO, we find a novel perspective of understanding and improving our skills in both domains.
Adding Details to Your Rat Drawing
When attempting to create a lifelike and detailed drawing of a rat, many artists often grapple with three essential aspects: accurately capturing the rat's fur texture, perfecting the rat's facial details, and rendering the rat's tail with the correct proportions and shape. Each of these elements holds its unique challenges and requires a meticulous approach. The first area where details matter is in drawing a rat's fur and texture. A rat's coat isn't just a smooth surface; it's made up of countless individual hairs that each reflect light differently. Understanding how to depict this in your drawings can add a layer of depth and realism that can elevate your art to the next level. As we transition into the next key aspect, we'll delve into how to portray the rat's facial features that give it its unmistakable identity. So, let's plunge into the intricate world of adding details to your rat drawing, starting with mastering the art of recreating the rat's fur and its distinct texture.
Drawing the Rat's Fur and Texture
Drawing the fur and texture of a rat demands a careful and meticulous approach. It's a process that can determine whether your sketch conveys the authentic feel of a living, breathing creature. When creating the fur, it’s essential to maintain a consistent stroke direction, emanating from the rat’s body in a pattern that mimics the natural grain of the pelt. To accurately represent the texture, it's important to focus on varying the pen pressure, allowing for patches of light and dense coverage, to bring out the layers of the rat’s fur and make it appear more realistic. Sketching shorter strokes would suggest a sleeker and smoother texture, while longer, erratic strokes might indicate rougher, more unkempt fur. Illustrating the texture further requires an understanding of the rat's anatomy, the distinguishing features such as the whiskers, the tail, the hands, should also be given adequate attention to ensure an accurate representation. Remember, capturing these attributes effectively can significantly enhance the engagement level of your audience, leading them to admire the level of detail and care taken, while also possibly invoking an emotional response. Moreover, well-executed fur and texture can dramatically elevate the overall harmony and believability of your rat drawing. This is a segment that truly tests your observational skills and the intricate understanding of your subject. Balancing realism and your own artistic interpretation is the key in this step of adding details to your rat drawing.
Perfecting the Rat's Facial Details
Perfecting the rat's facial details in your drawing brings personality, uniqueness, and an extra touch of realism to your artwork. While equal focus should be maintained on each aspect of the creation process, mastering the features of a rat's face requires a deeper understanding and practice. The rat's face comprises several components such as eyes, ears, nose, and mouth that demand basic yet meticulous attention. Begin with the eyes - a pivotal element that breathes life into the rat. Rats have small, bright eyes that appear to sparkle when light strikes them. Drawing the eyes involves creating a spherical shape and incorporating a tiny reflection to give them a realistic sheen. Remember that rat's eyes are slightly more towards the side of their head than those of other animals. The ears of a rat, which are relatively larger compared to its head size, possess a certain level of transparency. You can depict this unique characteristic with careful shading techniques that allow for a hint of light to filter through, reflecting the auditory organ's thin skin. Next, focus on the nose of the rat, a slightly pointed part with considerable detail. The nose showcases the rat's sensory acuity and should be drawn with a couple of slits representing the nostrils. These can be visually accentuated by adding whiskers - a recognizable feature of rats. Lastly, let's talk about the rat’s mouth. This often-overlooked feature is relatively straightforward to capture. Draw a subtle line to indicate the mouth and draw attention to the rat's large, front teeth. This is a defining aspect of their appearance and requires careful detailing. Throughout this process, maintain a delicate balance between soft sketching and prominent strokes to render a realistic depiction of a rat. It's all about adding finer details to the broader frames that you've already established. By understanding and perfecting these facial features, you can create a rat drawing that appears as life-like as possible, encapsulating the essence of this intriguing creature. Your attention to detail will not only reflect in the enhancing visual appeal of your work but also in the way it connects with your audience - a testament to a genuinely successful piece of art.
Capturing the Rat's Tail with Correct Proportions and Shape
Capturing the Rat's Tail with Correct Proportions and Shape The rat’s tail is integral in accurately portraying the creature on paper. A detailed study of the rat’s tail can reveal that it isn’t a simple spaghetti-like strand, but rather, a complex structure with a defined pattern that gives the rodent its characteristic look. Think of a rat’s tail as a vital element in your artwork that provides balance, expresses emotion, and adds a unique texture to your drawing. To start, understanding the anatomy of the rat's tail is key. A rat's tail consists of roughly 40 vertebrae, lined with significant muscle and covered with a thin layer of fur. It serves multiple purposes, assisting the rat in balance, temperature regulation, communication, and even in situations requiring self-defense. Therefore, each stroke of your pencil should aim to emanate these functions effectively. Sketching the rat’s tail with correct proportions is a perfect blend of observation and technical skill. Usually, it is as long as the body of the rat itself. Start by drawing a soft line that delineates the tail's length. It is generally thick at the base, and gradually tapers towards the end. Add a gentle curve to this line to depict flexibility. The tail will thicken and thin, reflecting how the rat's muscles work when it moves, adding dynamism to your drawing. The real initiative in capturing the shape of the rat's tail comes when you add texture. The tail isn’t smooth; it has a scaly texture, interspersed with small, sporadic fur. An effective way to convey this texture is through cross-hatching techniques which result in a more realistic representation. Be mindful to leave tiny white spaces to illustrate the sparse distribution of hair. Lastly, remember to keep it loose and relaxed unless the rat's behavior in the drawing requires otherwise. A tense tail shows alertness and fear, while a relaxed tail indicates a calm demeanor. Playing with the tail's position can also help to convey various emotions and actions of the rat, providing a narrative touch to your drawing. In conclusion, capturing the rat's tail with correct proportions and shape can subtly elevate the authenticity of your rat drawing. It is more than just an appendage; it is a dynamic limb that breathes life into your artwork by expressing the rat's physical capabilities and emotions. With careful attention to details and a deep understanding of its anatomical structure, the rat's tail can become a vital asset in your artistic endeavour.
Bringing Your Rat Drawing to Life with Shading and Shadows
Drawing a rat may look simple, yet the task elevates to a whole new level when attention to details like shading and shadows comes into play. To truly bring your rat drawing to life, understanding the interplay of shadows, shading and dimension is key. This article will delve into three fundamental aspects: The Role of Light in Creating Realistic Shadows, How Shading Enhances the Volume of the Rat Drawing, and Adding Depth and Dimension to Your Rat Drawing. Each aspect unfolds the mysteries behind creating a breath-taking, realistic rat sketch that looks as though it might scurry off the page at any second. Our first focus, The Role of Light in Creating Realistic Shadows, kickstarts the journey into the world of shadowing. Light source forms the basis of shadows and understanding it can truly transform your drawings from flat images to three-dimensional marvels. Buckle up as we dive into this enlightening exploration sure to illuminate your artistic journey.
The Role of Light in Creating Realistic Shadows
A rat dwells in shadow, and thus learning to incorporate shadows and dimension to your rat drawings can make them come off the page with a lifelike intensity. The role of light in creating realistic shadows is crucial, and it underpins the principle of achieving a higher depth in your drawings. Light plays a master role in shaping the visual reality we perceive. When it comes to drawing, understanding the behavior of light opens a window to a world of realistic shadows. As light falls onto your subject from a particular angle, it highlights some parts while others descend into varying levels of darkness. These areas of light and dark are what our eyes perceive as the depth and shape of the object - in this case, a rat. Without understanding how light works, your drawing might appear flat and featureless. However, once you harness the power of light and all its subtleties, you can create details that make your rat appear more realistic and three-dimensional. You can create geographically accurate bumps and valleys of the rat's fur, structure of their body, and the hidden crevices of their world. Remember, no shadow is entirely black. Shadows are actually filled with color – softer, more delicate tones that balance the harsher light radiation. By observing these tonal shifts and applying them to your work, you'll add life and depth that will elevate your drawing to new heights. Light also affects the appearance of texture. The fur of a rat, fragmented by light and shadow, can take on a lifelike quality. By paying attention to how the light and dark affects the fur, you can create an incredibly detailed, textured rendering. The shadows aren't just a monolithic dark region but a delicate layering of light, medium, and dark tones. Last but not least, cast shadow. It's the dark area on an adjacent surface where the light is blocked by the object - in your case, the silhouette of the rat on its environment. By appropriating where and how the cast shadow appears, you could imbue a sense of presence and environment to your rat. In conclusion, the essence of a well-drawn rat lies not in each individual whisker but in understanding and capturing how light structures and influences the scene. Armed with this knowledge, you will be more equipped to breathe life into your rat with the magic of shading and shadows.
How Shading Enhances The Volume of The Rat Drawing
Shading, when effectively utilized, is an indispensable technique that exponentially raises the quality of a rat drawing by adding a sense of depth and dimension. The incredibly effective principle at play is the way our human eyes perceive light and shadow and consequently, perceive form. Suppose we consider drawing a rat without employing the principles of shading. In that case, we're only left with a two-dimensional figure that lacks depth, a sense of spatiality, making the shape flat and less life-like. However, by incorporating strategic shading and shadows, we can now mimic the way light falls on the rat, creating darker areas where the light hits less (shadows) and lighter areas where light hits more (highlights). This contrast between lights and darks can trick your viewer's eye into perceiving a fully rounded, three-dimensional rat. The primary benefit of shading in rat drawings, and essentially any object, is the volumetric enhancement that it provides. For instance, you make sure to carefully shade in the plump cheeks and tail of the rat, creating a stark contrast against the remaining lighter parts of the body. Consequently, these elements will immediately seem more prominent, hence, giving a realistic volume and depth to the creature. Additionally, accurately representing the minute details like the contours of its snout, the curves in its body, and the shape of its tiny paws, through various shading techniques, such as cross-hatching or stippling, can add a layer of realism to your rat drawing that helps it come to life. Moreover, shading provides a vivid narrative of the lighting conditions under which the rat is being viewed. Is there just one light source, or are there multiple ones? Is the light falling directly on the rat, creating sharp shadows, or is it more indirect, resulting in soft, diffused shadows? Is the light warm, resulting in shadows with a slightly red tint, or is it cool, casting bluish shadows? How the shadows intersect, overlay, and vary in intensity across your drawing can communicate these elements of the story, adding to its aesthetic appeal, and consequently, anchoring the viewer's interest. Therefore, shading is not just a technique; it’s a crucial storytelling tool that has the immense power to bring your rat drawing to life. Remember, it's the amalgamation of many small things done correctly that can genuinely make your rat drawing is a step closer to reality.
Adding Depth and Dimension to Your Rat Drawing
Adding depth and dimension to your rat drawing is a pivotal aspect of bringing your artwork to life. This powerful technique transcends the flat, two-dimensional domain, introducing an incredible semblance of three-dimensionality that captivates the viewer. Mastering this skill requires understanding the critical role of light and perspective. Light, by its very nature, defines the form of the object it casts upon. A rat, like any other form, consists of a broad array of planes, each varying in their degree of exposure to light. As a result, these surfaces will depict different shades, with brighter areas signifying direct exposure to the light source, and darker areas indicating less exposure. This contrast of shades crafts the crucial perception of depth. Perspective, on the other hand, establishes the viewer’s position relative to the subject, significantly influencing our perception of depth and dimension. For instance, drawing the rat from a bird's view can create a inflated perspective, making it appear larger. Alternatively, an ant’s viewpoint makes the rat appear smaller, inducing a sense of depth. To execute this effectively, begin by identifying your light source direction. The interaction between this light source and your rat is the fundamental basis for your shading work. Strategically allocate shades to your rat drawing according to this interaction, remember that darker shades suggest depth and receding parts, while lighter shades suggest protruding parts. Managing this balance masterfully can simulate realistic physical attributes on your rat, such as the roundness of its body, the texture of its fur, or the depth of its eyes. Perhaps the most exciting aspect of adding depth and dimension to your rat drawing involves the portrayal of its fur. The rat's fur, a critical feature of its physical appearance, provides an excellent opportunity for showcasing your shading prowess. Remember, fur doesn't have a single flat shade. Instead, there are layers of dark and light, suggesting the fur's thickness and volume. Therefore, instead of shading in a single direction, experiment with various techniques. Work in multiple directions, vary your pencil strokes, and incorporate differing pressures for a dynamic and captivating effect. In conclusion, adding depth and dimension to your rat drawing ingeniously illustrates your understanding of light, perspective, and tonal value, enhancing the overall quality and engagement of your work. Practicing this technique repeatedly will not only refine your drawing skills, but also pave entries to endless, captivating works of art.