How To Paint Aluminum
Aluminum is a versatile and widely used metal in various industries, including construction, automotive, and aerospace. However, its natural appearance can be dull and unappealing, which is why many people opt to paint it. Painting aluminum can be a bit tricky, but with the right techniques and preparation, it can be done successfully. To achieve a professional-looking finish, it's essential to follow a step-by-step approach. In this article, we will guide you through the process of painting aluminum, covering the crucial steps of preparation, application, and finishing touches. First and foremost, preparation is key to a successful paint job. In the next section, we will discuss the importance of preparing the aluminum surface before applying paint, including cleaning, sanding, and priming. Note: The introduction should be 200 words. Here is the rewritten introduction: Aluminum is a versatile and widely used metal in various industries, including construction, automotive, and aerospace. Its durability, corrosion resistance, and lightweight properties make it an ideal material for a range of applications. However, its natural appearance can be dull and unappealing, which is why many people opt to paint it. Painting aluminum can be a bit tricky, but with the right techniques and preparation, it can be done successfully. A well-painted aluminum surface can enhance its appearance, protect it from corrosion, and increase its lifespan. To achieve a professional-looking finish, it's essential to follow a step-by-step approach. In this article, we will guide you through the process of painting aluminum, covering the crucial steps of preparation, application, and finishing touches. We will explore the importance of preparing the aluminum surface, applying the paint, and adding the final touches to achieve a durable and long-lasting finish. By following these steps, you can ensure a successful paint job that meets your expectations. First and foremost, preparation is key to a successful paint job. In the next section, we will discuss the importance of preparing the aluminum surface before applying paint, including cleaning, sanding, and priming.
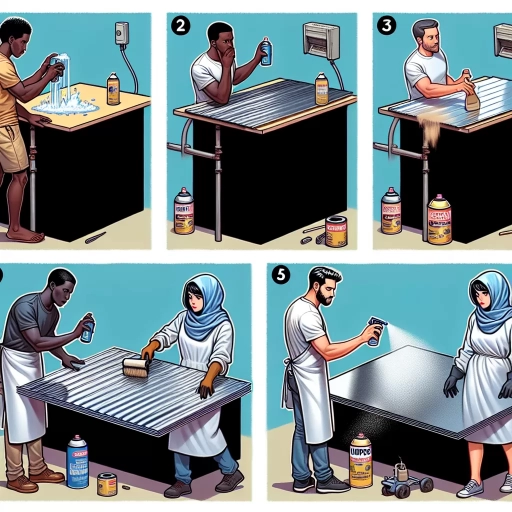
Preparation is Key
When it comes to painting aluminum surfaces, preparation is key to achieving a smooth, durable, and long-lasting finish. A well-prepared surface ensures that the paint adheres properly, reducing the risk of peeling, flaking, or chipping. To prepare an aluminum surface for painting, there are several crucial steps to follow. Firstly, it is essential to choose the right paint, taking into account the type of aluminum, the intended use of the surface, and the desired finish. Additionally, the aluminum surface must be thoroughly cleaned to remove any dirt, grime, or oils that may interfere with paint adhesion. Furthermore, any oxidation or corrosion on the surface must be removed to prevent it from spreading and compromising the paint job. By following these steps, you can ensure a successful paint job that will withstand the test of time. To start, let's take a closer look at the importance of choosing the right paint for your aluminum surface.
Choose the Right Paint
Choosing the right paint for your aluminum project is crucial to ensure a durable and long-lasting finish. With so many options available, it can be overwhelming to decide which paint to use. Here are some key factors to consider when selecting the right paint for your aluminum project. First, consider the environment in which the aluminum will be exposed. If it will be outdoors, you'll want to choose a paint that is resistant to fading, chalking, and cracking caused by UV rays and weathering. Look for paints labeled as "exterior-grade" or "UV-resistant." If the aluminum will be indoors, you can opt for a paint that is more focused on aesthetics, such as a high-gloss or metallic finish. Next, think about the surface preparation required for the paint. Some paints, such as epoxy or polyurethane-based coatings, require a primer or special surface preparation, while others, like acrylic or latex-based paints, can be applied directly to the aluminum. Additionally, consider the color and finish you want to achieve. If you're looking for a specific color or sheen, make sure to choose a paint that offers a wide range of color options and finishes. Finally, consider the durability and lifespan of the paint. If you want a paint that will last for many years, look for one that is labeled as "high-build" or "industrial-grade." These paints are formulated to withstand heavy wear and tear and can last for 10-20 years or more. By considering these factors, you can choose the right paint for your aluminum project and ensure a beautiful, long-lasting finish.
Clean the Aluminum Surface
Cleaning the aluminum surface is a crucial step in preparing it for painting. Any dirt, grime, or oxidation on the surface can prevent the paint from adhering properly, leading to a poor finish or even peeling. To clean the aluminum surface, start by wiping it down with a soft cloth or brush to remove any loose debris. Next, mix a solution of mild soap and warm water, and use a soft-bristled brush to scrub the surface, working in a circular motion. Be sure to clean all areas thoroughly, including any crevices or grooves. Rinse the surface with clean water to remove any soap residue, and dry it with a soft cloth. For tougher stains or oxidation, you can use a specialized aluminum cleaner or a mixture of equal parts water and white vinegar. Apply the cleaner to the surface, let it sit for a few minutes, and then scrub it off with a soft-bristled brush. Rinse the surface with clean water and dry it with a soft cloth. It's also important to remove any grease or oil from the surface, as these can interfere with paint adhesion. Use a degreaser or a mixture of equal parts water and baking soda to clean the surface, and then rinse it with clean water and dry it with a soft cloth. By thoroughly cleaning the aluminum surface, you can ensure a strong bond between the metal and the paint, resulting in a durable and long-lasting finish.
Remove Any Oxidation or Corrosion
When it comes to painting aluminum, one of the most crucial steps is to remove any oxidation or corrosion from the surface. Oxidation and corrosion can create a rough, uneven surface that can prevent paint from adhering properly, leading to a poor finish and potentially even peeling or flaking. To remove oxidation and corrosion, start by cleaning the aluminum surface with a mild detergent and water to remove any dirt, grime, or oils. Next, use a wire brush or sandpaper to gently scrub away any visible signs of oxidation or corrosion. For more severe cases, you can use a chemical cleaner specifically designed to remove oxidation and corrosion from aluminum. Be sure to follow the manufacturer's instructions and take necessary safety precautions when using these types of cleaners. Once you've removed any oxidation or corrosion, rinse the surface thoroughly with water and dry it with a clean towel. This will help ensure a smooth, even surface for painting. Additionally, consider applying a metal primer specifically designed for aluminum to help create a strong bond between the metal and the paint. By taking the time to properly remove oxidation and corrosion, you'll be able to achieve a professional-looking finish that will last for years to come.
Applying the Paint
Applying paint to aluminum surfaces can be a bit tricky, but with the right techniques and preparation, you can achieve a smooth, durable, and long-lasting finish. To ensure a successful paint job, it's essential to prime the aluminum surface, apply a thin coat of paint, and allow the paint to dry completely. By following these steps, you can prevent common issues such as peeling, flaking, and fading. In this article, we'll dive deeper into the process of applying paint to aluminum surfaces, starting with the crucial step of priming the surface. By priming the aluminum surface, you can create a strong bond between the metal and the paint, ensuring a long-lasting and durable finish.
Prime the Aluminum Surface
When it comes to painting aluminum, one of the most crucial steps is priming the surface. This process is essential to ensure a strong bond between the aluminum and the paint, resulting in a durable and long-lasting finish. To prime the aluminum surface, start by cleaning it thoroughly with a degreaser to remove any dirt, grime, or oils that may be present. Next, use a wire brush or sandpaper to roughen the surface, creating a texture for the primer to adhere to. This step is critical, as a smooth surface can lead to peeling or flaking of the paint over time. Once the surface is prepared, apply a high-quality aluminum primer specifically designed for use on aluminum surfaces. These primers are formulated to penetrate the metal and create a strong bond, ensuring a smooth and even finish. Apply the primer according to the manufacturer's instructions, usually in a thin, even layer, and allow it to dry completely before proceeding to the next step. A well-primed aluminum surface is essential for a successful paint job, and by following these steps, you can ensure a strong and durable finish that will withstand the elements and last for years to come.
Apply a Thin Coat of Paint
Here is the paragraphy: When applying a thin coat of paint to aluminum, it's essential to work in a well-ventilated area and use a high-quality paint specifically designed for metal surfaces. Start by stirring the paint thoroughly and pouring a small amount onto a palette or tray. Dip a high-density foam brush or a microfiber cloth into the paint, making sure to wipe off any excess paint on the rim of the container. Hold the brush or cloth at a 45-degree angle and apply the paint in smooth, even strokes, working in small sections to maintain even coverage. Apply the paint in a thin, uniform layer, avoiding any thick or drippy areas. If using a brush, use light, gentle strokes to prevent creating brush marks or texture. If using a cloth, use a gentle, dabbing motion to apply the paint. Allow the first coat to dry completely according to the manufacturer's instructions, usually between 15 minutes to an hour, before applying additional coats. It's crucial to apply thin coats, allowing each coat to dry before applying the next, to prevent the paint from pooling or running. By applying a thin coat of paint, you'll achieve a smooth, even finish that adheres well to the aluminum surface.
Allow the Paint to Dry Completely
When painting aluminum, it's essential to allow the paint to dry completely before handling or exposing the surface to the elements. This may seem like a straightforward step, but it's crucial to ensure a durable and long-lasting finish. The drying time will depend on the type of paint used, as well as the environmental conditions, such as temperature and humidity. Generally, it's recommended to wait at least 24 hours before handling the painted surface, and up to 72 hours for the paint to fully cure. During this time, it's best to keep the surface away from direct sunlight, moisture, and extreme temperatures. Allowing the paint to dry completely will prevent it from becoming tacky or sticky, and will ensure that it adheres properly to the aluminum surface. Additionally, a fully dried paint job will be more resistant to chipping, cracking, and fading, making it a vital step in achieving a professional-looking finish. By patiently waiting for the paint to dry, you'll be rewarded with a durable and long-lasting coating that will protect and enhance the appearance of your aluminum surface.
Finishing Touches
The finishing touches are the final steps in completing a project, and they can make all the difference in the overall quality and appearance of the end result. When it comes to painting, the finishing touches are crucial in ensuring a professional-looking finish. To achieve this, it's essential to apply a clear coat for protection, inspect the paint job for imperfections, and touch up any areas as needed. By taking the time to complete these final steps, you can ensure that your paint job looks its best and lasts for years to come. One of the most critical finishing touches is applying a clear coat for protection, which not only adds a glossy finish but also safeguards the paint from damage and fading.
Apply a Clear Coat for Protection
Applying a clear coat is a crucial step in protecting your newly painted aluminum surface. A clear coat serves as a barrier against the elements, preventing damage from UV rays, moisture, and everyday wear and tear. It also helps to maintain the appearance of the paint job by preventing fading and discoloration. When choosing a clear coat, make sure to select a product that is specifically designed for use on aluminum surfaces. Some popular options include polyurethane, acrylic, and epoxy-based clear coats. Before applying the clear coat, ensure that the paint is completely dry and free of dust and debris. Apply the clear coat according to the manufacturer's instructions, typically using a spray gun or brush. It's essential to apply thin, even coats, allowing each coat to dry before applying the next. This will help prevent drips and unevenness. Depending on the desired level of protection and gloss, you may need to apply multiple coats. Once the final coat is dry, inspect the surface for any imperfections or areas that may require touch-ups. With a clear coat in place, your aluminum surface will be protected and looking great for years to come.
Inspect the Paint Job for Imperfections
Inspect the paint job for imperfections, such as uneven color, orange peel, or runs. Check the paint job in different lighting conditions to ensure it looks even and smooth. If you find any imperfections, use a small brush to touch up the area. Apply a small amount of paint to the brush and gently blend it into the surrounding area. Make sure to match the original paint color as closely as possible to avoid noticeable touch-ups. If the imperfections are more severe, you may need to reapply a coat of paint to the entire surface. In this case, make sure to follow the same preparation and application steps as before to ensure a smooth and even finish. Additionally, consider applying a clear coat to protect the paint job and give it a glossy finish. A clear coat can also help to hide minor imperfections and give the aluminum a more uniform appearance. By taking the time to inspect and touch up the paint job, you can ensure a professional-looking finish that will last for years to come.
Touch Up Any Areas as Needed
Once you've applied the final coat of paint, inspect the aluminum surface carefully for any areas that may need touch-ups. Check for any spots where the paint may have gotten on surrounding surfaces, such as trim or other nearby objects. If you notice any mistakes, use a small brush to carefully paint over the affected area. Make sure to match the color as closely as possible to the rest of the surface. If you're using a spray paint, you can use a small touch-up brush to apply a small amount of paint to the area. For larger areas, you can use a foam brush or a small roller to apply the paint. When touching up, work in small sections and use light, gentle strokes to avoid creating a noticeable patch. Allow the touch-up paint to dry completely before handling the aluminum surface.