How To Draw A Shoe
 Ever wondered how to capture the perfect silhouette of a sneaker or the delicate elegance of a stiletto in your drawings? Equipped with pencil, paper, and passion, anyone can learn how to reproduce the finesse of footwear through their artwork. This comprehensive guide will help you understand the fine art of shoe illustration, beginning with the fundamental understanding of shoe anatomy, descrying the meticulous step-by-step process of sketching diverse styles of shoes, and finally, adding intricate details and textures to enhance the image's realism. The first page of your shoe sketching journey starts with the basics, which can be compared to the foundation upon which a robust structure is built. As we delve into the nuts and bolts of shoe anatomy, you will encounter the key constituent parts of footwear and how these inform your drawings. Let's lace up our metaphorical shoestrings and set-off on our creative journey!
Understanding the Basics of Shoe Anatomy
In the vast world of footwear, a deeper comprehension of shoe anatomy is crucial to selecting the proper footwear for any activity. Whether it's for comfort, style, or performance, understanding the structure of a shoe provides insights on how it can support and protect your foot. In its primary breakdown, a shoe is composed of three main components: the sole, the upper part, and the heel. Each part playing a unique role in the overall functionality and design of the shoe. Starting from the base of the shoe, the sole, it is designed to provide a cushioned layer between the foot and the ground, mitigating impact and providing grip. Ascending to the upper part of the shoe, it protects and secures the foot inside the shoe. Lastly, the formation of the heel, which controls the foot's motion and provides balance. As we transition into the nitty-gritty of the shoe anatomy, let's first delve into the sole - the foundation of every shoe’s structure. Its purpose and design are crucial as it serves not only as the shoe’s primary point of contact with the ground but also significantly contributes to the comfort and performance of the wearer.
The Sole of the Shoe
The Sole of the Shoe Undeniably, the sole is perhaps the most crucial part of a shoe, representing a combination of design, construction, and functionality that sets the tone for the entire shoe’s behavior, style, and purpose. It's the foundation, offering the first line of defense between the foot and the ground, playing an irreplaceable role in safeguarding comfort and ensuring various performance demands. The sole is typically composed of several layers – the insole, midsole, and the outsole. Each layer contributing to the overall comfort, support, and resilience of the shoe. Insole, the layer inside the shoe, forms an intimate association with the foot, and is often padded to further escalate comfort. The characteristics of the insole dramatically influence the shoe-wearing experience. It can often be removable, providing the opportunity to replace with orthopedic or specialty insoles, customizing the shoe's comfort level. The midsole acts as a buffering mechanism, protecting the foot from shock. Crafted predominantly from foam-based compounds and silicone derivatives, it's energy-absorbing properties are geared towards minimizing impact, reducing stress on joints, and enhancing the shoe longevity. The midsole's engineering often includes technology systems to boost performance for athletic shoes. Lastly, the outsole or the tread, in direct contact with the ground, regulates grip and traction. Here, wear resistance and flexibility are the prime focus. Depending on the shoe type, the outsoles can have various patterns and designs with a choice of materials like rubber, leather, or plastic. The outsole may have grooves, spikes, or special patterns for added traction, an elemental tenet in shoes for hiking or sports. Understanding the sole and its components form the foundation of shoe anatomy, highlighting the importance of examination when purchasing or drawing a shoe. Integrated with intricate engineering and subtle aesthetics, the sole is the heart of a shoe's functionality and design. This consideration is paramount not only for footwear designers but anyone looking to appreciate the intricacies of shoe construction. Only by investigating this section can one genuinely understand the complex craftsmanship and technology behind every pair of shoes.
The Upper Part of the Shoe
In understanding the basics of shoe anatomy, it is crucial to shed light on the upper part of the shoe - a fundamental component that significantly affects the shoe's overall functionality and style. The upper part refers to all sections of the shoe that cover the foot, including the toe box, vamp, quarter, and the heel counter. Each element of the upper has a specific purpose, designed with user comfort and aesthetics in mind. The toe box, the frontal area of the shoe, provides room for toe movement while maintaining a shape that suits the shoe style. The roomier the toe-box, the higher the comfort level, especially in active footwear. The vamp refers to the area that covers the top front part of the foot, playing a key role in determining the snugness of the shoe fit. The vamp can possess detailing from embellishments to distinct stitching, each contributing to the shoe's unique appearance. Moving to rear elements, the quarter, or the sides and back of the shoe, in collaboration with lacing, controls the firmness of grip around the foot, supporting balance and movement. The heel counter, a stiff piece often embedded inside the shoe's back structure, secures the heel in place, enhancing shoe fit and stability. It is also pivotal to note that the materials used in the upper part significantly influence its durability, breathability, and ease of maintenance. This portion epitomizes the intersection of utility and design, where the lace-up system, ornamentation, finish, and even the color are strategically chosen to allure specific target markets. Hence, in learning to draw a shoe, understanding the upper part's architecture is beneficial not only for its precise illustration but also for immersing into the essence of footwear design. No shoe is a mere combination of pieces; it is an intricate synergy of thoughtfully crafted parts engineered to meet user experience expectations. Emphasizing the upper part of the shoe uncovers the science behind comfort while unravelling the artistry that makes footwear more than just a protective covering for feet. It climbs a notch higher, turning a commodity into an expression of personality and a testament of style. Despite residing in the realm of utility and practicality, shoes, just like any form of art, speak a language of their own. The upper part of the shoe does not merely secure the foot; it tells a story - a story of design, function, and fashion.
The Formation of the Heel
Understanding the Basics of Shoe Anatomy is a fascinating study, especially when delving into the details of one of its key components, the heel. The formation of the heel is not just a random design iteration but is backed by centuries of engineering, ergonomics, and style innovations. A heel's primary function is to provide elevation, improve stability, and bring an aesthetic value to the shoe. However, delving deeper into its formation can truly enhance our collective appreciation for this crucial feature of any footwear. The formation of the heel begins with a careful consideration towards the wearer's comfort and the shoe's functionality. Typically, the design process starts with the evaluation of the shoe wearer's biomechanics - how the body, particularly the foot and ankle, moves. Factors like weight, gait, and foot shape play a significant role in designing a suitable heel. Designing the heel holistically considers its elevation, contour, size, and the material used. The elevation balances the wearer's height preference and walking comfort. The contour should map seamlessly into the shoe's sole and the wearer's underfoot, while the size must allocate appropriate weight distribution. Additionally, materials play a vital role. Traditionally, wood, cork, and leather were used. But modern heels involve a plethora of materials like plastics, rubber, and even metal. Material choice significantly impacts the heel's weight, durability, flexibility, and overall look. The formation of the heel doesn't stop at design but extends to careful craftsmanship. The choice of adhesives, precision in molding, meticulousness in sanding, and overall attention to detail during the construction phase determines the heel’s ultimate strength and smoothness. Finally, consider the heel's aesthetic role. The heel can dramatically alter a shoe's look - transforming a casual style into an elegant semblance, making it a strategic design element. Moreover, from stilettos to kitten heels, the heel shape becomes a defining character in various shoe categories. In a nutshell, the formation of the heel is a blend of science, art, and craftsmanship. Its creation involves deep understanding, accuracy, creativity, which demonstrates its indispensable role in shoe anatomy.
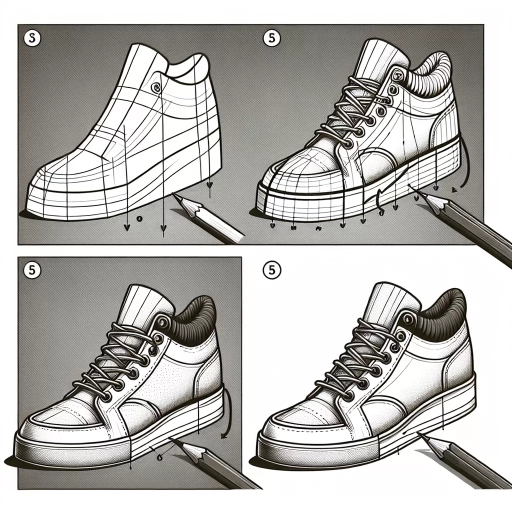
Step-by-Step Process of Drawing Different Types of Shoes
Embarking on the fascinating journey of learning to draw different types of shoes is indeed an enriching artistic pursuit that opens up a wide realm of possibilities. This comprehensive guide provides clear, step-by-step directions on how to accurately sketch sneakers, high heels, and boots – the three fundamental types of footwear universally admired. The techniques are carefully delineated to present an engaging and immersive trajectory toward mastering the contours, dimensions, and definitive elements that create distinctive footwear representations. Starting with the ubiquitous sneaker, a cultural fashion staple, we explore its dynamic design, delving into how to accurately capture the shoe’s distinctive features. Following the foundation laid by sketching a sneaker, we transition seamlessly into the world of high-glamour and sophistication – drawing a high heel. The final stride leads us to the sturdy and practical boot. Each type of footwear has its own unique style and challenges, offering valuable lessons for artists seeking to broaden their skill set. Strap in for this exciting adventure that begins with an introspective look at drawing a sneaker.
Drawing a Sneaker
Drawing a sneaker is a dynamic, fun, and creatively rewarding process that engages both beginners and seasoned artists. To effectively illustrate a sneaker, one must pay attention to the various elements that make up the shoe's anatomy. The snappy lines, the detail-rich stitching, the contrasting textures of the rubber sole and the fabric - each component contributes to the overall aesthetic of the sneaker. However, like other forms of art, constructing a lifelike sneaker drawing goes beyond strict adherence to anatomical features. The initial phase of drawing a sneaker incorporates a fundamental knowledge of geometric shapes. The shoe box is an excellent starter for building the overall structure. Its rectangular shape provides a solid framework that bears the potential to be carved into a more intricate design. As an artist, you can make some alterations to this rectangle to mimic the visual cues of a unique sneaker design. You may want to adjust the length and height to suit the sneaker's profile, whether it's a classic low-top or a trendy high-top. Having set up the basic structure, the next focus should be on detailing. The tongue, which usually carries the logo or brand name, is one such element that can't be ignored. Its position and size often give the sneaker its distinguishing look, serving as an identifier of the shoe model. Similarly, eyelets, where the shoelaces thread through, are essential for sneaker realism. Keep in mind that the distinctive elements of a sneaker come in different types and styles, so ensure an individual approach for each pair you draw. The color and shading phase is a pivotal point in the sneaker drawing process. It can make or break the realistic look and feel of your illustration. Use this opportunity to capture the texture of different materials - the shiny, supple leather, the rough-hewn suede, or the rigid rubber sole. Play around with varying shades and gradients to highlight the sneaker's unique features and contours. Shadows and highlights can also add depth to your sketch, making it look three-dimensional. However, mastering the art of sneaker drawing isn't just about being heavy-handed with the technical aspects – it's also about story-telling. Use the drawing as a medium to tell a story and captivate your audience. Perhaps this sneaker has just triumphed at a challenging marathon, or it could be a shiny new pair, ready to hit the court. Your creative outlook and the story you impart will help create an emotional connection with the viewer, even if they're peering at a simple sneaker drawing. In short, successful sneaker illustration is a combination of meticulous precision, an eye for detail, understanding of color and texture interplay, and a dash of creativity to narrate a compelling story. With practice and persistence, you can master the art of drawing a sneaker that echoes realism and resonates emotively.
Drawing a High Heel
In the realm of shoe design, the allure of high heels is unquestionable. High heels possess an intrinsic chic and class, imbued with an artistry that harnesses the essence of femininity. However, drawing a high heel is no simple task, as it involves adhering to certain geometry calculations, differing perspectives, and intricate detailing. But with proper understanding and practice, one can master this art of drawing a high heel step-by-step. The first step toward sketching a high heel is to create its basic skeleton structure. Start with rough lines for the outline of the shoe, mapping the ground length and the heel's elevation. It's crucial to keep these lines proportionate to form a realistic high heeled shoe. The second step involves refining the sketch with a well-defined contour to shape up the shoe structure. As you shape the contours, remember to maintain the elegance and the sharp lines that are characteristic of high heels. Next, focus on the heel itself, which is an iconic part of the shoe. It is an elongated structure, often varying from pencil-thin stilettos to slightly thicker heels for more balance. Sketch this detail carefully while adhering to the perspective rules – the further parts should be smaller than the closer ones. Afterward, indicate the rim between the shoe body and its sole to add a realistic touch. The next crucial part is the front design of the high-heeled shoe – from peep-toe designs to ornate coverings. Alter the design and style per your choice but ensure that it adheres to the overall anatomy of the shoe. Once the sketch is ready, erase the primary guiding lines and refine your sketch. Add shadows and highlights, noting that they play a pivotal role in lending a three-dimensional effect to the shoe. The final step involves adding texture details to the shoe. Whether your high heels are made of leather, satin or velvet, infuse the unique texture into your sketch to amplify the look. Use soft and hard pencil strokes to render the correct feel. Drawing a high heel is a process that involves both an artist's eye and a keen eye for detail. Therefore, never rush the process, whether you're adding gradual shading to show folds in the footwear material or creating the perfectly tapered heel. As you master the step-by-step process of drawing different types of shoes, including high heels, you'll find your sketches capturing the elegance, allure, and design of these fashionable foot accessories increasingly accurately. This artistic journey, with its challenges and victories, is an excellent example of how manual skills, creativity, and scientific knowledge can work together to create beautiful results.
Drawing a Boot
Drawing a boot is a fun and creative process that requires attention to detail. It is essential to understand that a boot, unlike a sneaker or dress shoe, carries its own distinctive shape and structure. The boot's charm lies in its robustness and rugged exterior, which adds an exciting angle to the drawing process. When starting to draw a boot, it's convenient to begin with a baseline sketch. This empowers the artist to define the boot's shape and contour. Typically, most boots have a broad base that narrows as it moves upwards. This should be factored into your sketch to ensure an authentic look. Furthermore, minute details like seams, laces, zippers, or straps should also be captured, adding depth and character to your shoe drawing. Interestingly, it is the shading and texture that genuinely bring a boot sketch to life. Boots, unlike other types of shoes, possess unique textures arising from leather or suede materials used for their creation. By incorporating these textures via shading and strokes, the drawing transforms into a realistic boot depiction. Incorporating shading also enhances the boot's three-dimensional effect, providing it an elevated look on a flat surface. Audience engagement is essential in such a tutorial. Encourage amateur artists to experiment with different styles and boot types, like combat boots, cowboy boots, or hiking boots. Each type has its own unique features and detailing, which will help artists adapt to varying drawing scenarios. Conclusively, drawing a boot requires a blend of accurate sketching, careful detail incorporation, and appropriate shading to bring it to life. It not only helps to bolster drawing skills but also deepens the understanding of different textures, shades, and forms. By mastering boot drawing, you get one step closer to becoming a versatile and adaptive artist. Aim to keep evolving your skills and experimenting with diverse techniques.
Adding Details and Textures to Enhance the Image’s Realism
An immersive journey into enhancing image realism awaits you as we delve into the world of photo editing in this article. Understanding the mechanisms of adding details and textures is pivotal to achieving a realistic outcome in any image enhancement process. When it comes to improving realism in images, it's not just about adding elements, but it's using them effectively. We will unravel the art of photographic improves in three well-structured segments for a comprehensive grasp. Each section representing a new chapter of your educational journey, starting from how light and shadow factor into the equation of realism. Moving forward, we will explore the incorporation of textures in a way to mirror reality and finally, we will finalize our image-enhancing journey with a lesson on the significance of colours and the finishing touches they bring. The first segment that awaits us is ‘Depicting Light and Shadow’, where you will learn how the intelligent use of these two factors can add life to your image. We will uncover the secrets that artist employ in their work while ensuring an engaging learning experience. Join us, as we dive headfirst into this captivating world of digital enhancement.
Depicting Light and Shadow
In creating an appealing and detailed image of a shoe, a fundamental aspect that deserves substantial attention is Depicting Light and Shadow. These are not just mere elements of drawing, but integral components that have the power to either make or break the image's illusion of realism. Essentially, light and shadow function as narrative devices in the realm of illustration, informing the audience about the shape, form, depth, and texture of the subject – much like words forming comprehensive sentences in a story. Captured accurately, they bring to life the 2-dimensional representation of the shoe, transforming it into a tangible object in the minds of the viewers that they can almost reach out and touch. When it comes to drawing a shoe, light is utilized to highlight the details and textures of the article – it amplifies the tactile qualities of the leather, the fluent curves on the design, or the minute stitches on the seams. It works to convey the physical attributes of the shoe, emphasizing the attributes that make it unique. On the contrary, shadows introduce depth and volume to the object under study, focusing on the spatial dimension that defines how the shoe occupies space. It creates an illusion of shape and form, reflecting the unseen dimensions of the shoe. Whether it's the hollow beneath the arch, the firmness of the heel, or the depth of the shoelaces' intertwining - shadows narrate the spatial story of the shoe. Beside each other, the dichotomous pair of light and shadow function together to bring coherence and harmony to the image. They follow a precise dance dictated by the source of light, in unison revealing the contours, the curves and the dimensions of the shoe. Therefore, a craftful and deliberate touch while depicting these two elements not just enhances the realism of the shoe but also manages to engage the viewer more profoundly, making them appreciate the unique details and the textured finesse that makes the shoe - a remarkable piece of art in itself. Thus, while attempting to enhance the realism of an image, light and shadow are as significant as the shoe's actual lines and textures. A successful depiction of these elements, therefore, requires careful observation, fine detailing, and an understanding of viewing perspectives. Mastering these critical aspects can transform a simple drawing into a vibrant masterpiece, injecting life, authenticity, and intrigue into a seemingly ordinary shoe. As they say, beauty lies in the details, and in the realm of drawing, it's undisputedly the subtle play between light and shadow that brings those details to life.
Incorporating Realistic Textures
Incorporating Realistic Textures When weaving a detailed depiction such as a shoe, the incorporation of realistic textures inevitably plays a crucial role. Understanding and replicating the various textures found on a shoe is not as daunting as it might initially appear, and the process possesses the potential to significantly enhance the image's overall realism. To begin with, observe an actual shoe meticulously first. Notice the unique texture of each component; the smoothness of the leather, the ruggedness of the laces, the soft fluffiness of the interiors, the graininess of the sole. The discrepancies in these textures make a shoe what it is, and therefore, a key aspect of emphasizing realism in your drawing lies in your adept ability to mimic these textures correctly. Detailed shading methods make the texture representation process much easier. This technique requires various types of pencils that range from hard (H) for light lines to soft (B) for darker and broader strokes - they help enunciate the depth and character of each texture. You can use cross-hatching for the fabric or circular strokes for capturing the leather's unique properties. A blending stump can help you, too, to smooth out the rough lines and bring about that natural, soft effect. The role of light and its usage should not be underestimated when adding textures. It dictates how human eyes perceive depth, size, and texture, seriously influencing the high-lights and shadows that must be included in the drawing to convey the "tactile feel" visual. It's important to note though, that you should take care to never over-exaggerate these textures. Although adding details is crucial to reinforcing realism, oversaturating the drawing with excessive texture may, contrary to your intentions, take away from its naturalistic appeal, making it appear less realistic. Lastly, it's not all about the precision of stroke and finessing detail. Patience plays a significant role since quality cannot be rushed. Remember that the level of detail you invest in bringing the textures of the shoe to life directly influences the depth and realism of the image. In conclusion, mastering the art of incorporating realistic textures requires time and practice—it's an ongoing learning process. As you continue your artistic journey and learn to draw shoes or any other objects, these skills of texture detailing will become stronger, substantially enhancing your efforts to capture realism in your images.
Finalizing with Colors and Finishing Touches
Finalizing with colors and finishing touches is an essential element in the creative process of drawing a shoe, especially when it comes to adding realism. This phase can make your drawn shoe look like its real-life counterpart, complete with the brand's specific details and textures. Firstly, when choosing colors, it's essential to select a palette that corresponds to the shoe's actual shades. Scan the shoe for its primary and secondary colors, and try to match them as closely as possible using your chosen medium (be it colored pencils, paint, or digital tools). Don't forget to include the subtle nuances and gradient variations that often color real shoes. For instance, the purported 'black' of leather isn't typically pure black, but a mix of dark browns, blues or greens depending on the light source and reflection. Also, consider the texture of the shoe. Is it glossy, rough, smooth or shiny? Is it made of leather, canvas, or suede? Translate these aspects into your drawing through strategic shading, hatching or cross-hatching. The way you apply your color can give a hint of the material, for instance, lighter, directional strokes may suggest a rough canvas, while a polished, even application of color can mimic the sleekness of leather. Furthermore, shadows and highlights are crucial finishing touches that add depth and dimension to your drawing, turning it from a 2D image into something more 3D and lifelike. Identify the light source and how it interacts with the shoe's surface. Apply darker tones in areas where light is least likely to hit and contrast with lighter tones where the light is most likely to reflect. Finally, pay attention to the minute details that give the shoe its character. This might include stitch lines, patterns on the sole, logos, or decorative elements such as buckles or laces. You might also want to add wear-and-tear effects like scuffs or creases that make your shoe look used or worn in. In conclusion, finalizing with colors and adding the finishing touches transforms your drawn shoe from a simple sketch to a detailed, realistic piece. It’s a crucial, rewarding stage that enhances the authenticity of your image and brings it closer to reality. Remember, the devil is in the details- the smaller, subtle touches that breathe life into your work.