How To Draw A Lion For Kids
Here is the introduction paragraph: Are you ready to unleash your creativity and learn how to draw a majestic lion? Drawing a lion can be a fun and exciting activity for kids, and with the right guidance, they can create a roaring masterpiece. In this article, we will take you on a journey to learn the basics of drawing a lion, provide a step-by-step guide to help you get started, and offer some valuable tips and variations to make your lion drawing truly special. To begin, let's start with the fundamentals. Understanding the basics of drawing a lion is crucial to creating a realistic and impressive drawing. In the next section, we will explore the essential elements of a lion's anatomy and provide a solid foundation for your artistic journey. So, let's dive in and learn the basics of drawing a lion!
Understanding the Basics of Drawing a Lion
Drawing a lion can be a challenging yet rewarding experience, especially for those who are passionate about wildlife and art. To create a realistic and captivating lion drawing, it's essential to understand the basics of its anatomy and structure. This involves familiarizing yourself with the lion's body shape, learning the basic shapes that make up its face, and understanding the importance of proportions in drawing a lion. By mastering these fundamental elements, you'll be able to bring your lion drawing to life and capture its majestic beauty. In this article, we'll delve into the basics of drawing a lion, starting with the foundation of its body structure. By understanding the lion's body shape, you'll be able to create a solid foundation for your drawing and set yourself up for success. So, let's begin by familiarizing yourself with the lion's body structure.
1. Familiarize yourself with the lion's body structure
. Here is the paragraphy: Familiarize yourself with the lion's body structure. A lion's body is similar to that of a large cat, with a few distinct features. They have a short, tawny or golden coat with a long mane that covers the head, neck, and shoulders. The mane serves as a sign of masculinity and helps protect the lion's neck during fights. Lions also have a tufted tail with a black tip, which they use for balance and communication. Their ears are small and rounded, and their eyes are a piercing yellow. When drawing a lion, pay attention to the proportions of the body. The head is relatively small compared to the body, and the legs are long and powerful. The lion's body is also slightly elongated, with the hindquarters being slightly higher than the front. By understanding the lion's body structure, you can create a more accurate and realistic drawing.
2. Learn the basic shapes that make up a lion's face
. When it comes to drawing a lion's face, it's essential to start with the basic shapes that make up its features. Begin by drawing a large oval for the head, making sure it's tall rather than wide. The oval should be slightly tilted, with the top end leaning towards the back of the head. Next, draw a smaller oval for the muzzle, connected to the head by a gentle curve. The muzzle oval should be positioned at a slight angle, with the top end pointing towards the nose. For the eyes, draw two almond-shaped ovals, making sure they're fairly close together and angled slightly upwards. The nose is a small triangle, and the mouth is a curved line that follows the shape of the muzzle. Don't forget to add two small circles for the nostrils and a few curved lines to indicate the lion's whiskers. By breaking down the lion's face into these simple shapes, you'll be able to get a sense of its overall structure and proportions, making it easier to add more details and features later on. Remember, the key to drawing a lion's face is to keep it simple and symmetrical, so don't be afraid to use guidelines and measurements to help you get everything in proportion. With a little practice, you'll be drawing a lion's face like a pro in no time!
3. Understand the importance of proportions in drawing a lion
. When it comes to drawing a lion, proportions play a crucial role in creating a realistic and visually appealing image. Understanding the proportions of a lion's body is essential to ensure that your drawing looks balanced and accurate. A lion's body is roughly 1.5 to 2 times the length of its head, with the head being about one-quarter of the total body length. The neck is relatively short, and the shoulders are broad and muscular. The legs are also proportionate to the body, with the front legs being slightly shorter than the back legs. The tail is long and tufted, making up about one-third of the total body length. By paying attention to these proportions, you can create a drawing that captures the majestic and powerful appearance of a lion. For example, if you're drawing a lion's head, make sure the ears are in proportion to the rest of the head, and the eyes are positioned correctly in relation to the nose and mouth. Similarly, when drawing the body, ensure that the shoulders are broad and the legs are in proportion to the rest of the body. By getting the proportions right, you can create a drawing that looks realistic and engaging, and that will surely impress your friends and family.
Step-by-Step Guide to Drawing a Lion for Kids
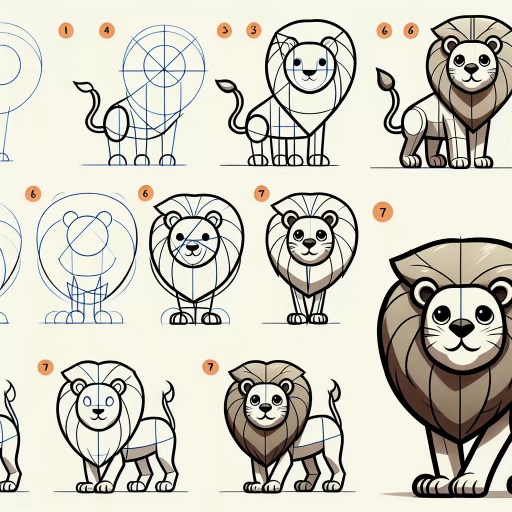
Here is the introduction paragraph: Learning to draw a lion can be a fun and creative activity for kids. With a few simple steps, your child can create a majestic and realistic lion drawing. In this article, we will guide you through a step-by-step process of drawing a lion, covering the basic shape of the lion's body, adding the lion's face and facial features, and finally, drawing the lion's mane and adding texture to the body. By following these easy steps, your child will be able to create a stunning lion drawing that they can be proud of. So, let's get started with the first step: Start with the basic shape of the lion's body.
1. Start with the basic shape of the lion's body
. Here is the paragraphy:
Start by drawing the basic shape of the lion's body. Imagine a large oval for the body and a smaller oval for the head. The body oval should be about 1.5 to 2 times the size of the head oval. Make sure the ovals are connected by a neck, which is slightly narrower than the head. The body oval should be positioned slightly tilted, with the top end leaning towards the head. This will help create a sense of movement and energy in your lion drawing. Don't worry too much about the proportions at this stage, just focus on getting the basic shape right. You can always adjust the proportions later as you add more details to your drawing.
2. Add the lion's face and facial features
. The article is written for kids and parents who want to learn how to draw a lion together. The paragraphy should be easy to understand, fun to read, and provide clear instructions for kids to follow. Here is the paragraphy: Now that we have the lion's body and legs drawn, it's time to add the face and facial features. Start by drawing a circle for the lion's head, making sure it's connected to the body. The circle should be slightly tilted, with the top of the circle leaning towards the back of the lion's body. Next, draw a smaller circle for the lion's nose, making sure it's centered on the head. Draw two small triangles on either side of the nose for the lion's nostrils. For the eyes, draw two almond-shaped circles, making sure they're about one-third of the way down from the top of the head. Add two small circles for the pupils, and make sure they're nice and dark. Draw a curved line above the eyes for the lion's eyebrows, and add two small lines on either side of the nose for the lion's mouth. Finally, draw a long, curved line that follows the shape of the lion's head for the mane. The mane should be nice and fluffy, so make sure to add some texture and detail to it. And that's it! Your lion's face is now complete. Take a step back and admire your hard work – you're one step closer to creating a majestic lion that will roar with pride!
3. Draw the lion's mane and add texture to the body
. To add the final touches to your lion's majestic appearance, it's time to draw the iconic lion's mane and add some texture to the body. The lion's mane is a distinctive feature that sets lions apart from other big cats, and it's a crucial element in making your drawing look like a true king of the jungle. Start by drawing a series of curved lines around the lion's neck, making sure to follow the shape of the head and shoulders. The mane should be thicker and more pronounced around the neck, with the lines becoming softer and more sparse towards the shoulders. You can also add some texture to the mane by drawing short, curved lines that follow the direction of the fur. This will give your lion's mane a more realistic and shaggy appearance. Next, move on to adding texture to the body. You can do this by drawing short, curved lines that follow the shape of the muscles and the direction of the fur. Start at the shoulders and work your way down to the legs, making sure to vary the length and thickness of the lines to create a more natural and dynamic texture. Don't forget to add some texture to the tail as well, using the same technique to create a fluffy and expressive tail that completes your lion's majestic appearance. With the mane and texture in place, your lion is now starting to look like a true king of the jungle, and you're just a few steps away from completing your drawing.
Tips and Variations to Make Your Lion Drawing Roar
Here is the introduction paragraph: When it comes to drawing a lion, many artists stick to the classic pose of a regal lion sitting or standing with its mane flowing in the wind. However, there are many ways to make your lion drawing stand out and roar with personality. By experimenting with different poses and expressions, adding background and scenery to create a lion's habitat, and using different colors and textures to make your lion drawing unique, you can create a truly eye-catching piece of art. In this article, we'll explore some tips and variations to help you take your lion drawing to the next level. Let's start by exploring how experimenting with different lion poses and expressions can add some much-needed personality to your drawing.
1. Experiment with different lion poses and expressions
. Here is the paragraphy: Experimenting with different lion poses and expressions can add a lot of personality to your drawing. Try drawing your lion in different positions, such as sitting, standing, or even lying down. You can also experiment with different facial expressions, like a happy smile or a fierce roar. Don't be afraid to get creative and try out some fun and silly poses, like a lion doing a handstand or playing with a ball. You can also draw inspiration from real-life lion photos or videos to get a sense of their natural behavior and movements. By experimenting with different poses and expressions, you can create a unique and engaging lion drawing that really captures the animal's spirit. Additionally, you can also try to draw different lion breeds, such as the majestic male lion with its shaggy mane, or the sleek and agile lioness. Each breed has its own distinct characteristics, and drawing them can be a fun and educational experience.
2. Add background and scenery to create a lion's habitat
. To create a lion's habitat, let's start by adding some background and scenery. Imagine a vast savannah with grasslands stretching as far as the eye can see. The sun is shining brightly, casting a warm glow over the landscape. In the distance, you can see a few acacia trees, their branches twisted and gnarled with age. A rocky outcropping rises up from the ground, providing a perfect spot for our lion to survey its kingdom. The grass is a vibrant green, with a few patches of yellow and brown where the sun has dried it out. A small stream runs through the center of the scene, its gentle babbling providing a soothing background noise. As we add more details, we can include some of the lion's favorite snacks, like antelopes and zebras, grazing peacefully in the distance. With this idyllic scene set, our lion can roam freely, its majestic mane and powerful roar commanding respect from all who enter its domain. By adding these background elements, we can create a rich and immersive environment that brings our lion drawing to life.
3. Use different colors and textures to make your lion drawing unique
. When it comes to adding some personality to your lion drawing, don't be afraid to get creative with colors and textures! A lion's majestic mane can be depicted in a variety of ways, from a shaggy, golden brown to a sleek, black coat with hints of copper. You could also experiment with different textures, such as adding soft, fluffy fur to your lion's belly or rough, scaly skin to its paws. To make your lion drawing truly unique, consider adding some fun patterns or markings, like stripes or spots, to its fur. You could even try drawing your lion in a fun, cartoonish style, with exaggerated features and bold, bright colors. For a more realistic look, you could study the different colors and textures of real lions, from the tawny coats of savannah lions to the darker, more muted tones of forest lions. Whatever style you choose, remember to have fun and let your imagination run wild!