How To Propagate Spider Plant
Understanding Spider Plant Propagation
The Basics of Spider Plant Propagation
The Spider Plant, scientifically known as Chlorophytum comosum, is one of the most popular houseplants known for its beauty and resilience. To propagate this plant, there's an array of methods that have been proven effective: by using plantlets, division, and seeds. The simplest route, especially for beginners, is through plantlets. The spider plant produces babies or small plantlets at the end of its legs, which can be separated and planted independently. While this might sound like a straightforward task, proper knowledge and a meticulous hand are necessary to prevent harming the parent plant or the plantlets.
Optimal Conditions for Spider Plant Propagation
The success of any plant propagation is significantly influenced by the environment in which the procedure is carried out. The spider plant is a tropical indoor plant and it thrives in well-draining soil, bright but indirect light, and moderate temperature ranging from 70 – 90 degrees Fahrenheit. In setting up the space for propagation, you must replicate these conditions. The pot or container should have holes to allow excess water to drain, the soil used should be light and fertile, and the plant should be situated away from direct sunlight as it can cause leaf scorching. Providing these optimal conditions allows the plantlet to quickly root and mature.
Troubleshoot Common Problems in Spider Plant Propagation
As with any plant, Spider Plants can pose a few challenges during propagation. For instance, the plantlets can wilt and die if not planted promptly after being separated from the parent plant. This can be mitigated by preparing the pot and soil beforehand. Another common problem is the yellowing of leaves which could signal overwatering or lack of adequate nutrients. Regular monitoring and proper plant care can easily solve these propagation problems. If a plant appears droopy after propagation, it could be due to watering problems or temperature stress. It's important to adjust watering schedules and rectify temperatures where necessary to maintain a comfortable environment for the Spider Plant.
Precise Steps to Propagate Spider Plants
Step-by-Step Guide on Propagating Spider Plants from Plantlets
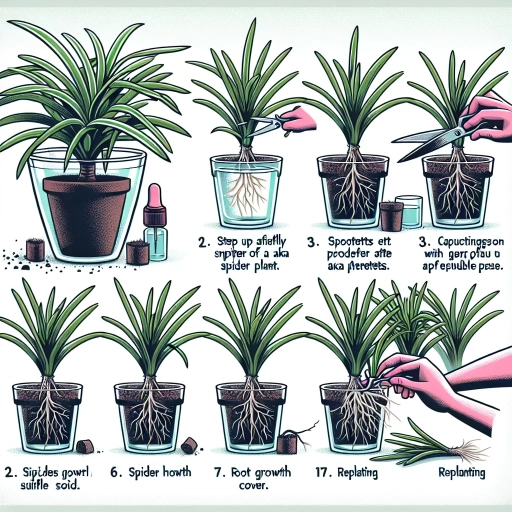
Spider Plant propagation from plantlets could be likened to a journey – one that begins with a careful selection of a healthy plantlet from the parent Spider Plant. The selected plantlet should ideally have multiple roots and a set of mature leaves. The plantlet is gently separated from the mother plant and immediately transferred to a prepared pot containing moist, well-draining soil. In the initial days after transplanting, the plantlet should be watered considerately but sparingly to promote root growth. Apart from that, providing it with adequate sunlight and temperature also supports growth.
Success Tips on Propagating Spider Plants through Division
Propagation via division method provides a faster way to get a large, mature Spider Plant. This method, however, requires a medium to large-sized Spider plant with multiple crowns. The plant is carefully un-potted and the root ball gently separated into two or more pieces, ensuring each division has healthy roots and foliage. These divisions are then repotted into individual pots with appropriate soil and cared for as independent plants. Periodic watering, provision of indirect sunlight, and maintenance of suitable room temperature are vital post-propagation care steps to ensure subsequent growth.
Overcoming Challenges While Propagating Spider Plants from Seeds
Propagation from seeds is rarely used due to the length of the process. However, for those who prefer this method, it's necessary to understand it might take months before a mature plant is realized. The seeds are sowed in a pot with moist soil, covered lightly with soil and kept in a bright, warm location. Watering should be minimal to prevent waterlogging which can cause rot. This method is most successful when the seeds are fresh, the temperature is kept constant, and the young seedlings are accorded the right care.
Maintaining Healthy Spider Plants Post Propagation
Caring for Newly Propagated Spider Plants
The work doesn't end once the Spider Plant is successfully propagated. The newly propagated plant will need consistent care to grow and flourish. This includes appropriate watering, sufficient light exposure, and ideal temperatures. The first month post-propagation is crucial for the Spider Plant and may determine its survival. Over or under watering during this period may stunt the plant growth. Similarly, too much direct sunlight can cause leaf burn, while too little light can result in a leggy and unhealthy-looking plant.
Feed Your Spider Plant with the Right Nutrients
Proper nutrition plays an essential role in promoting healthy growth of the Spider Plant. Spider Plants are light feeders, which means they should be fertilized sparingly using a diluted liquid fertilizer. Overfeeding can cause salt buildup in the soil and the tips of leaves may begin to brown as a result. Applying fertilizer during the spring and summer months provides the plants with the vital nutrients they need during their active growing season.
Prevent and Tackle Pests and Diseases in Spider Plants
Spider Plants are notably hardy and resistant to most pests and diseases. However, common houseplant pests such as aphids, spider mites, and whiteflies can infect Spider Plants if not correctly cared for. Regular inspection of the plant, keeping the plant's surroundings clean, and applying organic pest control methods can effectively curb any potential pests attack. Diseases such as root rot can also affect Spider Plants, particularly when over-watered or kept in poorly-draining soils.