How To Draw A Dove
 Artistic exploration takes many forms, and for those with a special place in their heart for avian friends, sketching a dove can often be a treasured journey of creativity. This enlightening article will equip you with comprehensive skills to masterfully depict this symbol of peace - rendering it from a rudimentary outline to a captivating creation colored with finesse. To steer you towards achieving a vivid masterpiece, our step-by-step instructions are divided into three meticulously designed segments. We commence with "Understanding the Basics of Sketching a Dove," laying down foundational knowledge to effectively create an accurate and authentic representation. Next, our guided tour proceeds towards the "Step-By-Step Guide to Sketching a Dove", ensuring you have an explicit blueprint to harness your artistry. Lastly, any artwork is incomplete without the finishing touches - our final part, "Enhancing Your Dove Sketch with Colors and Background", enlivens your sketch from being just black and white scribbles to a nuanced composition illuminated with depth and perspective. Grasping these basics could be the first step on your winding journey towards becoming an artistic maestro. Now, let's start with a simple pencil and paper, preparing to understand the basics of sketching a dove.
Understanding the Basics of Sketching a Dove
The art of sketching a dove - a symbol of peace - beautifully encapsulates the elegance of nature. Understanding the basics of dove sketching, however, necessitates a three-pronged focus. Firstly, the acquisition of the correct sketching tools is imperative; the quality of your equipment greatly influences the outcome of your artwork. Secondly, mastering the essential skills of sketching will determine how accurately you can represent your subject. Lastly, gaining a thorough understanding of dove anatomy is also important. As sketching is more than just attempting to replicate an image - it's about understanding the subject itself. Effective representation of a dove's anatomy greatly contributes to the richness and realism of the sketch. In subsequent sections, we will delve deeper into each of these critical aspects beginning with 'The Importance of Getting the Right Tools.' Ensuring that you are well-equipped for the task lays the foundation for a high-quality sketch. The right tools can make your sketching process smoother and more precise, and truly bring your dove to life on paper.
The Importance of Getting the Right Tools
The Importance of Getting the Right Tools Success in sketching a dove, or any artwork, heavily depends on the quality and suitability of the tools being used. Selecting appropriate sketching tools not only enhances your ability to capture detail but also contributes significantly to the overall outcome of your art piece. The first tool of importance in sketching is the pencil. It serves as the backbone for your drawings. Quality pencils offer a variety of hardness and softness, allowing artists to create different textures and shades. A hard pencil (H) is ideal for light, fine lines often used in the initial stages of sketching. Accordingly, a soft one (B) is perfect for creating dark, thick lines best for final touches and shading. An eraser is also a vital tool for rectifying mistakes and creating highlights. A quality eraser should efficiently remove lines without damaging the paper or leaving behind any residue. Sketching papers play a critical part too. They differ in texture, weight, and color, each influencing your art differently. Smoother papers, for instance, are fitting for detailed works whereas rougher ones are excellent for creating textured appearances. Similarly, heavier papers can handle more erased lines and are less prone to damage. Further tools you may need include blending stumps for smudging, sharpeners to ensure your pencils are always sharp, and rulers for more accurate lines. A sketching set may also be of use, featuring different types of pencils, charcoal sticks, and graphite sticks allowing more room for experimentation. In conclusion, having the right tools is not simply about convenience; it is crucial for the execution, quality, and success of your sketching project. It’s a fundamental understanding for aspiring artists and serves as the bedrock of producing compelling artwork. Therefore, before you set out to sketch your dove, take a moment to ensure you have the right tools - they can make all the difference.
Mastering the Basics of Sketching
Mastering the Basics of Sketching is a fundamental step towards accurately capturing the majestic image of a dove. This process requires a keen focus on essential elements such as shape, line, tone, and texture. Understanding these basics will empower you to eventually draw anything, from the simplest objects to the complex elegance of a dove in flight. Starting with shapes is often the simplest way to initiate the sketching process. Squares, circles, triangles, and rectangles are simple forms that comprise most complex drawings. The dove's body, for instance, can be effectively represented by ovals and rounded rectangles before your draw more intricate details. Lines play a significant role in depicting direction and movement. The dove's curved wings, its sharp beak, its delicate feet—each requires lines with specific qualities. Creating these lines with confidence and precision, staying consistent in your line weight, will bring energy and life to your bird. Tone and texture are essential for adding depth and realism to your sketches. Varying the pressure of your pencil to achieve different levels of darkness can help convey the depth of the bird's features, distinguishing its soft chest feathers from the harder texture of its beak. It’s also valuable to understand the effects of light and shadow to create realistic textures and features. In our pursuit to sketch a dove, we must remember the importance of practice - the cornerstone of mastering any art form. Consistent sketching hones your observation skills, trains your hands for precision, and helps you develop your unique style. As you get more comfortable with the basics, the complexity of drawing a dove becomes less intimidating. You will find that the basic principles enumerated here - shape, line, tone, and texture - will serve as your reliable guides. Their application remains consistent even as you venture into more complex territories, such as drawing a dove in graceful flight. Understanding and mastering the basics of sketching paves the pathway towards more advanced artistic expressions. Your journey towards sketching a perfect dove is essentially a commitment to mastering these basics.
Understanding Dove Anatomy for Accurate Sketching
Understanding dove anatomy rightly is an integral part of accurately sketching these serene birds. Grasping the intricacies of their body structure not only aids in creating realistic illustrations but also imparts a sense of the bird's life and energy onto the canvas. A dove's body can be roughly divided into four main sections – head, body, wings, and tail – each having unique features that lend to its delicate and serene appearance. The head of a dove is small, rounded and houses the beady eyes and a small beak that come together to give the bird its characteristic gentle look. Observing the head's proportions in relation to the body forms the primary step in understanding dove anatomy. The dove’s body is usually stout, rounded, and compact. Unlike other birds, the chest region is fuller, giving it a robust form necessary for achieving the desired realism in your sketch. Pay special attention to the soft, fluffy texture of the feathers, as their precise depiction can bring about a touch of natural grace and realism to your bird sketch. The wings are another critical aspect to concentrate on. Doves possess relatively broad, strong wings, which when sketched with attention to the fine details of the wing feathers, add dynamism to the drawing. Remember, the wings are the most powerful and flexible parts of a dove's body, giving it its majestic flight. Capturing this essence is key for an accurate dove sketch. Lastly, the tail of a dove, though seemingly straightforward, adds balance to the body's overall structure. The tail feathers, complete with their intricate patterns, can add an impressive final touch to your sketch. In conclusion, a keen understanding of a dove's anatomy is crucial in neatly capturing the bird's elegance and tranquillity through your sketches accurately. It’s about the painstaking observation of the small details and nuances of how each body part comes together to form the graceful figure of a dove. This understanding forms the basis of accurate and realistic dove sketching, paving the way for you to create high-quality, engaging and informative bird artwork.
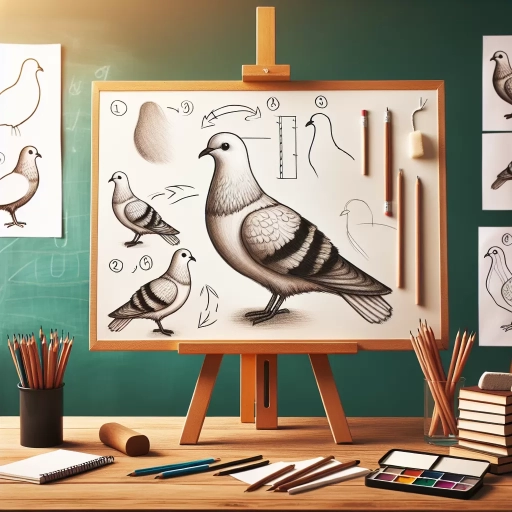
Step-By-Step Guide to Sketching a Dove
Mastering the art of sketching a dove may seem daunting at first, but through a systematic approach, even novices can create a realistic representation. This detailed guide will help you navigate through the process effortlessly, broken down into three easily digestible steps. We will first start with establishing the basic shapes, setting up a solid foundation with uncomplicated figures that shapes the structure of the dove. We then proceed to the second stage: adding details and refining the outline. This phase is where the geometrical forms start coming to life and the personality of the bird begins to emerge. Finally, the third step involves shading and texturing to give the dove a realistic look, infusing the sketch with depth and dimension that breathes life into your bird. With these steps, your pencil can deftly transform a blank canvas into a dove in flight. Let's dive into the first step: starting with basic shapes, which is the key to making the process manageable and enjoyable. The beauty of sketching begins with seeing complex objects as simple shapes, so let us embark this creative journey from here.
Starting with Basic Shapes
Starting with basic shapes is a fundamental and effective technique in sketching a dove, particularly for beginners. This preliminary step in drawing serves as the cornerstone upon which more complex elements and details are subsequently established. Firstly, it's essential to ascertain the overall form of a dove, noticing that its body can essentially be divided into two key geometric forms: an oval and a circle for the body and head, respectively. Remember that when beginning with basic shapes, the integral goal is to capture the dove's proportions accurately rather than striving for a detailed outcome. This process provides a simplified vision of the final image, helping the artist understand the dove's structure in a much easier way. The oval for the body is somewhat elongated, reflecting the dove's somewhat compact body. The circle for the head is considerably smaller, yet conspicuously round, designed to represent the dove’s small, rounded head. The application of basic shapes extends beyond the body and head. The dove’s tail, for instance, when observed closely, resembles a thin triangle, and its wings can be sketched as larger, curved triangles attached to the oval. Each wing will follow a slightly scalloped pattern, with the curve of the upper edge more pronounced than the lower. Remember to lightly sketch these initial shapes, as they will be completely integrated into the finished sketch. Drawing basic shapes are not limited to the physical form of the dove alone. Art enthusiasts often use a line of action - a simple line that runs through the dove’s body in the desired action or movement direction. This technique helps facilitate a more dynamic, animated end result, creating a sense of motion that makes the sketch appear more lifelike. This phase is all about breaking the complex form of a dove into simpler shapes. It is the artist's secret to tackling intricate sketching tasks. By mastering this technique, artists not only struggle less as they progress to complex sketching but are also more likely to produce proportionate, dynamic, and appealing sketches, even when they venture into adding more details of the dove like the beak, the feathers, and the eyes in the following steps of the sketching process.
Adding Details and Refining the Outline
Adding details and refining the outline can be a truly gratifying stage when sketching a dove, as it allows you to breathe life into your initial barebones design. Like a sculptor attentively chiseling away to reveal a masterpiece, this step involves honing your initial rough sketch into a more refined, detailed, and expressive figure. When executing this step, the primary aim is to progressively smooth out your draft, ensuring that each line seamlessly connects with the next to create a harmonious representation of a dove. Your first aim should be to focus on the bird's body, paying close attention to detailing the feathers. Unlike human hair or the fur on a dog, drawing bird feathers requires a good amount of focus. Birds, like a dove, have feathers that overlap, so a key point of focus will be capturing the layers that add depth and texture to the dove's appearance. After satisfactorily detailing the body, your attention should then pivot to the bird's head and beak. These are instrumental features that give the dove its gentle expression. The eyes, especially, should be drawn carefully - they can greatly impact the overall emotion that your dove sketch conveys. Furthermore, beak shape and size vary among bird species, therefore ensure that your depiction is true to that of a dove. Then comes the wings and tail feathers. The wings of a dove are their most prominent feature and necessitate considerable detailing. Draw attention to the unique shape of individual feathers, the curve of the wing, and how they fold onto the body. Note that doves have an exceptional wing shape - they are broad but taper down to a pronounced point. Simultaneously, the tail feathers should also be accented, indicative of the dove's ability to stay balanced during flight. Lastly, refine the outline. This stage involves meticulously going over your drawing, smoothing and tweaking lines as necessary. It provides an opportunity to fix any previously unnoticed errors, such as asymmetry, and to imbue your dove sketching with a professional finish. Adding details and refining the outline is indeed a time-intensive process, but it signifies a gratifying turning point in your artwork. It sets your sketch apart from being a mere rough depiction and towards becoming a more sophisticated rendition of a dove. Remember to practice patience and concentrate on the finer details, and you'll find yourself well on your way to creating a detailed, meticulously drawn dove. Can this exciting process be time-consuming? Certainly. But, it’s in this artistic perseverance where your abilities as an artist are honed, propelling you from beginner to accomplished illustrator.
Shading and Texturing to Give the Dove a Realistic Look
Shading and Texturing to Give the Dove a Realistic Look Undeniably, one of the integral parts of sketching a dove that sets apart an amateur drawing from a professional touch is the addition of shading and texturing. Surprisingly, these techniques can breathe life into the dove sketch, making it appear incredibly realistic. Shading is fundamental to creating depth and dimension, which tricks the eye into perceiving a two-dimensional sketch as a three-dimensional object. To give your dove a realistic look, start by identifying your light source. This will determine the areas on the dove that should be darker or lighter. Typically, the parts of the dove facing the light source will be lighter, while those away from the light will be darker. Remember, shading should be done subtly, using soft and smooth strokes. You may gradually build up the darkness instead of rushing to add more pencil lead to the paper. This builds up layers that create a rich, detailed finish. Close observation of a real dove reveals its plumage characterised by soft, small feathers which require intricate texturing to depict accurately. Texturing amplifies the level of precision and realism in the sketch. To achieve this, you can use a technique called hatching, which entails making small, closely spaced parallel lines. For the dove’s chest and underparts, use curved hatching lines that follow the form of the bird's body for a soft, fluffed-up look. On the flip side, you can employ straight, stiffer lines for the wings and tail feathers. This effectively highlights the variations in the dove's plumage. Additionally, include the subtle marking and colour variations characteristic of a dove’s feathering pattern. Incorporating these markings and colour changes is essential to avoid a flat, non-descriptive image. While you are effectively making a monochrome sketch, you can imitate colour changes by using tonal variations to depict different shades. Use lighter strokes for lighter grey areas and increase the hardness of your pencil for darker regions. Incredibly, the fine details might seem intimidating and meticulous, but they contribute significantly to the authentic appearance of your dove sketch. Keep practicing the techniques of shading and texturing and soon, your dove will not just be a sketch, but a representation that exudes lifelikeness, reflecting the true essence and characteristics of a dove. This can create an engaging and enjoyable user experience, as readers learn to sprinkle your fresh ideas and techniques into their own drawing practices. Thus, beyond the mere act of drawing, your guide becomes a tool of inspiration, cultivating creativity and artistic flair among readers. Above all, armed with your tips, readers can embark on a rewarding journey to create a compelling rendition of a dove that does justice to its natural elegance and beauty.
Enhancing Your Dove Sketch with Colors and Background
Captivating the essence of a dove through sketching is an art. However, the true magic unfolds when you enhance that sketch with colors and background, transforming your simple sketch into a lively and vibrant masterpiece. This article reveals the secret to this transformation, anchored in three critical elements: choosing the right colors for your dove, applying digital coloring techniques for a stunning effect, and creating a compelling background to complement your dove sketch. By harnessing these strategies, you can breathe life into your sketch, creating a masterpiece that tells an engaging story. Choosing the right colors for your dove is the first step towards this transformation. The color choice should not only reflect the physical attributes of a dove but also resonate with its symbolic and emotional undertones. A dove is not just a bird; it is traditionally a symbol of peace, love, innocence, and hope. So, the colors you use should be able to convey these feelings effectively. Once you have a grasp on this concept, you'll be one step closer to attaining a captivating dove sketch masterpiece. Read on to explore more on this front.
Choosing the Right Colors for Your Dove
Choosing the Right Colors for Your Dove When it comes to enhancing your dove sketch with colors and background, an essential element involved is selecting the right colors. The comprehensive choice of colors contributes significantly to the final product's visual appeal and emotional impression, critical elements in art and design. Doves are widely known for their tranquil, graceful, and serene disposition, so the colors chosen should embody these characteristics to accurately portray their image. Primarily, one must bear in mind that doves are typically light, often seen in nuances of white, soft greys, and occasionally a splash of pastel shade or earthy hue. If portraying a 'pure' dove, primarily white should be used. However, an overly stark white should be balanced with numerous shades of grey to add dimensions, preventing the dove from appearing one-dimensional or flat. So, while not directly colorful, shades of grey can act as the perfect complement to the white. Those willing to experiment can even introduce a hint of color in certain areas. For instance, introducing a bit of blue or lavender to the dove's wings or breast can evoke a sense of tranquility and peacefulness. These colors' cool tones harmonize with the dove's symbolic meanings. An occasional burst of warm tones such as light-brown, cream, or even pale peach can also add a lovely touch of contrast, enhancing the feeling of vibrancy and life in the piece. Also, the background color plays heavily into the overall composition, with cool backgrounds providing harmony, and warm colors giving powerful contrast. A serene blue sky scene, for instance, can enhance the dove's symbolism of peace, while a sunset orange setting can highlight contrasts, creating a striking image. In all instances, color choices should adhere to the essential rule of harmony. In conclusion, choosing the right colors for your dove is not only crucial for visual appeal, but it also affects the overall mood and message conveyed by your artwork. Therefore, consider these tips when bringing your dove sketch to life, and remember, the best designs result from detailed observation, a creative mind, and the courage to test combinations until you find the right balance.
Digital Coloring Techniques for a Stunning Dove
In the realm of digital art, infusing color into your dove sketch can dramatically amplify its allure and convey a depth of emotion that simply cannot be achieved with monochrome sketches. This section will lead you through the exploration of digital coloring techniques that can transform your basic dove sketch into a vibrant masterpiece. The foundation of any flawlessly colored drawing is understanding the light source and how it interacts with your subject. For your dove, note how the light source will influence the appearance of shadows, the play of colors, and the manifest details on the bird’s feathers. The soft color of a dove offers the perfect blank canvas for experimenting with different color schemes and lighting scenarios. One of the most effective digital coloring techniques is layering. This concept, while seemingly basic, requires a patient hand and an artistic eye for detail. Begin by filling in the basic color – this will serve as your base layer. For a dove, this might typically be a shade of white or incredibly light gray. Following this, you can layer different tones on to give your dove the dimensionality it needs. Highlighting is another invaluable tool in your digital coloring arsenal. Highlights can give your dove sketch a luminous quality, making the feathers seem almost iridescent. Using lighter hues, you can add highlights where the light touches the bird's body. Remember that moderation is key here - too much highlighting can make your dove look unnatural. An equally important aspect is the detailed work on the dove's feathers. Each feather might take on a slightly different hue, creating a stunning mosaic effect when viewed as a whole. Use a smaller brush size to color in every single feather on the dove's body. The color variation could range from silvery white to a hint of blue, or even a soft purple. Adjust the opacity to ensure that the variations are subtle yet effective. What brings a digital art piece together is the incorporation of a well-crafted background. The color scheme of the background should complement the main subject, in this case, the dove. For instance, a light sky-blue background will contrast well with a white dove, and the addition of few fluffy white clouds and sunlight can enhance the overall composition, ensuring the dove really stands out. In conclusion, digital coloring techniques give you an assortment of tools and tricks to enhance your dove sketch. These methods help you add depth, realism, and emotional resonance to your artwork. The brilliance of digital art lies in your ability to experiment, so feel free to play around with different techniques until you arrive at a result that truly dazzles. Thus, the process of digitally coloring a dove sketch truly encapsulates the beauty of creating art.
Creating a Compelling Background to Complement Your Dove Sketch
Creating a compelling background to enhance your dove sketch is an essential constituent for your drawing to stand out. When developing the backdrop, you should aim to evoke an emotional response from the viewer while complementing the main subject – the dove. Begin by picturing a narrative around the dove sitting peacefully or taking flight. This visualization will help guide your decision on what environment best suits your storytelling. For instance, if you visualize the dove resting, you could draw a serene nature reserve dotted with blooming flowers and green trees. This image can create a tranquil, lush paradise that corresponds well with the symbol of peace the dove represents. On the other hand, imagine a dove majestically soaring through the sky; the complementing background could then be a breathtaking sunset with shades of orange, red, and purple. This scene sets up an ambiance of awe-inspiring freedom. Texture also plays a significant role in the background, providing depth and character to your drawing. Adding layered foliage in the background of a perching dove or demonstrating the movement of clouds where it flies provides a sense of dimension and realism. While you work on this, remember to include less detail in the backdrop to ensure the dove remains the point of attraction. Using gradients or lighter shades can achieve this. Color selection also matters. Warm or pastel colors are preferable when aiming for a peaceful and calm environment, while a vibrant or varied color palette will generate a lively setting. The background, however, should extend the story of the dove, not overshadow it. Therefore, balance is key. An excessively complex background can distract the viewer, so moderation is critical. In closing, creating a compelling background to complement your dove sketch is an art of storytelling in itself. Each element - the setting, texture, color, and degree of detail, work in harmony to support and enhance the portrayal of your dove. With careful consideration and a creative mind, your backdrop can take the viewer on a captivating journey, making your dove sketch truly memorable.