How To Connect Chromecast To Wifi
Understanding Chromecast and its Functions
What is Chromecast
Chromecast is a streaming media adapter from Google that allows users to stream video content to their television. Developed by Google, it is designed to help you get more out of the simplest or oldest TV by allowing it to stream not just from your computer or phone, but also directly from the internet. This means you can watch your favorite TV shows, movies, and web-based content directly on your TV screen without the need for a separate device or an intricate network setups. It is a compact device, controlled through the Google Home app or directly from streaming apps that support Google Cast.
Main Functions of Chromecast
The main function of Chromecast is to provide users with streaming capabilities. It achieves this by being plugged into an HDMI port on a television and then being connected to the internet via a Wi-Fi network. Once connected, streaming content from websites and services that support Google Cast like YouTube, Netflix, and many more is a breeze. The device can also be used to mirror content from a Chrome web browser or screen-share from an Android device.
Advantages of Chromecast
Chromecast offers a number of advantages over other streaming devices. Firstly, it is an inexpensive way to turn any TV with an HDMI port into a smart TV, with the ability to stream from multiple services. Secondly, it is very compact and portable, making it a good choice for traveling or for moving from room to room. Lastly, it is very easy to set up and use, with a simple user interface and straightforward controls.
Steps to connect Chromecast to Wi-Fi
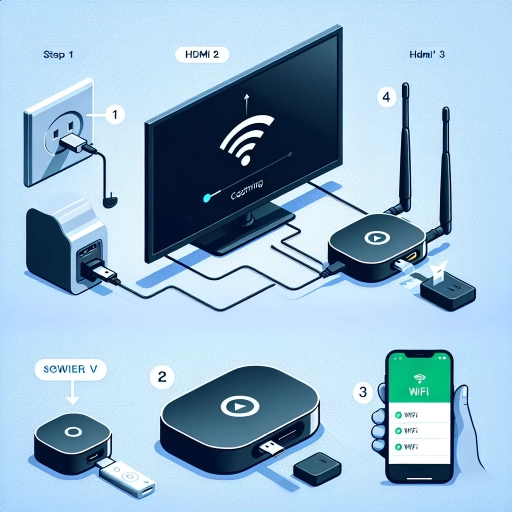
Step 1: Plug in your Chromecast
Connect the micro USB cable to your Chromecast; then plug the Chromecast into an HDMI port on your television. The other end of the micro USB cable should be connected to a power source, whether that be a USB port on your TV or a power adapter connected to a wall socket.
Step 2: Install the Google Home app
After installing your device, you need to download and install the Google Home app on your smartphone or tablet. This app will guide you through the Chromecast setup process, which includes connecting your Chromecast to your Wi-Fi network.
Step 3: Connect your Chromecast to Wi-Fi
Open the Google Home app and tap the Add icon. Select Set Up Device and then pick the Chromecast you want to set up. The app will ask you to verify a code that shows up on your TV screen. After confirming the code, you’ll be asked to set a name for your Chromecast and then be prompted to connect it to your Wi-Fi network.
Troubleshooting common issues when connecting Chromecast to Wi-Fi
The Chromecast Does Not Connect to Wi-Fi
If your Chromecast doesn’t connect to Wi-Fi, ensure that it’s within 15-20 feet of your wireless router. Chromecast operates on a 2.4GHz frequency, so if you’re using a 5GHz network, it may have issues connecting. If the problem persists, try resetting your Chromecast.
The Google Home App Does Not Identify the Chromecast
If the Google Home app doesn’t identify your Chromecast during the setup process, ensure that your smartphone or tablet is connected to the same Wi-Fi network you intend to connect to your Chromecast. In addition, check if Bluetooth is enabled on your device as it is required for the setup process.
Chromecast Does Not Show Up on the TV
If your Chromecast doesn’t show up on your TV, check if the HDMI cable is properly connected to the TV. Also, ensure that the TV is set to display the correct HDMI input. Lastly, make sure that your Chromecast is powered on.