How To Draw Tulips
Drawing tulips can be a delightful and creative experience, allowing artists to express their imagination and bring beauty to life on paper. To master the art of drawing tulips, it's essential to understand the fundamental structure of these flowers, including their petals, stem, and leaves. By grasping the basic anatomy of tulips, artists can create a solid foundation for their drawings. In addition to understanding the structure, mastering various techniques for drawing tulips is also crucial, as it enables artists to capture the intricate details and textures of the flower. Furthermore, adding details and finishing touches to the drawing can elevate it from a simple sketch to a stunning work of art. In this article, we will explore the world of drawing tulips, starting with the basics of their structure. By understanding the basic structure of tulips, artists can set themselves up for success and create beautiful, realistic drawings that showcase the beauty of these iconic flowers.
Understanding the Basic Structure of Tulips
Tulips are one of the most recognizable and beloved flowers in the world, known for their unique shape and vibrant colors. To truly appreciate these beautiful blooms, it's essential to understand their basic structure. By recognizing the main components of a tulip, observing the symmetry and proportion of their shape, and noting the variations in their shapes and sizes, you can gain a deeper appreciation for these stunning flowers. In this article, we'll delve into the world of tulips and explore their fascinating structure. We'll start by identifying the main components of a tulip, including the petals, sepals, and stem, and how they work together to create the iconic tulip shape.
Identifying the Main Components of a Tulip
Tulips are one of the most recognizable and beloved flowers, and understanding their basic structure is essential for drawing them accurately. The main components of a tulip include the petals, sepals, stem, leaves, and bulb. The petals are the colorful, cup-shaped parts of the flower that are often the most noticeable feature. They come in a wide range of colors and patterns, and can be ruffled, smooth, or fringed. The sepals, on the other hand, are the green, leaf-like structures that protect the petals and are usually found at the base of the flower. The stem is the long, slender part of the plant that supports the flower and leaves, and can range in height from a few inches to several feet. The leaves are the green, strap-like structures that grow from the base of the stem and provide nutrients to the plant. Finally, the bulb is the underground storage organ that contains the energy and nutrients needed for the plant to grow and bloom. By understanding these main components, you can begin to draw tulips with confidence and accuracy.
Recognizing the Symmetry and Proportion of Tulips
Recognizing the symmetry and proportion of tulips is crucial in drawing them accurately. Tulips have a symmetrical structure, with the center of the flower being the focal point. The petals are arranged in a radial pattern, with the outer petals being slightly larger than the inner ones. The stem and leaves are also symmetrical, with the leaves being oval-shaped and the stem being slender and straight. To draw a tulip, start by sketching the center of the flower, which is usually a small, rounded shape. Then, draw the petals, working your way outwards from the center. Make sure to keep the petals symmetrical and evenly spaced, with the outer petals being slightly larger than the inner ones. The stem and leaves should also be drawn in a symmetrical manner, with the leaves being oval-shaped and the stem being slender and straight. Pay attention to the proportion of the tulip, making sure that the flower is in balance with the stem and leaves. A good rule of thumb is to make the flower about two-thirds the size of the stem and leaves. By recognizing the symmetry and proportion of tulips, you can create a beautiful and realistic drawing of these stunning flowers.
Observing the Variations in Tulip Shapes and Sizes
Observing the variations in tulip shapes and sizes is a crucial step in understanding the basic structure of tulips. Tulips come in a wide range of shapes and sizes, from the tiny, delicate species tulips to the large, showy hybrid tulips. By observing the different shapes and sizes of tulips, you can gain a deeper understanding of the various parts of the flower, including the petals, sepals, and stem. For example, some tulips have long, slender stems with small, cup-shaped flowers, while others have shorter stems with larger, more bowl-shaped flowers. Some tulips have petals that are ruffled or fringed, while others have smooth, glossy petals. By studying these variations, you can develop a more nuanced understanding of the tulip's structure and learn to draw them with greater accuracy and detail. Additionally, observing the variations in tulip shapes and sizes can also help you to identify different types of tulips and understand their unique characteristics. For instance, some tulips have distinctive markings or colors on their petals, while others have unique shapes or forms. By paying attention to these variations, you can develop a more sophisticated understanding of the tulip's structure and learn to draw them with greater precision and flair.
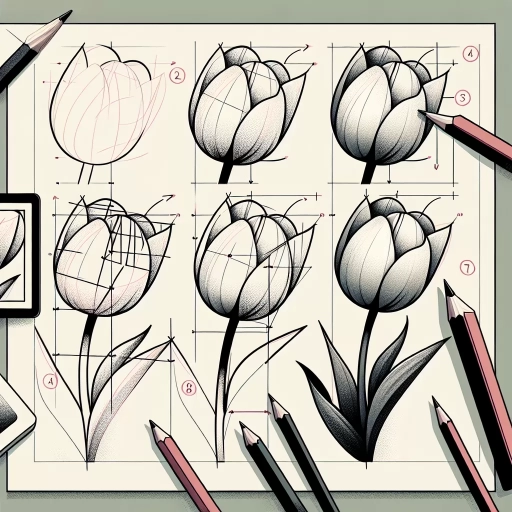
Mastering the Techniques for Drawing Tulips
Mastering the techniques for drawing tulips requires a combination of skill, patience, and attention to detail. To create a realistic and visually appealing tulip drawing, artists must consider various aspects of the flower's appearance, including its texture, depth, and delicate curves. One key aspect of drawing tulips is using different line styles to capture the texture of the petals, which can range from smooth and silky to ruffled and intricate. Additionally, creating depth and dimension with shading and lighting is crucial in bringing the tulip to life on paper. Furthermore, practicing the art of capturing the delicate curves of the tulip stem is essential in achieving a sense of elegance and refinement. By mastering these techniques, artists can create stunning tulip drawings that showcase the beauty and uniqueness of this iconic flower. By starting with the basics of line styles, artists can lay the foundation for a beautiful and realistic tulip drawing, and that's where we'll begin – by exploring the different line styles used to capture the texture of tulip petals.
Using Different Line Styles to Capture the Texture of Tulip Petals
When drawing tulips, using different line styles is crucial to capture the texture of the delicate petals. To achieve this, start by observing the tulip's petal structure, noting the gentle curves and soft folds. Begin with a range of gentle, flowing lines to suggest the overall shape of the petal, using a soft pencil or a fine-tip pen. Varying the pressure and speed of your strokes will help create a sense of texture and movement. For the outer edges of the petals, use short, broken lines to convey the delicate, almost translucent quality of the tulip's skin. As you work your way towards the center of the petal, gradually transition to longer, smoother lines to suggest the softer, more delicate texture. To add depth and dimension, experiment with hatching and cross-hatching techniques, applying gentle pressure to create a range of values and textures. For the intricate, swirling patterns found on some tulip varieties, use a combination of loose, expressive lines and tight, controlled strokes to capture the intricate details. By mastering different line styles and techniques, you'll be able to convincingly capture the texture and beauty of tulip petals, bringing your drawings to life with a sense of delicacy and wonder.
Creating Depth and Dimension with Shading and Lighting
Creating depth and dimension in your tulip drawings can be achieved through the strategic use of shading and lighting. By manipulating the light source and shading techniques, you can create a sense of volume and texture, drawing the viewer's eye into the composition. To start, consider the light source and how it will interact with your tulip. Will it be a soft, warm light or a harsh, cool light? This will determine the type of shading you'll use and the level of contrast in your drawing. Next, think about the areas of your tulip that will be in shadow and those that will be in light. Use a range of shading techniques, from hatching and cross-hatching to stippling and blending, to create a sense of depth and dimension. Pay particular attention to the areas where the petals overlap, as these can create interesting shadows and highlights. By carefully balancing light and dark, you can create a sense of volume and texture that will make your tulip drawings come alive. Additionally, consider using atmospheric perspective to create a sense of distance and depth in your drawing. This can be achieved by fading the edges of your tulip into the background, creating a sense of softness and subtlety. By mastering the techniques of shading and lighting, you can add depth, dimension, and emotion to your tulip drawings, making them truly unforgettable.
Practicing the Art of Capturing the Delicate Curves of Tulip Stems
Here is the paragraphy: Practicing the Art of Capturing the Delicate Curves of Tulip Stems Capturing the delicate curves of tulip stems requires a combination of observation, technique, and practice. To begin, study the shape and structure of tulip stems, noting the gentle, flowing curves that connect the flower to the base of the plant. Observe how the stem tapers from the base to the top, and how the curves of the stem are often more pronounced near the flower. Next, practice drawing the curves of the stem using a range of lines and techniques, from smooth, flowing lines to more expressive, gestural marks. Pay attention to the way the curves of the stem intersect with the leaves and the flower, and practice capturing these intersections with precision and delicacy. As you practice, experiment with different tools and media, such as pencils, pens, and brushes, to find the ones that work best for you. With time and practice, you will develop the skills and confidence to capture the delicate curves of tulip stems with ease and precision. By mastering this technique, you will be able to add depth, texture, and visual interest to your tulip drawings, and bring your artwork to life.
Adding Details and Finishing Touches to Your Tulip Drawing
Adding the final details to your tulip drawing is a crucial step in bringing your artwork to life. To create a visually appealing and realistic tulip drawing, it's essential to focus on adding details and finishing touches. This involves incorporating leaves and stems to complete the tulip composition, enhancing the realism of your drawing with colors and patterns, and refining your drawing with final details and textures. By paying attention to these aspects, you can add depth, dimension, and character to your tulip drawing. In this article, we will explore these three key elements in more detail, starting with the importance of incorporating leaves and stems to complete the tulip composition.
Incorporating Leaves and Stems to Complete the Tulip Composition
Once the petals are in place, it's time to incorporate the leaves and stems to complete the tulip composition. Begin by sketching the stem, starting from the base of the flower and working your way down. Use gentle, flowing lines to capture the stem's natural curve. The stem should be slightly thicker at the base and taper down towards the top. Next, add the leaves, which are typically oval-shaped with a pointed tip. The leaves are attached to the stem at the base of the flower and can be arranged in a way that creates a sense of movement and flow. Use soft, rounded lines to draw the leaves, making sure to capture their gentle curl and twist. To add depth and dimension to the leaves, you can use a combination of light and dark shading. The leaves should be slightly darker at the base and lighter towards the tip, creating a sense of gradient. Finally, use a fine-tip pen to add the veins to the leaves, creating a delicate network of lines that add texture and interest to the composition. As you work on the leaves and stems, remember to pay attention to the overall balance and harmony of the composition, making sure that the elements work together to create a cohesive and visually appealing whole.
Enhancing the Realism of Your Tulip Drawing with Colors and Patterns
When it comes to adding colors and patterns to your tulip drawing, the key is to enhance the realism of the flower without overdoing it. Start by selecting a color palette that reflects the natural hues of tulips, such as vibrant reds, soft pinks, and sunny yellows. Consider the subtle variations in color that occur within each petal, with the edges often being slightly lighter or darker than the center. To achieve this, use gentle gradations of color, blending the hues together seamlessly. For added depth and dimension, incorporate subtle shading and texture, using techniques such as hatching and cross-hatching to suggest the delicate curves and ridges of the petals. Patterns can also be used to add visual interest, such as the intricate striations that often appear on the petals of certain tulip varieties. To incorporate these patterns, use a fine-tip pen or pencil to draw delicate lines that follow the natural contours of the flower. By carefully balancing color, pattern, and texture, you can create a tulip drawing that is not only visually stunning but also remarkably realistic.
Refining Your Drawing with Final Details and Textures
Refining your drawing with final details and textures is a crucial step in bringing your tulip artwork to life. To add depth and dimension, start by defining the edges of the petals and leaves with a fine-tip pen or a sharp pencil. Use gentle, smooth strokes to create soft, feathery textures on the petals, and more defined lines for the leaves. Next, add veins to the leaves by drawing thin, curved lines that follow the natural shape of the leaf. For the petals, use a range of values to create a sense of volume and dimension. Add subtle shading to the creases and folds of the petals, and use a white or light-colored pencil to create highlights on the raised areas. To add texture to the stem, use short, curved strokes to suggest the ridges and bumps of the plant's surface. Finally, use a small brush or a fine-tip pen to add delicate, swirling patterns to the center of the flower, suggesting the intricate details of the tulip's reproductive structures. By taking the time to refine your drawing with these final details and textures, you'll create a beautiful, realistic tulip that seems to leap off the page.