How To Draw Chicken
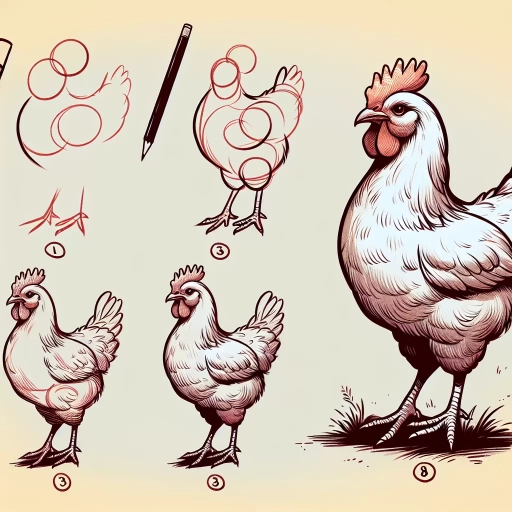
Drawing a chicken can be a fun and creative activity, whether you're an experienced artist or just starting out. To get started, it's essential to understand the basics of drawing a chicken, including its overall shape, proportions, and key features. Once you have a solid foundation, you can move on to sketching the chicken's body and features, paying attention to details such as feathers, beak, and legs. Finally, adding details and texture to your drawing can bring your chicken to life and make it look more realistic. In this article, we'll take you through each of these steps, starting with the fundamentals. So, let's begin by understanding the basics of drawing a chicken.
Understanding the Basics of Drawing a Chicken
Drawing a chicken can be a fun and rewarding experience, but it requires a good understanding of the basics. To get started, it's essential to familiarize yourself with chicken anatomy, including the shape and structure of the body, wings, and legs. Additionally, choosing the right drawing tools and materials can make a significant difference in the quality of your artwork. A set of sharp pencils, a sketchbook, and a comfortable drawing space can help you achieve the desired results. Setting up your drawing space for comfort and efficiency is also crucial, as it allows you to focus on your art without distractions. By understanding these fundamental aspects, you'll be well on your way to creating a realistic and engaging drawing of a chicken. Let's start by taking a closer look at the anatomy of a chicken and how it can inform your drawing.
Familiarizing Yourself with Chicken Anatomy
Familiarizing yourself with chicken anatomy is a crucial step in drawing a realistic and accurate chicken. Chickens have a unique body structure that is different from other animals, and understanding their anatomy will help you to draw them more effectively. Start by studying the overall shape of a chicken's body, which is typically rounded and plump, with a short neck and legs. Notice the position of the wings, which are usually held close to the body, and the tail, which is long and feathery. Next, focus on the head and beak, which are distinctive features of a chicken. The beak is short and stout, and the head is rounded with a distinctive comb on top. The eyes are small and bead-like, and the ears are small and hidden under the feathers. Study the feathers themselves, which are soft and fluffy, and come in a variety of colors and patterns. Finally, take note of the chicken's legs and feet, which are strong and sturdy, with sharp claws. By familiarizing yourself with these different parts of a chicken's anatomy, you will be able to draw a more accurate and detailed picture of a chicken.
Choosing the Right Drawing Tools and Materials
When it comes to drawing a chicken, having the right tools and materials can make all the difference in achieving a realistic and detailed representation. To start, you'll need a pencil with a range of hardness levels, such as a set of graphite pencils (HB, 2B, 4B, 6B) or a sketching pencil with a built-in sharpener. This will allow you to create a variety of line weights and shading effects. A sharpener is also essential for keeping your pencils sharp and ready to use. In addition to pencils, a set of fine-tip pens or markers can be useful for adding details and textures to your drawing. Look for pens with archival-quality ink to ensure that your artwork will last over time. A sketchbook or drawing paper with a smooth finish is also necessary for creating a high-quality drawing. Look for paper with a weight of at least 80 gsm to prevent it from buckling or warping. Erasers, such as a kneaded eraser or a white vinegar eraser, can be used to correct mistakes and create highlights in your drawing. Finally, a drawing board or other stable surface can help you stay comfortable and focused while drawing. By investing in these basic tools and materials, you'll be well on your way to creating a realistic and engaging drawing of a chicken.
Setting Up Your Drawing Space for Comfort and Efficiency
Setting up your drawing space for comfort and efficiency is crucial for creating a productive and enjoyable drawing experience. To start, choose a quiet and dedicated area with good lighting, preferably natural light, to minimize eye strain. Ensure the room is at a comfortable temperature, and consider using a desk or table with a smooth surface to prevent your paper from slipping or wrinkling. Invest in a comfortable and ergonomic chair, as you'll likely be spending hours sitting and drawing. A drawing board or lap desk can also be useful for supporting your paper and allowing you to work at a comfortable angle. Organize your drawing tools and supplies within easy reach, such as pencils, erasers, sharpeners, and paper, to save time and reduce distractions. Consider using a pencil case or container to keep your supplies tidy and prevent them from getting lost. Finally, minimize clutter and distractions in your drawing space by turning off notifications on your phone or computer, and consider playing calming music or nature sounds to help you focus. By setting up your drawing space with comfort and efficiency in mind, you'll be able to focus on creating your best work, including drawing a realistic and charming chicken.
Sketching the Chicken's Body and Features
Sketching a chicken's body and features requires attention to detail and a basic understanding of its anatomy. To create a realistic and accurate drawing, it's essential to break down the process into manageable steps. First, you'll need to draw the chicken's body shape and proportions, taking into account its overall size and shape. Next, you'll add the head, beak, and comb, which are distinctive features that set chickens apart from other birds. Finally, you'll sketch the wings, tail, and legs, which are crucial for movement and balance. By following these steps, you'll be able to create a detailed and lifelike drawing of a chicken. In this article, we'll explore each of these steps in more detail, starting with the basics of drawing the chicken's body shape and proportions.
Drawing the Chicken's Body Shape and Proportions
Drawing the chicken's body shape and proportions is a crucial step in creating a realistic and visually appealing drawing. To start, imagine a rough oval shape for the body, with the long axis running vertically. The oval should be slightly tilted, with the top end leaning towards the head and the bottom end towards the tail. The body should be roughly 1.5 to 2 times the size of the head, and the neck should be about one-third the length of the body. The wings should be positioned on either side of the body, with the top of the wing aligned with the top of the body and the bottom of the wing aligned with the bottom of the body. The tail should be long and rounded, with a slight curve at the end. The legs should be positioned at the bottom of the body, with the feet facing forward. The overall shape of the body should be smooth and curved, with no sharp angles or edges. By paying attention to these proportions and shapes, you can create a chicken drawing that is both accurate and visually appealing.
Adding the Chicken's Head, Beak, and Comb
When adding the chicken's head, beak, and comb, start by sketching a small oval for the head, connected to the body by a neck. The head should be positioned at a slight angle, with the beak pointing downwards. Draw a small triangle for the beak, making sure it's in proportion to the head. The beak should be rounded at the tip and have a slight curve to it. Next, draw the comb, which is the fleshy red crown on top of the chicken's head. The comb should be teardrop-shaped and have a series of rounded points along the edges. Make sure to leave some space between the comb and the head to create a natural-looking gap. Finally, add some details to the head, such as the eyes, nostrils, and mouth. The eyes should be small and rounded, with a slight curve to the eyelids. The nostrils should be small and oval-shaped, and the mouth should be a small, curved line. By adding these details, you'll be able to bring your chicken drawing to life and create a more realistic and engaging image.
Sketching the Chicken's Wings, Tail, and Legs
When sketching the chicken's wings, tail, and legs, it's essential to consider their proportions and relationships to the body. The wings should be positioned on either side of the body, with the wingtips pointing downwards and slightly outwards. Each wing should be roughly the same size, with the primary feathers at the leading edge and the secondary feathers at the trailing edge. The tail, also known as the caudal appendage, should be long and rounded, with a distinctive fan shape. It should be positioned at the back of the body, with the feathers pointing downwards. The legs, which are actually modified wings, should be sturdy and strong, with the feet positioned at the end. Each leg should be roughly the same size, with the thigh and drumstick forming a smooth curve. The feet should be small and oval-shaped, with three toes pointing forwards and one backwards. When sketching these features, pay attention to the subtle curves and contours that give the chicken its unique shape and character. Use gentle, flowing lines to capture the softness of the feathers and the smoothness of the legs and feet. By carefully observing and rendering these details, you can create a convincing and engaging drawing of a chicken.
Adding Details and Texture to Your Chicken Drawing
When it comes to drawing a chicken, it's the little details that can make all the difference between a good drawing and a great one. Adding details and texture to your chicken drawing can help bring your artwork to life and make it more engaging for the viewer. One way to add depth and realism to your chicken drawing is by adding feathers and plumage. This can be achieved by drawing individual feathers, layering them to create a sense of volume and texture. Additionally, you can also add details to the chicken's eyes, nostrils, and mouth to give it a more expressive and lifelike appearance. Furthermore, adding texture and patterns to the chicken's feathers and body can help create a more realistic and visually appealing drawing. By incorporating these details, you can take your chicken drawing to the next level and create a truly impressive piece of art. To start, let's take a closer look at how to add feathers and plumage to your chicken drawing.
Adding Feathers and Plumage to Your Chicken
Adding feathers and plumage to your chicken drawing can elevate it from a simple outline to a more realistic and visually appealing representation. To start, consider the different types of feathers that chickens have, including flight feathers, tail feathers, and body feathers. Flight feathers are long and stiff, with a distinctive shape and texture, while tail feathers are long and slender, often with a rounded tip. Body feathers, on the other hand, are soft and fluffy, covering the chicken's body in a thick layer. To draw these feathers, use a range of lines and textures, from smooth and flowing to stiff and jagged. For flight feathers, use long, curved lines that follow the shape of the wing, while for tail feathers, use long, straight lines that taper to a point. For body feathers, use short, curved lines that follow the contours of the chicken's body, creating a soft and fluffy texture. You can also add texture and detail to your feathers by adding quill knobs, which are small bumps at the base of the feather, and barbs, which are the branching fibers that make up the feather itself. By adding these details, you can create a more realistic and engaging chicken drawing that showcases the beauty and complexity of a chicken's plumage.
Drawing the Chicken's Eyes, Nostrils, and Mouth
Drawing the chicken's eyes, nostrils, and mouth is a crucial step in adding details and texture to your chicken drawing. Start by drawing two small circles for the eyes, making sure to leave a small gap between them. The eyes should be positioned on either side of the head, about one-third of the way down from the top. Add a small dot in the center of each circle to create the pupil, and a curved line above each eye to form the eyelid. For the nostrils, draw two small oval shapes on either side of the beak, making sure they are slightly tilted upwards. The nostrils should be fairly small and rounded, with a slight curve to them. Moving on to the mouth, draw a small, curved line below the beak to create the mouth opening. Add a few short, curved lines on either side of the mouth to create the mouth corners. Finally, add some texture to the beak by drawing a few short, curved lines along its length. By adding these details, you can bring your chicken drawing to life and give it a more realistic appearance.
Adding Texture and Patterns to the Chicken's Feathers and Body
Adding texture and patterns to the chicken's feathers and body can elevate your drawing from a simple outline to a visually appealing and realistic representation. To start, observe the different textures and patterns found on a chicken's feathers, such as the soft, fluffy texture of the down feathers and the smooth, glossy texture of the flight feathers. You can use a range of techniques to capture these textures, including hatching, cross-hatching, and stippling. For example, you can use short, curved hatching lines to suggest the softness of the down feathers, while longer, more linear hatching lines can be used to convey the smoothness of the flight feathers. Additionally, you can add patterns to the feathers, such as the distinctive barred or speckled patterns found on some breeds of chicken. To do this, you can use a combination of hatching and stippling to create a subtle, mottled effect. When adding texture and patterns to the body, consider the chicken's scaly legs and feet, as well as the soft, feathery texture of the belly and underside. You can use a range of techniques to capture these textures, including hatching, cross-hatching, and stippling. For example, you can use short, curved hatching lines to suggest the scaly texture of the legs and feet, while longer, more linear hatching lines can be used to convey the softness of the belly and underside. By adding texture and patterns to the chicken's feathers and body, you can create a more detailed and realistic drawing that captures the unique characteristics of this fascinating bird.