How To Repot An Orchid With Air Roots
Orchids are known for their exotic beauty and delicate nature, but they can be finicky when it comes to their growing conditions. One common issue that orchid enthusiasts face is dealing with air roots, which can be a sign of a healthy plant, but also a challenge when it comes to repotting. If you're struggling to care for your orchid with air roots, you're not alone. In this article, we'll explore the ins and outs of repotting an orchid with air roots, starting with understanding what air roots are and why they're important. We'll also cover the essential steps to prepare for repotting, including choosing the right potting mix and timing. Finally, we'll dive into the repotting process itself, providing you with a step-by-step guide on how to successfully repot your orchid with air roots. By the end of this article, you'll be equipped with the knowledge and confidence to give your orchid the care it needs to thrive. So, let's start by understanding what air roots are and why they're a crucial part of your orchid's growth.
Understanding Orchid Air Roots
Orchids are one of the most unique and fascinating plants in the world, with over 30,000 species and a wide range of characteristics. One of the most distinctive features of orchids is their air roots, which can be a source of confusion and curiosity for many growers. But what exactly are orchid air roots, and why do they grow them? In this article, we will delve into the world of orchid air roots, exploring what they are, why they grow them, and how to identify healthy air roots. By understanding these fascinating structures, you can better care for your orchids and appreciate their unique beauty. So, let's start by exploring the basics of orchid air roots. What are Orchid Air Roots?
What are Orchid Air Roots?
Orchid air roots, also known as aerial roots, are a unique and fascinating feature of many orchid species. These roots grow above the soil surface, often in the air, and are adapted to absorb moisture and nutrients from the atmosphere. Unlike traditional roots that grow underground, air roots are exposed to the air and can be seen growing on the surface of the potting medium or even outside of the pot. They are usually thick, fleshy, and covered in a thin layer of velamen, a spongy tissue that helps to absorb moisture and protect the root from drying out. Orchid air roots play a crucial role in the plant's survival, allowing it to thrive in environments with limited water and nutrient availability. They are also an important indicator of the plant's overall health, with healthy air roots being a sign of a well-cared-for orchid. As such, it's essential to handle air roots with care when repotting an orchid, as damaging them can cause stress to the plant and potentially lead to disease or decline.
Why Do Orchids Grow Air Roots?
Orchids grow air roots as a natural adaptation to their environment. In their native habitats, many orchids grow on other surfaces such as trees, rocks, or even power lines, rather than in soil. As a result, they have developed air roots, also known as aerial roots, to absorb moisture and nutrients from the air. These roots are covered in a special type of tissue called velamen, which helps to absorb moisture and nutrients from the air. Air roots also allow orchids to breathe and exchange gases, which is essential for their survival. In addition, air roots can help to anchor the orchid to its surface, providing stability and support. Overall, the growth of air roots is a remarkable adaptation that allows orchids to thrive in a variety of environments.
How to Identify Healthy Air Roots
To identify healthy air roots, look for roots that are plump, firm, and have a silvery or grayish color. These roots should be covered in a thin layer of velamen, a spongy tissue that helps the roots absorb moisture and nutrients from the air. Healthy air roots will also have a slight sheen to them, indicating that they are actively growing and thriving. Avoid roots that are dry, brittle, or brown, as these can be a sign of dehydration or root rot. Additionally, check for any signs of pests or diseases, such as mealybugs, spider mites, or fungal infections, which can cause damage to the air roots. By inspecting the air roots carefully, you can determine whether they are healthy and thriving, or if they need attention and care.
Preparing for Repotting
Repotting an orchid with air roots can be a daunting task, especially for beginners. However, with the right preparation and knowledge, it can be a straightforward process. To ensure a successful repotting, it's essential to consider several key factors. Firstly, choosing the right potting mix for orchids with air roots is crucial, as it will provide the necessary support and nutrients for the plant's unique roots. Additionally, selecting a suitable pot that accommodates the orchid's air roots is vital, as it will prevent damage and promote healthy growth. Finally, timing is everything, and knowing when to repot an orchid with air roots is critical to avoid stressing the plant. By understanding these key factors, you can set your orchid up for success and enjoy its beautiful blooms for years to come. In this article, we'll start by exploring the importance of choosing the right potting mix for orchids with air roots.
Choosing the Right Potting Mix for Orchids with Air Roots
Choosing the right potting mix for orchids with air roots is crucial for their health and well-being. Orchids with air roots require a potting mix that is well-draining, yet retains moisture, and provides adequate aeration. A mix that is too dense or waterlogged can cause the roots to rot, while a mix that is too dry can cause the roots to become desiccated. A good potting mix for orchids with air roots should contain a combination of ingredients such as sphagnum moss, perlite, and fir bark. Sphagnum moss helps to retain moisture, while perlite and fir bark provide good aeration and drainage. It's also important to choose a potting mix that is specifically designed for orchids, as they have different needs than other plants. Some potting mixes may contain fertilizers or other additives that can be beneficial for orchids, but it's also important to choose a mix that is free of contaminants and pesticides. When selecting a potting mix, it's also important to consider the specific needs of your orchid, such as its species, size, and growth habits. By choosing the right potting mix, you can help to ensure the health and well-being of your orchid with air roots.
Selecting a Suitable Pot for Orchids with Air Roots
When selecting a suitable pot for orchids with air roots, it's essential to consider the unique needs of these plants. Orchids with air roots, also known as aerial roots, require a pot that allows for good air circulation and moisture retention. A pot with good drainage holes is crucial to prevent waterlogged soil, which can lead to root rot. Look for a pot with holes on the sides or bottom to ensure excess water can escape. Additionally, a pot with a wide mouth or a mesh pot can provide better air circulation, allowing the air roots to breathe and absorb moisture. The pot should also be shallow, as orchids with air roots tend to have a shallow root system. A pot that is too deep can cause the roots to rot, while a shallow pot will allow the roots to grow and thrive. When choosing a pot, consider the size of the plant and the type of orchid. A pot that is too small can cause the plant to become pot-bound, while a pot that is too large can cause the soil to become too wet. A general rule of thumb is to choose a pot that is slightly larger than the plant's current pot. Finally, consider the material of the pot. Orchids prefer a pot that is well-ventilated and can breathe, such as a pot made of clay, ceramic, or mesh. Avoid using plastic pots, as they can retain too much moisture and cause root rot. By selecting a pot that meets these criteria, you can provide your orchid with the right environment to thrive.
When is the Best Time to Repot an Orchid with Air Roots
When to repot an orchid with air roots depends on several factors, including the plant's growth cycle, potting mix, and overall health. Generally, the best time to repot an orchid with air roots is when the plant has outgrown its container, the potting mix has broken down, or the plant is showing signs of nutrient deficiency. This is usually every 1-3 years, as orchids typically need fresh potting mix and a larger pot to accommodate their growing roots. However, if the plant is healthy and thriving, it's best to wait until the potting mix has broken down and the roots have filled the pot. Repotting too frequently can cause stress to the plant, leading to disease or pest issues. It's also essential to repot an orchid with air roots when the plant is dormant, usually during the spring or fall, to minimize the risk of shocking the plant. Avoid repotting during the active growing season, as this can cause the plant to drop its buds or flowers. By repotting at the right time, you can ensure your orchid with air roots continues to thrive and produce beautiful blooms.
Repotting an Orchid with Air Roots
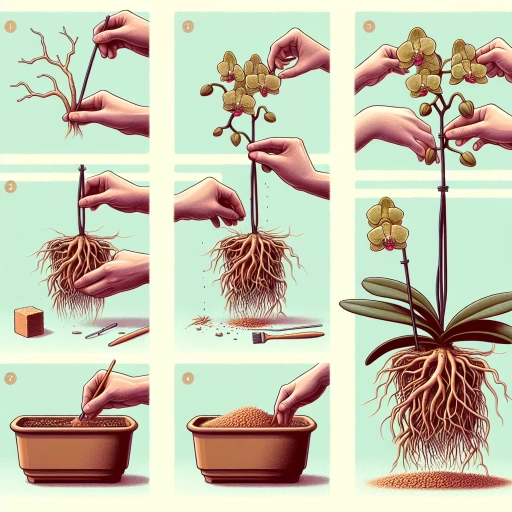
Repotting an orchid with air roots can be a delicate process, but with the right steps, you can ensure the health and well-being of your plant. To start, it's essential to understand that air roots are a natural part of an orchid's growth, and they play a crucial role in absorbing moisture and nutrients from the air. When repotting an orchid with air roots, there are three key steps to follow: removing the orchid from its old pot, trimming and pruning the air roots, and planting the orchid in its new pot. By following these steps, you can give your orchid the best chance to thrive in its new environment. The first step in this process is to carefully remove the orchid from its old pot, taking care not to damage the air roots or disturb the plant's roots.
Removing the Orchid from its Old Pot
When removing the orchid from its old pot, it's essential to be gentle to avoid damaging the roots or the plant itself. Start by carefully turning the pot on its side and gently rocking it back and forth to loosen the plant from the pot. If the plant doesn't come out easily, you can run a knife or a chopstick around the inside of the pot to help release it. Once the plant is out of the pot, inspect the roots to see if they have become pot-bound, which means they have grown in a circular pattern and need to be gently teased apart. If the roots are badly pot-bound, you may need to use a pair of sterile scissors or pruning shears to carefully cut them apart. Be careful not to damage any of the air roots, as these are essential for the plant's survival. If the old potting media is stuck to the roots, you can soak the roots in water for a few minutes to help loosen it. After removing the old potting media, take a moment to inspect the roots for any signs of rot or damage, and trim them back if necessary. By taking the time to carefully remove the orchid from its old pot, you'll be able to give it the best chance of thriving in its new pot.
Trimming and Pruning Air Roots
Trimming and pruning air roots is a crucial step in repotting an orchid with air roots. Air roots are a natural occurrence in orchids, and they serve as an adaptation to absorb moisture and nutrients from the air. However, when repotting, it's essential to trim and prune these air roots to promote healthy growth and prevent the orchid from becoming pot-bound. To trim air roots, use a pair of sterile scissors or pruning shears, and carefully cut off any dead or damaged roots. This will help prevent the spread of disease and encourage new growth. Next, trim back any long or circling air roots to about an inch or two from the base of the plant. This will help the orchid absorb moisture and nutrients more efficiently and prevent the roots from becoming tangled. It's also essential to prune any air roots that are growing outside of the pot, as these can cause the orchid to become unstable and prone to toppling over. By trimming and pruning air roots, you can help promote healthy growth, prevent disease, and ensure your orchid thrives in its new pot.
Planting the Orchid in its New Pot
When planting the orchid in its new pot, gently remove the plant from its old container, taking care not to damage the air roots or disturb the potting media. If the plant is stuck, you can run a knife or spatula around the inside of the pot to loosen it. Once the plant is free, inspect the roots and remove any dead or damaged roots with sterile scissors or pruning shears. This will help prevent the spread of disease and encourage healthy growth. Next, place a layer of potting media, such as sphagnum moss or a well-draining orchid mix, in the bottom of the new pot. This will help to stabilize the plant and prevent the roots from growing out of the pot. Then, gently place the orchid in the new pot, making sure the rhizome is above the potting media and the air roots are not buried. You can use a small amount of potting media to secure the plant in place, but be careful not to pack it too tightly, as this can cause the roots to rot. Finally, water the plant thoroughly to settle the potting media and provide enough moisture to support establishment. It's also a good idea to provide humidity and bright, indirect light to help the orchid adjust to its new environment. By following these steps, you can help your orchid with air roots thrive in its new pot.