How To Tape Achilles Tendon
Achilles tendon taping is a common practice used to provide support and stability to the ankle joint, particularly for individuals who engage in high-impact activities or have experienced injuries. However, to achieve the desired benefits, it is essential to understand the basics of Achilles tendon taping, prepare properly, and follow a step-by-step guide. In this article, we will delve into the world of Achilles tendon taping, starting with the fundamentals. Understanding the basics of Achilles tendon taping is crucial, as it will help you comprehend the underlying principles and techniques involved. By grasping these concepts, you will be better equipped to prepare for the taping process and ultimately, follow a step-by-step guide to achieve optimal results. Therefore, let's begin by understanding the basics of Achilles tendon taping.
Understanding the Basics of Achilles Tendon Taping
Achilles tendon taping is a popular technique used to provide support and stability to the Achilles tendon, which is a vital part of the ankle joint. The Achilles tendon is prone to injuries, and taping can help prevent or alleviate pain and discomfort. In this article, we will delve into the basics of Achilles tendon taping, exploring what it entails, its benefits, and the precautions to take before applying the tape. We will start by understanding what Achilles tendon taping is, including its purpose and how it works. By grasping the fundamentals of this technique, individuals can make informed decisions about using it to support their ankle health. So, let's begin by examining what Achilles tendon taping is.
What is Achilles Tendon Taping?
Achilles tendon taping is a technique used to provide support and stability to the Achilles tendon, which connects the calf muscles to the heel bone. The taping method involves applying athletic tape to the affected area to help reduce pain, inflammation, and stress on the tendon. The tape is typically applied in a specific pattern to help redistribute the forces acting on the tendon, allowing it to heal and recover from injuries or overuse. By providing additional support and stability, Achilles tendon taping can help alleviate symptoms of Achilles tendonitis, such as pain and stiffness, and enable individuals to continue participating in their desired activities. The taping technique can be applied by a healthcare professional or learned by individuals themselves, making it a convenient and accessible treatment option for managing Achilles tendon-related issues.
Benefits of Taping the Achilles Tendon
Taping the Achilles tendon can provide numerous benefits, particularly for individuals who engage in high-impact activities or have experienced Achilles tendon injuries. One of the primary advantages of taping the Achilles tendon is that it provides additional support and stability to the tendon, reducing the risk of further injury or strain. The tape helps to compress the tendon, which can reduce inflammation and alleviate pain. Additionally, taping the Achilles tendon can help to improve proprioception, or the body's ability to sense the position and movement of the ankle joint. This can be particularly beneficial for athletes who participate in sports that involve quick changes of direction, such as soccer or basketball. Furthermore, taping the Achilles tendon can also help to reduce the risk of overuse injuries, such as tendonitis or tendinosis, by reducing the amount of stress and strain placed on the tendon. Overall, taping the Achilles tendon can be a simple yet effective way to provide additional support and protection to the tendon, reducing the risk of injury and improving overall ankle function.
Precautions Before Taping
Before applying tape to your Achilles tendon, it's essential to take a few precautions to ensure a safe and effective taping experience. First, make sure your skin is clean and dry, free from any lotions, oils, or dirt that may interfere with the adhesive. If you have sensitive skin, consider applying a thin layer of hypoallergenic tape or pre-wrap to protect your skin from irritation. Additionally, if you have any open wounds or cuts on your ankle or foot, it's best to avoid taping until they are fully healed. It's also crucial to remove any old tape or adhesives from previous taping sessions to prevent skin irritation and ensure a secure bond between the new tape and your skin. Furthermore, if you have any underlying medical conditions, such as diabetes or poor circulation, consult with your doctor or a medical professional before taping your Achilles tendon. They can provide personalized guidance and recommendations to ensure your safety and comfort. By taking these precautions, you can minimize the risk of skin irritation, ensure a secure and comfortable fit, and get the most out of your Achilles tendon taping experience.
Preparing for Achilles Tendon Taping
Preparing for Achilles tendon taping requires careful consideration of several key factors to ensure a safe and effective application. One of the most critical steps is choosing the right tape, as different types of tape can provide varying levels of support and stability. However, before selecting a tape, it's essential to prepare the skin properly to prevent irritation and ensure a secure bond between the tape and the skin. Understanding the anatomy of the Achilles tendon is also crucial, as it will help you identify the correct areas to apply the tape and avoid putting unnecessary pressure on the tendon. By considering these factors, you can ensure a successful taping experience. With the right tape in hand, you'll be ready to move forward with the taping process, starting with the selection of the most suitable tape for your needs.
Choosing the Right Tape
When it comes to choosing the right tape for Achilles tendon taping, there are several factors to consider. The type of tape used can significantly impact the effectiveness of the taping technique. There are two main types of tape commonly used for Achilles tendon taping: athletic tape and kinesiology tape. Athletic tape is a rigid, non-elastic tape that provides support and stability to the affected area. It is often used to restrict movement and provide additional support to the tendon. On the other hand, kinesiology tape is a flexible, elastic tape that allows for a full range of motion while providing support and stability. It is often used to promote healing, reduce pain and inflammation, and improve proprioception. When choosing between the two, consider the level of support and stability needed, as well as the individual's activity level and personal preference. It's also important to consider the width and thickness of the tape, as well as its adhesive properties, to ensure a secure and comfortable fit. Additionally, some tapes may have additional features such as breathable materials, antimicrobial properties, or pre-cut strips for easy application. Ultimately, the right tape for Achilles tendon taping will depend on the individual's specific needs and preferences.
Preparing the Skin
Preparing the skin is a crucial step before applying Achilles tendon taping. The goal is to create a clean and dry surface that allows the tape to adhere properly and stay in place. Start by washing the affected area with soap and water to remove any dirt, sweat, or bacteria. Dry the skin thoroughly, paying extra attention to the creases and folds around the ankle. Remove any lotions, oils, or creams that may interfere with the tape's adhesion. If you have hairy skin, consider shaving the area to ensure a smooth surface. Use a gentle exfoliating scrub or a pumice stone to remove any dead skin cells or rough patches. This will help the tape stick better and reduce the risk of skin irritation. Finally, use a skin prep wipe or a small amount of rubbing alcohol to clean and degrease the skin, allowing the tape to adhere securely. By following these steps, you'll be able to create a clean and dry surface that will help the Achilles tendon taping stay in place and provide the necessary support and stability for your ankle.
Understanding the Anatomy of the Achilles Tendon
The Achilles tendon is a vital component of the human body, playing a crucial role in facilitating movement and supporting the ankle joint. Located at the back of the lower leg, the Achilles tendon is a thick, fibrous cord that connects the calf muscles (gastrocnemius and soleus) to the heel bone (calcaneus). This tendon is responsible for transmitting forces from the calf muscles to the heel bone, enabling actions such as walking, running, and jumping. The Achilles tendon is composed of collagen fibers, which provide strength and elasticity, allowing it to withstand significant stress and strain. However, its unique anatomy also makes it prone to injuries, particularly tears and ruptures, which can be debilitating and require extensive rehabilitation. Understanding the anatomy of the Achilles tendon is essential for preventing and treating injuries, as well as for effective taping techniques that can provide support and stability to the tendon. By recognizing the tendon's structure and function, individuals can take proactive steps to protect and care for this critical component of the musculoskeletal system.
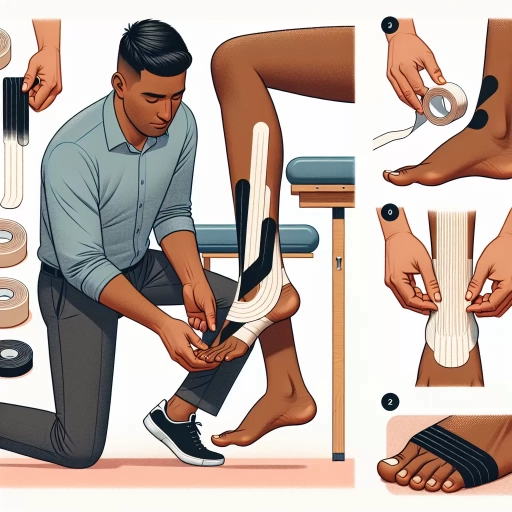
Step-by-Step Guide to Taping the Achilles Tendon
Taping the Achilles tendon is a common practice among athletes and individuals who engage in high-impact activities to provide support and stability to the ankle joint. A well-applied tape job can help prevent injuries, reduce pain, and enhance performance. However, improper taping techniques can lead to discomfort, skin irritation, and decreased mobility. To ensure a safe and effective taping experience, it is essential to follow a step-by-step guide. This article will walk you through the process of taping the Achilles tendon, covering the application of the anchor strip, wrapping the tendon, and securing the end of the tape. By mastering these techniques, you can enjoy the benefits of taping while minimizing the risks. To begin, let's start with the first step: applying the anchor strip.
Applying the Anchor Strip
Applying the anchor strip is a crucial step in taping the Achilles tendon. This strip serves as the foundation for the rest of the taping process, providing a secure base for the subsequent strips. To apply the anchor strip, start by tearing off a piece of tape that is approximately 2-3 inches wide and 6-8 inches long. Place the center of the strip at the base of the calf, just above the heel, with the edges of the tape aligned with the natural contours of the leg. Press the tape firmly onto the skin, ensuring it is smooth and wrinkle-free. The anchor strip should be applied with moderate tension, not too tight or too loose, to provide a comfortable and secure fit. It's essential to apply the anchor strip in the correct position, as it will help to distribute the tension of the subsequent strips evenly and prevent the tape from rolling or bunching up. By applying the anchor strip correctly, you'll be able to create a solid foundation for the rest of the taping process, ensuring a secure and effective support for the Achilles tendon.
Wrapping the Achilles Tendon
Wrapping the Achilles tendon is a crucial step in providing support and stability to the affected area. To begin, start by wrapping the tape around the lower calf, about 2-3 inches above the heel. This initial wrap helps to anchor the tape in place and prevents it from slipping down during activity. Next, wrap the tape around the Achilles tendon itself, applying gentle to moderate pressure. Be careful not to wrap too tightly, as this can cut off circulation and cause discomfort. The goal is to provide support and stability, not to constrict the tendon. As you wrap, make sure to keep the tape smooth and even, avoiding any wrinkles or creases that can cause irritation. Continue wrapping the tape around the tendon, overlapping each layer by about half the width of the tape. This helps to build up a strong and supportive layer of tape that can withstand the stresses and strains of activity. Finally, finish the wrap by securing the tape with a small piece of athletic tape, making sure it is snug but not too tight. By following these steps, you can create a secure and supportive wrap that helps to alleviate pain and discomfort in the Achilles tendon.
Securing the End of the Tape
Securing the end of the tape is a crucial step in the taping process, as it ensures that the tape remains in place and provides the necessary support and stability to the Achilles tendon. To secure the end of the tape, start by applying a small piece of tape to the skin, about 1-2 inches from the end of the previous strip. This anchor strip should be applied at a 45-degree angle, with the edge of the tape pointing towards the heel. Next, take the end of the tape and fold it back onto itself, creating a small tab. Apply another small piece of tape to the tab, securing it in place. This will prevent the tape from unraveling and ensure that it remains securely attached to the skin. Finally, apply a small amount of pressure to the tape to ensure that it is securely adhered to the skin. By following these steps, you can ensure that the end of the tape is properly secured, providing the necessary support and stability to the Achilles tendon.