How To Draw A Tree Easy
Here is the introduction paragraph: Drawing a tree can be a fun and rewarding experience, especially when you have a clear understanding of the basics and a few simple techniques to follow. Whether you're a seasoned artist or a beginner, learning how to draw a tree can be a great way to improve your drawing skills and create beautiful pieces of art. In this article, we'll take you through the process of drawing a tree, from understanding the basics of tree anatomy to adding details and texture to your drawing. We'll start by exploring the fundamentals of drawing a tree, including the different types of trees and their characteristic features. From there, we'll move on to sketching the tree's structure and form, including the trunk, branches, and leaves. Finally, we'll add details and texture to your tree drawing, including patterns, shapes, and shading techniques. By the end of this article, you'll have a solid foundation in drawing trees and be able to create your own beautiful tree drawings. So, let's get started by understanding the basics of drawing a tree.
Understanding the Basics of Drawing a Tree
Here is the introduction paragraph: Drawing a tree can be a daunting task, especially for beginners. However, with a solid understanding of the basics, anyone can create a beautiful and realistic tree. To get started, it's essential to familiarize yourself with the basic shapes of a tree, including the trunk, branches, and leaves. Additionally, learning about the different types of trees and their unique characteristics can help you add depth and variety to your drawings. Finally, understanding the importance of proportions and scale is crucial in creating a believable and visually appealing tree. By mastering these fundamental concepts, you'll be well on your way to Understanding the Basics of Drawing a Tree.
1. Familiarize yourself with the basic shapes of a tree
step by step for beginners: To begin drawing a tree, it's essential to familiarize yourself with the basic shapes that make up its structure. A tree can be broken down into several fundamental shapes, including the trunk, branches, and leaves. The trunk is typically represented by a large, vertical cylinder or rectangle, while the branches are often depicted as smaller, curved lines that extend from the trunk. The leaves can be simplified into teardrop or oval shapes, depending on the type of tree you're drawing. By recognizing and understanding these basic shapes, you'll be able to create a more accurate and visually appealing representation of a tree. Additionally, being aware of the proportions and relationships between these shapes will help you achieve a more balanced and harmonious composition. For example, the trunk should be thicker at the base and taper towards the top, while the branches should become smaller and more delicate as they extend further from the trunk. By mastering these basic shapes and proportions, you'll be well on your way to creating a beautiful and realistic tree drawing.
2. Learn the different types of trees and their characteristics
step by step for beginners. To truly master the art of drawing trees, it's essential to learn about the different types of trees and their unique characteristics. Trees can be broadly classified into two main categories: deciduous and evergreen. Deciduous trees, such as oaks, maples, and elms, shed their leaves seasonally, while evergreen trees, like pines, spruces, and firs, retain their leaves year-round. Within these categories, there are numerous species, each with distinct features. For instance, palm trees are known for their slender trunks and feathery leaves, while willows have long, drooping branches and narrow leaves. Understanding the characteristics of different tree species will help you accurately depict their shapes, textures, and proportions in your drawings. By studying the unique features of various trees, you'll be able to create more realistic and detailed drawings that capture the essence of these natural wonders. Whether you're drawing a majestic oak or a delicate cherry blossom, knowing the characteristics of different tree species will elevate your artwork and bring your trees to life.
3. Understand the importance of proportions and scale
and simple. Here is the paragraphy: Understanding the importance of proportions and scale is crucial when drawing a tree. A tree's proportions can make or break the overall appearance of your drawing. If the trunk is too thick or the branches are too long, the tree can look unnatural and unbalanced. To achieve a realistic drawing, it's essential to observe the proportions of a real tree. Notice how the trunk tapers as it rises, and how the branches decrease in size as they extend from the trunk. The scale of your tree is also vital, as it will affect the overall composition of your drawing. A tree that is too large or too small can throw off the balance of the entire piece. To ensure accurate proportions and scale, use a pencil to lightly sketch the overall shape of the tree, including the trunk, branches, and leaves. Then, use a ruler or measuring device to check the proportions and make any necessary adjustments. By paying attention to proportions and scale, you can create a tree that looks natural and harmonious in your drawing. Additionally, understanding proportions and scale can also help you to create a sense of depth and distance in your drawing, which is especially important when drawing a landscape or a scene with multiple trees. By using proportions and scale effectively, you can create a drawing that is visually appealing and engaging.
Sketching the Tree's Structure and Form
Here is the introduction paragraph: Sketching the structure and form of a tree can be a daunting task, but by breaking it down into manageable steps, anyone can create a beautiful and realistic representation of these natural wonders. To start, it's essential to begin with the foundation of the tree - the trunk and branches. Using simple lines and shapes, artists can establish the overall framework of the tree, setting the stage for the addition of foliage and other details. Next, loose, expressive strokes and varying textures can be used to add the foliage, bringing the tree to life. Finally, gentle curves and subtle shading can be employed to define the tree's shape and contours, adding depth and dimension to the drawing. By mastering these fundamental techniques, artists can gain a deeper understanding of the basics of drawing a tree, and unlock the secrets of capturing their beauty and essence on paper.
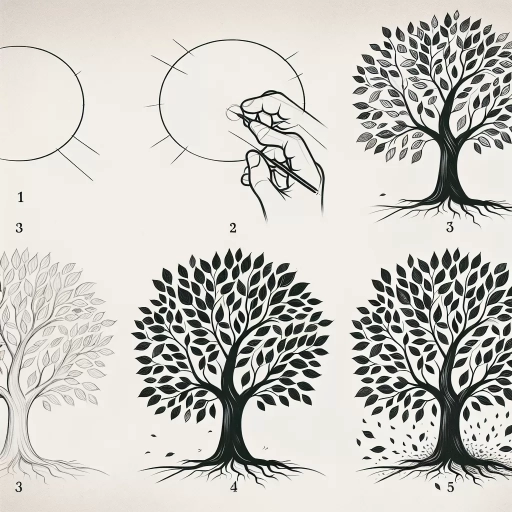
1. Start with the trunk and branches, using simple lines and shapes
step by step for beginners. Here is the paragraphy:
When drawing a tree, it's essential to start with the trunk and branches, as they provide the foundation for the rest of the tree's structure and form. Begin by sketching the trunk, using simple lines and shapes to capture its shape and proportions. Pay attention to the trunk's width, height, and any notable features, such as knots or grooves. Next, move on to the branches, using gentle, curved lines to suggest their shape and direction. Start with the main branches that grow directly from the trunk, and then add smaller branches that split off from these. Remember to vary the thickness and texture of the branches to create a sense of depth and dimension. As you sketch the branches, consider the overall shape and silhouette of the tree, using simple shapes and lines to capture its essence. Don't worry too much about details at this stage – focus on getting the basic structure and proportions right. By starting with the trunk and branches, you'll create a solid foundation for your tree drawing, and be able to build upon it with confidence.
2. Add the foliage, using loose, expressive strokes and varying textures
step-by-step guide for beginners. With the tree's structure and form in place, it's time to add the foliage, bringing your tree to life. Using loose, expressive strokes and varying textures, start adding the leaves or needles to your tree. For deciduous trees, use soft, curved lines to suggest the shape and movement of the leaves. Vary the size and density of the leaves to create depth and dimension. For evergreen trees, use shorter, more rigid lines to convey the texture and shape of the needles. Don't worry too much about drawing individual leaves or needles – focus on capturing the overall shape and texture of the foliage. As you add the foliage, pay attention to the way it interacts with the tree's structure, using the branches and trunk as a guide to create a sense of movement and flow. Remember, the foliage should be suggestive, not detailed – you want to create a sense of the tree's overall shape and texture, rather than getting bogged down in individual details. By using loose, expressive strokes and varying textures, you can create a sense of energy and movement in your tree, drawing the viewer's eye through the foliage and into the heart of the tree.
3. Define the tree's shape and contours, using gentle curves and subtle shading
step by step for beginners. To define the tree's shape and contours, start by using gentle curves to outline the overall form of the tree. Imagine the tree as a three-dimensional shape, with the trunk, branches, and foliage all working together to create a cohesive whole. Use soft, flowing lines to suggest the curves of the branches and the shape of the leaves. Don't worry too much about precision at this stage – the goal is to capture the overall essence of the tree, rather than to create a highly detailed or realistic representation. As you work, pay attention to the way the light falls on the tree, and use subtle shading to suggest the play of shadows and highlights on the trunk, branches, and leaves. This will help to create a sense of depth and dimensionality, and will give your drawing a more nuanced and engaging feel. Remember to vary the weight and texture of your lines to suggest the different textures of the tree – the rough bark of the trunk, the smoothness of the leaves, and the delicate intricacy of the branches. By using a range of lines and shading techniques, you can create a rich and detailed drawing that captures the beauty and character of the tree.
Adding Details and Texture to Your Tree Drawing
Here is the introduction paragraph: When it comes to drawing a tree, it's easy to get caught up in the basics - the overall shape, the placement of the branches, and the proportions of the trunk. However, it's the details and textures that truly bring a tree drawing to life. By adding bark texture and patterns to the trunk and branches, defining the leaves and foliage with varying shapes, sizes, and colors, and incorporating subtle shading and depth, you can create a tree drawing that's not only visually stunning but also rich in character. In this article, we'll explore these three key elements of adding details and texture to your tree drawing, building on the foundational skills you learned in Understanding the Basics of Drawing a Tree. By mastering these techniques, you'll be able to take your tree drawings to the next level and create artwork that's truly breathtaking.
1. Add bark texture and patterns to the trunk and branches
step by step for beginners. To add bark texture and patterns to the trunk and branches of your tree drawing, start by observing the unique characteristics of different tree species. Notice how the bark can be smooth, rough, scaly, or even peeling. For a more realistic representation, consider the age and health of the tree, as these factors can greatly impact the appearance of the bark. Begin by adding gentle, curved lines to the trunk, suggesting the natural ridges and grooves that occur as the tree grows. Vary the thickness and spacing of these lines to create a sense of depth and texture. For older trees, you can add more pronounced lines and patterns, such as deep grooves or knots, to convey a sense of age and character. Don't forget to add some subtle variations in texture and pattern to the branches as well, as these can help create a sense of movement and energy in your drawing. By carefully observing and rendering the unique bark texture and patterns of your tree, you can add a new level of depth and realism to your drawing, drawing the viewer's eye to the intricate details of this natural wonder.
2. Define the leaves and foliage, using varying shapes, sizes, and colors
step by step for beginners. The leaves and foliage of a tree are what bring it to life, adding texture, depth, and visual interest to your drawing. To create a realistic and engaging tree, it's essential to define the leaves and foliage using varying shapes, sizes, and colors. Start by observing the different types of leaves that trees have, from the broad, flat leaves of deciduous trees to the needle-like leaves of evergreens. Notice how the leaves are arranged on the branches, often in a spiral or alternating pattern. When drawing the leaves, use a range of shapes, from teardrops to ovals, and vary the size to create a sense of depth and dimension. For deciduous trees, you can use soft, rounded shapes, while evergreen trees require more pointed, triangular shapes. To add texture and detail, use short, curved lines to suggest the veins on the leaves, and vary the line weight to create a sense of depth and dimension. When it comes to color, consider the type of tree and the time of year. Deciduous trees often have bright green leaves in the spring, which turn golden, orange, or red in the fall. Evergreen trees, on the other hand, have year-round green foliage. By using a range of colors and shapes, you can create a rich, vibrant foliage that brings your tree to life. Remember to balance the foliage with the branches and trunk, creating a sense of harmony and balance in your drawing. With practice and patience, you can master the art of drawing leaves and foliage, and create stunning tree drawings that capture the beauty of nature.
3. Add subtle shading and depth to create a sense of dimension and atmosphere
step by step for beginners. To add subtle shading and depth to your tree drawing, start by identifying the areas that would naturally receive more or less light. The side of the tree facing the light source should be lighter, while the opposite side should be darker. Use a range of shading techniques, such as hatching and cross-hatching, to create a sense of dimension and atmosphere. Begin by applying gentle, soft strokes to the lighter areas, gradually increasing the pressure and density of the lines as you move to the darker areas. This will help to create a sense of volume and depth in your tree. Pay particular attention to the crevices and grooves in the trunk and branches, as these areas tend to be darker and more shaded. By adding subtle shading and depth to your tree drawing, you can create a sense of realism and texture that will draw the viewer's eye into the image. Additionally, consider adding some atmospheric perspective to your drawing by fading the lines and details into the background, creating a sense of distance and depth. This will help to create a sense of space and environment around your tree, making it feel more grounded and realistic. By combining these techniques, you can add a new level of sophistication and nuance to your tree drawing, making it feel more lifelike and engaging.