How To Draw An Elf
Understanding the Basics of Drawing
Grasping the fundamentals of sketching
Before diving into the specifics of drawing an elf, it's essential first to understand the basic principles of sketching and drawing. This is the foundation upon which all other drawing skills are built. To draw an elf—or any other figure—you must first learn how to render basic shapes, lines, and textures accurately. Mastering these fundamental skills will enable you to create more complex and realistic figures. While drawing may seem intimidating to beginners, with practice and perseverance, anyone can learn to draw an elf or other figures.
Choosing the right tools for drawing
The next step is ensuring that you have the right tools for the job. The quality of your art materials can have a big impact on the final result of your drawing. For sketching an elf, you'll need a variety of pencils of different grades, as well as tools for erasing and blending. Some artists also find sketching pencils useful for laying out the initial shape and proportions of their figure.
Learning how to see as an artist
Finally, one of the most critical skills any artist can develop is learning how to see as an artist. This means being able to analyze objects and figures not just as they appear, but in terms of their underlying structures and forms. When drawing an elf, for instance, you'll need to consider the figure's proportions, the way its limbs bend and move, and the effect of light and shadow on its form.
Breaking Down the Elf Drawing Process
Analyzing the proportions of an elf
To begin drawing an elf, one must first consider the character's unique proportions. Elves are often depicted as slender, graceful creatures with distinctive long ears and elegant facial features. The key to capturing these distinctive features is understanding and accurately depicting their proportions in relation to each other. Once you've grasped these proportions, it becomes easier to sketch an elf convincingly.
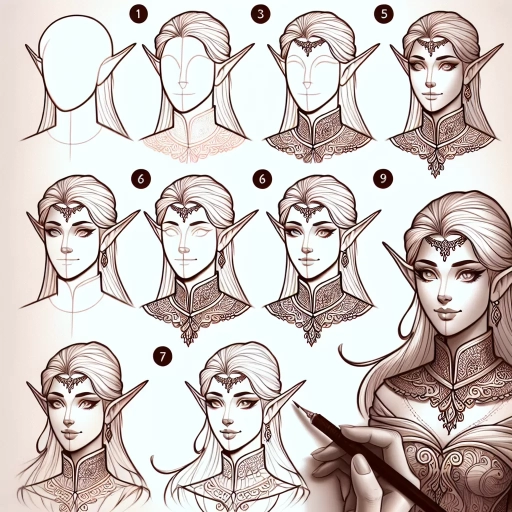
Drafting the initial sketch of the elf
Before you can begin refining your drawing, you must first lay down a rough sketch to establish the basic form and pose of your elf. This initial sketch should be light and loose, focusing on capturing the overall gesture of the figure rather than getting caught up in details. This is an essential step that will guide the rest of your drawing process.
Adding details and refining the elf drawing
Once you have your basic sketch down, you can begin adding details and refining your drawing. This is where your elf will start to come to life. Pay close attention to the unique characteristics of the elf, including its pointy ears, almond-shaped eyes, and slender figure. As you add these details, constantly refer back to your initial sketch to ensure you're maintaining the correct proportions and overall form.
Finalizing and Sharing Your Elf Drawing
Reviewing and refining your drawing
Once your drawing is complete, take some time to review and refine it. Check for any mistakes or inconsistencies, and make adjustments as necessary. This final review process is key to producing a polished, professional-looking drawing. It's also a good opportunity to add any finishing touches or additional details that will enhance your elf drawing.
Using digital tools to finalize your elf drawing
In the modern age, many artists choose to use digital tools to finalize their drawings. Tools like Procreate or Photoshop offer a range of features that can help you refine and enhance your elf drawing. This might include adding color, adjusting lighting and shading, or adding special effects.
Sharing your elf drawing
Finally, once your elf drawing is complete, it's time to share it with the world. There are many platforms available for sharing artwork, from social media sites like Instagram and Facebook to online art communities like DeviantArt and Behance. Sharing your work is an excellent way to receive feedback and improve your skills, as well as potentially gaining recognition for your artistic talent.