How To Make A Catapult Out Of Popsicle Sticks
Building a catapult out of popsicle sticks is a fun and creative project that can be enjoyed by people of all ages. Not only is it an entertaining activity, but it also provides a unique opportunity to learn about physics and engineering. With a few simple materials and some basic tools, you can create a working catapult that can launch small objects into the air. To get started, you will need to gather the necessary materials and tools, which will be covered in the next section, Gathering Materials and Tools. In this article, we will guide you through the process of designing and building your catapult, as well as testing and refining it to achieve the best results. By following these steps, you can create a catapult that is not only functional but also visually appealing, making it a great addition to any science fair or DIY project.
Gathering Materials and Tools
Gathering materials and tools is a crucial step in any crafting or DIY project. It sets the foundation for a successful outcome and helps ensure that the project is completed efficiently and effectively. When it comes to gathering materials and tools, there are several key considerations to keep in mind. First, it's essential to collect the necessary materials, such as popsicle sticks, glue, and other essential items. This involves selecting the right type and quality of materials to suit the project's requirements. Next, it's crucial to choose the right glue and adhesives to ensure a strong and durable bond. Finally, preparing the workspace and taking necessary safety precautions is vital to prevent accidents and ensure a smooth workflow. By considering these factors, crafters and DIY enthusiasts can set themselves up for success and create high-quality projects. To start, let's take a closer look at collecting popsicle sticks and other essential materials.
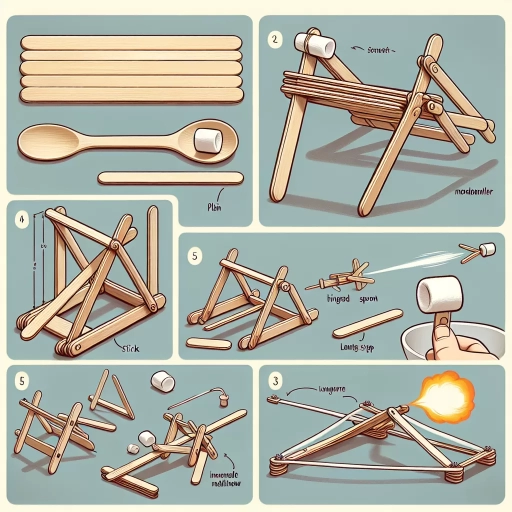
Collecting Popsicle Sticks and Other Essential Materials
Here is the paragraphy: Collecting Popsicle Sticks and Other Essential Materials To start building your catapult, you'll need to gather the necessary materials. The most crucial component is, of course, the popsicle sticks. You'll need a bunch of them, so start collecting as many as you can. You can ask your friends or family members to save their popsicle sticks for you, or you can purchase a pack of craft sticks from a craft store. Make sure to get sticks that are sturdy and not too flimsy, as they will be the foundation of your catapult. In addition to popsicle sticks, you'll also need some glue, scissors, a ruler, a pencil, and a rubber band. The glue will be used to hold the sticks together, while the scissors will be used to cut the sticks to the desired length. The ruler will help you measure and align the sticks, and the pencil will be used to mark the sticks where you need to make cuts. The rubber band will be used to provide the tension needed to launch your projectiles. You may also want to have some tape on hand to reinforce the joints of your catapult. With all these materials, you'll be ready to start building your popsicle stick catapult.
Selecting the Right Glue and Adhesives
When it comes to selecting the right glue and adhesives for your popsicle stick catapult, it's essential to consider the type of materials you're working with and the desired strength of the bond. For a sturdy and durable catapult, you'll want to use a combination of glues that provide both flexibility and rigidity. White glue, also known as PVA glue, is an excellent choice for bonding popsicle sticks together, as it dries clear and is easy to apply. However, for added strength and stability, you may also want to use a hot glue gun to reinforce the joints and provide extra support. Additionally, consider using a small amount of super glue to attach any metal or plastic components, such as rubber bands or a trigger mechanism, to the popsicle sticks. When working with glue, make sure to apply it sparingly and evenly, as excess glue can create a mess and weaken the structure. By selecting the right combination of glues and adhesives, you'll be able to create a strong and reliable catapult that will withstand repeated use and launching.
Preparing the Workspace and Safety Precautions
Preparing the workspace and taking necessary safety precautions are crucial steps before starting to build a catapult out of popsicle sticks. First, choose a flat and stable surface, such as a table or countertop, to work on. Cover the surface with newspaper, a plastic tablecloth, or a vinyl table runner to prevent any glue or other materials from damaging the surface. Ensure good lighting in the workspace, either natural or artificial, to see the small details of the popsicle sticks and other materials. Next, gather all the necessary materials and tools within arm's reach to avoid unnecessary movements and distractions. Wear protective gear, such as safety glasses and a dust mask, to prevent eye and respiratory injuries from sawdust, glue fumes, or other potential hazards. Additionally, keep loose clothing and long hair tied back to avoid any accidental entanglements with tools or materials. It is also essential to keep the workspace clean and organized throughout the project to avoid any tripping hazards or misplaced materials. By taking these precautions, you can ensure a safe and enjoyable experience while building your popsicle stick catapult.
Designing and Building the Catapult
Designing and building a catapult is a challenging yet rewarding project that requires a combination of creativity, technical skills, and attention to detail. To create a high-quality catapult, it's essential to understand the basic mechanics of the device, including the principles of tension, torsion, and gravity. A well-designed catapult should have a sturdy frame and base that can withstand the stresses of launching heavy projectiles, as well as a reliable launching mechanism and trigger that can be easily activated. In this article, we'll explore the key components of a catapult and provide a step-by-step guide on how to design and build one. We'll start by understanding the basic mechanics of a catapult, including the different types of catapults and their unique characteristics. By grasping these fundamental principles, you'll be able to create a catapult that is both functional and efficient. Understanding the Basic Mechanics of a Catapult is crucial to building a successful catapult, and it's where we'll begin our journey.
Understanding the Basic Mechanics of a Catapult
Understanding the basic mechanics of a catapult is crucial before designing and building one. A catapult is a simple machine that uses stored energy to propel objects through the air. The basic components of a catapult include a frame, a throwing arm, a counterweight, and a trigger. The frame provides the base structure of the catapult, while the throwing arm is the long, pivoting beam that propels the object. The counterweight is the heavy object attached to the opposite end of the throwing arm, which provides the energy needed to propel the object. The trigger is the mechanism that releases the throwing arm, allowing it to swing and propel the object. When the trigger is released, the counterweight falls, causing the throwing arm to swing upward, propelling the object into the air. The distance and accuracy of the projectile depend on the design and construction of the catapult, including the length and weight of the throwing arm, the size and weight of the counterweight, and the angle of release. By understanding these basic mechanics, you can design and build a catapult that is both functional and efficient.
Creating the Frame and Base of the Catapult
The frame and base of the catapult are the foundation of the entire structure, providing stability and support for the throwing arm and counterweight. To create the frame, start by gluing four popsicle sticks together in a square shape, making sure the corners are secure and the frame is even. This will form the base of the catapult. Next, glue two more popsicle sticks to the top of the frame, perpendicular to each other, to create the vertical supports for the throwing arm. Make sure these supports are evenly spaced and securely attached to the base. The throwing arm will be attached to these supports, so it's essential to ensure they are sturdy. For the base, glue two more popsicle sticks to the bottom of the frame, parallel to each other, to create a wide and stable base. This will prevent the catapult from tipping over when in use. Finally, glue a small piece of cardboard or a popsicle stick to the center of the base to create a pivot point for the throwing arm. This will allow the arm to move smoothly and consistently, ensuring accurate and powerful launches. By following these steps, you'll have a solid foundation for your catapult, ready to be equipped with the throwing arm and counterweight.
Designing the Launching Mechanism and Trigger
Here is the paragraph: Designing the Launching Mechanism and Trigger is a crucial step in building a functional catapult. The launching mechanism refers to the system that propels the projectile into the air, while the trigger is the component that releases the stored energy. A well-designed launching mechanism and trigger are essential for achieving optimal performance and accuracy. To design the launching mechanism, consider the type of motion you want to achieve, such as a simple pivot or a more complex cam-based system. The launching mechanism should be sturdy and able to withstand the forces generated during launch. The trigger, on the other hand, should be sensitive and responsive, allowing for precise control over the launch. You can use a variety of materials, such as rubber bands, springs, or even a simple lever, to create the launching mechanism and trigger. When designing the trigger, consider the safety aspect and ensure that it is secure and won't accidentally release the stored energy. A well-designed launching mechanism and trigger will enable your catapult to launch projectiles with precision and power, making it a fun and exciting project to build and operate.
Testing and Refining the Catapult
The development of a catapult is a complex process that requires careful planning, precise calculations, and rigorous testing. To create a high-quality catapult, it is essential to test and refine its design, ensuring that it can launch projectiles accurately and efficiently. This process involves conducting initial tests to assess the catapult's performance, identifying and addressing any design flaws or weaknesses, and refining its accuracy and range. By following these steps, engineers and designers can create a catapult that meets their requirements and achieves their desired outcomes. In this article, we will explore the process of testing and refining a catapult, starting with the crucial step of conducting initial tests and assessing its performance.
Conducting Initial Tests and Assessing Performance
Conducting initial tests and assessing performance is a crucial step in refining your popsicle stick catapult. Begin by launching small objects, such as paper clips or beads, to gauge the catapult's power and accuracy. Observe how far the projectiles travel and note any inconsistencies in their flight patterns. Next, test the catapult's range by launching objects at varying distances, taking care to maintain a consistent release point. This will help you identify any issues with the catapult's design or construction. Additionally, assess the catapult's durability by subjecting it to repeated launches, checking for any signs of wear or damage. By analyzing the results of these initial tests, you can identify areas for improvement and make targeted adjustments to optimize your catapult's performance.
Identifying and Addressing Design Flaws and Weaknesses
When testing and refining the catapult, it's essential to identify and address design flaws and weaknesses. One common issue is the catapult's throwing arm being too short or too long, resulting in inconsistent or inaccurate launches. To address this, you can adjust the length of the arm by adding or removing popsicle sticks, ensuring it's proportional to the catapult's base and counterweight. Another weakness is the catapult's frame being too flimsy or unstable, causing it to topple over during launches. To strengthen the frame, you can add additional popsicle sticks or glue to reinforce the joints, providing a more stable base for the catapult. Additionally, the catapult's trigger mechanism may be too sensitive or too stiff, affecting the accuracy of the launches. To refine the trigger, you can adjust the tension of the rubber band or add a small piece of tape to hold it in place, ensuring a smooth and consistent release. By identifying and addressing these design flaws and weaknesses, you can refine your catapult's performance, achieving more accurate and consistent launches.
Refining the Catapult's Accuracy and Range
Refining the Catapult's Accuracy and Range. To refine the catapult's accuracy and range, start by adjusting the tension of the rubber bands. Tightening the rubber bands will increase the catapult's power and range, while loosening them will decrease it. Next, experiment with different types of projectiles, such as small balls or marbles, to find the one that works best with your catapult. You can also try adjusting the angle of the catapult's arm to see how it affects the trajectory of the projectile. Additionally, consider adding a sighting mechanism, such as a small piece of tape or a toothpick, to help you aim the catapult more accurately. By making these adjustments and experimenting with different variables, you can refine your catapult's accuracy and range, and achieve more consistent and impressive results.