How To Remove Blinds From Window
Here is the introduction paragraph: Removing blinds from a window can be a daunting task, but with the right approach, it can be done efficiently and effectively. Whether you're looking to replace old blinds with new ones or simply want to give your windows a fresh new look, understanding the process of blind removal is essential. To ensure a smooth and successful removal, it's crucial to prepare properly, as this will set the tone for the entire process. In this article, we'll delve into the world of blind removal, covering the essential steps to take before starting, the techniques for removing different types of blinds, and the post-removal steps to follow. By the end of this article, you'll be equipped with the knowledge and confidence to tackle blind removal like a pro. So, let's get started by discussing the importance of preparation in the blind removal process. Preparation is Key.
Preparation is Key
Preparation is key to a successful project, and this is especially true when it comes to DIY home repairs. Before starting any project, it's essential to take the necessary steps to ensure a safe and efficient process. This includes turning off the power to the area you'll be working on, clearing the space of any clutter or tripping hazards, and gathering all the essential tools and materials needed for the job. By taking these simple yet crucial steps, you can avoid accidents, reduce stress, and achieve professional-looking results. In this article, we'll explore each of these preparation steps in more detail, starting with the importance of turning off the power.
Turn Off the Power
When it comes to removing blinds from a window, one of the most crucial steps is to turn off the power. This may seem like a no-brainer, but it's essential to ensure your safety while working with electrical components. If your blinds are motorized or have any electrical features, it's vital to switch off the power supply before starting the removal process. Locate the power source, which is usually a switch or a cord, and turn it off. Verify that the blinds are completely still and not moving before proceeding. This simple step can prevent accidents, electrical shocks, or injuries, allowing you to focus on removing the blinds safely and efficiently. By turning off the power, you'll also avoid any potential damage to the electrical components or the blinds themselves, making the removal process smoother and more successful.
Clear the Area
Clear the Area is essential when removing window blinds. Move any furniture away from the window to give yourself ample space and prevent any damage or injury. Cover the floor and surrounding areas with drop cloths or old sheets to protect them from dust, debris, and potential scratches. Remove any curtains, rugs, or mats that may interfere with the removal process or get damaged during the procedure. This will also make cleaning up easier once the blinds are removed. By clearing the area, you'll be able to work efficiently and safely, ensuring a successful removal process.
Gather Essential Tools
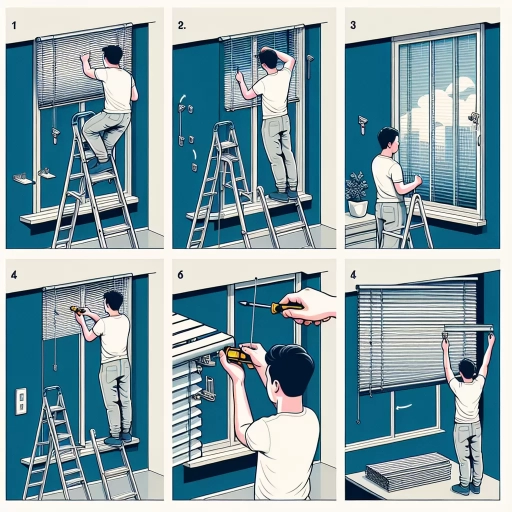
Here is the paragraphy: To remove blinds from a window effectively, it's crucial to gather essential tools beforehand. This preparation ensures that the process is smooth and minimizes the risk of damaging the blinds or the window frame. The first tool you'll need is a screwdriver, preferably a flathead or Phillips head, depending on the type of screws used to secure the blinds. A ladder or step stool is also necessary for reaching high windows safely. For certain types of blinds, such as those with clips or brackets, a pair of needle-nose pliers can be handy for gripping small parts. Additionally, a cloth or soft brush can be useful for dusting off the blinds and window frame as you work. If the blinds are particularly stubborn or have been painted over, a gentle adhesive remover might be required. Lastly, having a container or bag ready to store the removed blinds and their components can help keep the workspace organized. By having these tools at your disposal, you'll be well-prepared to tackle the task of removing your blinds efficiently.
Removing Different Types of Blinds
Removing different types of blinds can be a daunting task, especially if you're not familiar with the process. However, with the right tools and a bit of patience, you can successfully remove your old blinds and replace them with new ones. In this article, we'll take a closer look at how to remove three common types of blinds: Venetian, roller, and vertical blinds. We'll start by exploring the process of removing Venetian blinds, which can be a bit more complex due to their multiple slats and cord system. By understanding the steps involved in removing Venetian blinds, you'll be better equipped to tackle the task and move on to removing other types of blinds. So, let's dive in and start with the process of removing Venetian blinds.
Removing Venetian Blinds
Here is the paragraphy: Removing Venetian blinds can be a bit more challenging than other types of blinds, but with the right tools and a step-by-step approach, it can be done efficiently. To start, identify the type of Venetian blind you have, as there are different removal methods for different types. For standard Venetian blinds, begin by removing the valance or pelmet, which is usually held in place by screws or clips. Gently pry the valance away from the wall or window frame, taking care not to damage the surrounding area. Next, locate the blind's headrail, which is typically attached to the wall or window frame using brackets or screws. Remove the screws or brackets to release the headrail, and then carefully lift the blind away from the window. For cordless Venetian blinds, the process is similar, but you may need to release the cordless mechanism before removing the headrail. For motorized Venetian blinds, consult the manufacturer's instructions for specific removal procedures. Once the blind is removed, take care to clean and dust the window and surrounding area to ensure a smooth and efficient removal process.
Removing Roller Blinds
Removing roller blinds is a relatively straightforward process that can be completed with a few simple tools. To start, locate the roller blind's mounting bracket, which is usually attached to the wall or window frame. You'll need to remove the screws or clips that hold the bracket in place, taking care not to damage the surrounding area. Once the bracket is removed, gently pull the roller blind away from the window, taking care not to touch any of the internal mechanisms. If the blind is stuck, you can use a gentle rocking motion to loosen it. Next, locate the chain or cord that controls the blind's movement, and carefully remove any clips or ties that hold it in place. You may need to use a screwdriver or pliers to release the chain or cord from its mounting point. With the chain or cord removed, you should be able to lift the roller blind out of its mounting bracket and set it aside. If you're having trouble removing the blind, it may be helpful to consult the manufacturer's instructions or seek assistance from a professional.
Removing Vertical Blinds
Removing vertical blinds can be a bit more involved than other types of blinds, but with the right tools and a bit of patience, it can be done successfully. The first step is to identify the type of vertical blind you have, as this will determine the removal process. Most vertical blinds are either corded or chain-operated, and some may have a motorized system. Once you've identified the type, you can begin by removing any visible screws or clips that hold the blind in place. For corded vertical blinds, you'll need to release the tension on the cords by pulling them gently away from the blind. This will allow you to remove the blind from the headrail. For chain-operated vertical blinds, you'll need to remove the chain from the gear or pulley system, taking care not to damage the chain or the gear. If your vertical blind has a motorized system, you'll need to consult the manufacturer's instructions for specific removal procedures. Once the blind is removed from the headrail, you can then remove the headrail itself by taking out the screws or clips that hold it in place. Finally, you can remove any remaining brackets or screws that hold the blind to the window frame. It's a good idea to take your time and work carefully when removing vertical blinds, as they can be fragile and prone to damage.
Post-Removal Steps
After removing a window, it's essential to take the necessary post-removal steps to ensure a smooth and successful replacement process. These steps are crucial in preparing the window frame for the new installation, preventing any potential issues, and maintaining the overall integrity of the surrounding structure. Three key post-removal steps to focus on are cleaning the window frame, removing any remaining fixtures, and inspecting for damage. By paying attention to these details, homeowners can avoid costly repairs down the line and ensure a proper fit for their new window. Starting with the first step, it's vital to thoroughly clean the window frame to remove any debris, old adhesive, or other substances that may have accumulated during the removal process. This will provide a clean slate for the new installation and prevent any potential issues with the new window's seal. Cleaning the window frame is a critical step that sets the stage for a successful replacement.
Cleaning the Window Frame
Cleaning the window frame is an essential step after removing blinds to ensure a smooth and dust-free surface for new window treatments. Start by using a soft-bristled brush or a dry cloth to gently sweep away any debris, dust, or dirt that may have accumulated on the frame. Next, mix a solution of mild soap and warm water, and dip a soft cloth into it. Wring out the cloth thoroughly to avoid any excess moisture, which can damage the window frame or surrounding areas. Gently wipe down the entire frame, paying special attention to any areas with visible stains or dirt buildup. For tougher stains or grime, you can use a gentle cleaning product specifically designed for windows, but be sure to follow the manufacturer's instructions and test a small area first. Once you've cleaned the entire frame, use a dry cloth to wipe away any excess moisture and prevent water spots. Finally, inspect the frame for any remaining dust or debris and repeat the cleaning process if necessary. By thoroughly cleaning the window frame, you'll be able to install new window treatments with confidence, knowing that the surface is clean and free of any debris.
Removing Any Remaining Fixtures
Removing any remaining fixtures is a crucial step in the post-removal process. This involves taking out any leftover screws, brackets, or clips that were used to secure the blinds to the window frame. Start by inspecting the window frame and surrounding areas to identify any remaining fixtures. Use a screwdriver to remove any visible screws, taking care not to damage the surrounding material. For more stubborn fixtures, such as clips or brackets, use a gentle prying motion to loosen and remove them. Be careful not to scratch or damage the window frame or surrounding surfaces. If there are any adhesive residues left behind, use a gentle adhesive remover to clean the area. Once all fixtures have been removed, inspect the window frame and surrounding areas to ensure they are clean and free of debris. This will provide a smooth surface for any future window treatments or installations.
Inspecting for Damage
Here is the paragraphy: Inspecting for damage is a crucial step after removing blinds from a window. This step helps identify any potential issues that may have arisen during the removal process. Start by visually inspecting the window frame, sill, and surrounding areas for any signs of damage, such as scratches, dents, or cracks. Check the window's glass and glazing for any chips or breaks. If you notice any damage, take note of it and consider consulting a professional for repairs. Additionally, inspect the wall and surrounding areas for any damage to the paint, wallpaper, or plaster. If you find any damage, you can address it promptly to prevent further issues. Inspecting for damage also helps ensure that the window is safe and secure, and that the removal process did not compromise its integrity. By taking the time to inspect for damage, you can avoid costly repairs down the line and ensure a smooth and successful blind removal process.