How To Fray Jean Shorts
Here is the introduction paragraph: Frayed jean shorts are a timeless fashion staple that can add a touch of effortless cool to any summer outfit. But instead of buying a pair, why not try your hand at creating your own? With a few simple tools and some basic know-how, you can transform a pair of ordinary shorts into a unique and stylish piece of clothing. To get started, it's essential to understand the process of fraying jean shorts, which involves three key steps: preparation, the actual fraying process, and adding the finishing touches. In this article, we'll take you through each of these steps in detail, starting with the crucial first step: preparation is key.
Preparation is Key
Preparation is key to achieving a successful DIY project, especially when it comes to upcycling old jeans into trendy shorts. To ensure a smooth and enjoyable process, it's essential to prepare beforehand. This involves choosing the right jean shorts, deciding on the fray style, and gathering essential tools and materials. By doing so, you'll be able to create a pair of shorts that not only looks great but also fits perfectly. With the right preparation, you can avoid common mistakes and ensure a professional-looking finish. So, let's start with the first step: choosing the right jean shorts.
Choose the Right Jean Shorts
Here is the paragraphy: When it comes to fraying jean shorts, the type of jeans you start with can make all the difference. Look for a pair that is made from a high-quality denim that is thick enough to hold its shape, but not so thick that it's difficult to work with. A medium-weight denim is usually the best choice. You'll also want to consider the style of the shorts. A classic straight-leg or relaxed fit is usually the easiest to work with, as they have a clean line and minimal embellishments. Avoid shorts with a lot of distressing or embellishments, as these can be difficult to work with and may not fray evenly. Additionally, consider the color of the shorts. A lighter wash will be easier to fray than a darker wash, as the lighter color will show the frayed edges more clearly. Finally, make sure the shorts are comfortable and fit well, as you'll be wearing them after you've frayed them. By choosing the right pair of jean shorts, you'll be able to achieve the perfect frayed look and enjoy wearing your new shorts all summer long.
Decide on the Fray Style
When deciding on the fray style for your jean shorts, there are several options to consider. The most common fray styles include a raw hem, a subtle fray, a heavy fray, and a distressed fray. A raw hem is a clean cut without any fraying, giving a more polished look. A subtle fray is a slight unraveling of the threads, creating a soft, relaxed appearance. A heavy fray is a more dramatic unraveling, resulting in a bold, edgy look. A distressed fray is a combination of heavy fraying and deliberate tears or cuts, giving a worn, vintage appearance. Consider the overall style you want to achieve with your jean shorts, as well as your personal taste and the occasion you plan to wear them. If you want a more casual, laid-back look, a subtle or heavy fray may be the way to go. If you prefer a more polished, put-together look, a raw hem may be the better choice. Additionally, consider the length and fit of your shorts, as a heavier fray may be more suitable for longer shorts, while a subtle fray may be more flattering on shorter shorts. Ultimately, the fray style you choose will depend on your individual style and preferences, so don't be afraid to experiment and find the look that works best for you.
Gather Essential Tools and Materials
To successfully fray jean shorts, it's crucial to gather the essential tools and materials beforehand. Start by collecting a pair of scissors, preferably sharp and dedicated to cutting fabric, to prevent any damage or dulling. A seam ripper or a craft knife can also come in handy for carefully removing any unwanted threads or stitching. A pair of tweezers is necessary for plucking and pulling the frayed threads to achieve the desired effect. Additionally, a denim needle or a heavy-duty sewing needle is required for any necessary repairs or re-stitching. A measuring tape or a ruler will help you measure and mark the desired length of your shorts. A pencil or a marker is needed to mark the cutting line, and a cutting mat or a piece of cardboard can provide a stable surface for cutting. Optional materials include a pair of sandpaper or a distressing tool to add extra texture and fraying to your shorts. Having all these tools and materials within reach will ensure a smooth and efficient fraying process.
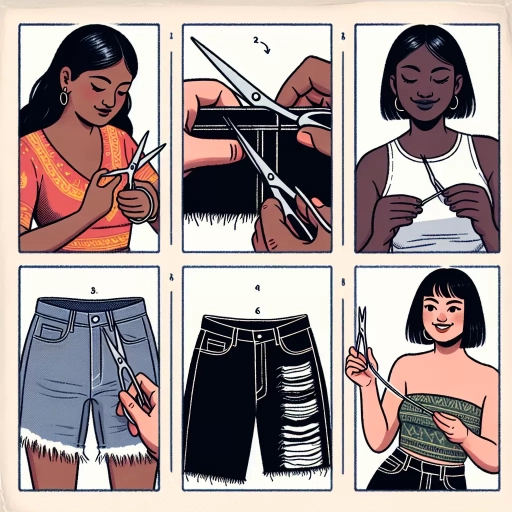
Step-by-Step Fraying Process
The fraying process is a simple yet effective way to add a decorative touch to your clothing, home decor, or accessories. To achieve a beautiful, frayed edge, you'll need to follow a step-by-step process that involves unraveling the hem, using scissors to create a frayed edge, and distressing the fabric for a worn look. By following these steps, you can create a unique and eye-catching design that adds a touch of personality to your project. In this article, we'll take a closer look at each of these steps, starting with the first and most crucial step: unraveling the hem.
Unravel the Hem
Unravel the Hem: To begin the fraying process, start by unraveling the hem of your jean shorts. This involves carefully picking apart the stitching that holds the hem in place. You can use a seam ripper or a pair of scissors to gently cut the threads, working your way around the hem. Be careful not to cut too much of the fabric, as this can lead to uneven fraying. As you unravel the hem, you'll start to see the threads begin to fray and the fabric start to unravel. This is the first step in creating a beautifully frayed hem on your jean shorts.
Use Scissors to Create a Frayed Edge
To create a frayed edge on your jean shorts, use scissors to carefully cut along the desired edge, making sure to only cut the threads that are visible on the surface. This will help to prevent the fabric from unraveling too much and give you more control over the fraying process. Start by cutting a small section at a time, working your way around the edge of the shorts. As you cut, gently pull the threads apart to create a frayed effect. Be careful not to pull too hard, as this can cause the fabric to tear or become misshapen. Continue cutting and pulling the threads until you achieve the desired level of fraying. It's also a good idea to use a pair of sharp scissors and to cut in a well-lit area to ensure that you can see what you're doing. Additionally, you can use a ruler or other straight edge to help guide your scissors and keep your cuts straight. By using scissors to create a frayed edge, you can add a unique and stylish touch to your jean shorts.
Distress the Fabric for a Worn Look
To achieve a worn look on your jean shorts, distressing the fabric is a crucial step. This process involves manipulating the fabric to create a frayed, worn-in appearance that adds character to your shorts. Distressing can be done using various techniques, including sanding, ripping, and cutting, which help to break down the fabric and create a soft, frayed edge. By distressing the fabric, you can create a unique, one-of-a-kind look that gives your shorts a laid-back, vintage vibe. To distress the fabric, you can use a variety of tools, such as sandpaper, scissors, or a distressing tool, which can be found at most craft stores. When distressing the fabric, be careful not to overdo it, as this can lead to an uneven or overly frayed look. Instead, work slowly and carefully, using gentle, controlled motions to achieve the desired level of distressing. With a little patience and practice, you can create a beautifully distressed fabric that adds a touch of personality to your jean shorts.
Finishing Touches
The finishing touches on a project can make all the difference in its overall appearance and quality. When it comes to adding the final details, there are several key steps to consider. First, it's essential to trim excess threads to prevent a messy and unfinished look. Additionally, taking measures to prevent further fraying can help maintain the project's integrity and extend its lifespan. Finally, adding embellishments can give the project a personalized touch and make it truly unique. By incorporating these finishing touches, individuals can take their projects to the next level and achieve a professional-looking result. To start, let's take a closer look at the importance of trimming excess threads.
Trim Excess Threads
Trim Excess Threads: Once you've achieved the desired frayed look, it's essential to tidy up the edges to prevent further fraying and give your shorts a polished finish. Using a pair of sharp scissors, carefully trim the excess threads, making sure not to cut too close to the actual fabric. This will help maintain the integrity of the shorts and prevent any unwanted holes or runs. To ensure a clean cut, it's best to trim the threads in small increments, working your way around the hem. This will also help you maintain control and avoid any mistakes. Additionally, you can use a lint roller or a small brush to remove any loose threads or debris, leaving your shorts looking neat and tidy. By trimming excess threads, you'll be able to enjoy your frayed jean shorts for a longer period, and they'll continue to look great with minimal maintenance.
Prevent Further Fraying
To prevent further fraying on your newly frayed jean shorts, there are a few simple steps you can take. First, wash your shorts inside out in cold water to prevent the frayed edges from unraveling further. When you take them out of the dryer, gently tug on the frayed edges to even out the fibers and prevent them from getting tangled. You can also use a fabric sealant or a clear nail polish to coat the frayed edges and prevent them from fraying further. Another option is to use a zigzag stitch or an overlock stitch on your sewing machine to reinforce the edges and prevent fraying. Additionally, you can use a pair of scissors to carefully trim any loose threads or fibers that are sticking out, which will help to prevent further fraying. By taking these steps, you can help to maintain the frayed look of your shorts and prevent them from becoming too worn or tattered.
Add Embellishments for a Personalized Look
Adding embellishments is a great way to give your frayed jean shorts a personalized look. You can use a variety of materials such as patches, pins, studs, and embroidery floss to add a unique touch to your shorts. Patches can be ironed or sewn onto the shorts, and can feature a wide range of designs, from cute cartoon characters to bold logos. Pins and studs can be used to add a touch of edginess to your shorts, and can be placed in a variety of patterns or designs. Embroidery floss can be used to add intricate stitching or designs to your shorts, and can be a great way to add a personal message or inside joke. You can also use other materials such as beads, sequins, or appliques to add a touch of glamour to your shorts. The key is to have fun and be creative with your embellishments, and to choose materials and designs that reflect your personal style. By adding embellishments, you can take your frayed jean shorts from a basic DIY project to a one-of-a-kind fashion statement.