How To Draw Mountains
Understanding the Basics of Mountain Drawing
The Fundamental Shapes and Lines
When you start learning how to draw mountains, it's important to familiarize yourself with the basic shapes and lines used to represent mountainous terrains. Observing real-life scenes or photographs of mountains can help you understand their geometric properties and identify common patterns. Mountains are mainly composed of triangles or irregular polygon shapes, connected with curves or rugged lines to depict their rocky nature. By mastering these basic forms, you can lay a good foundation for your mountain drawing journey.
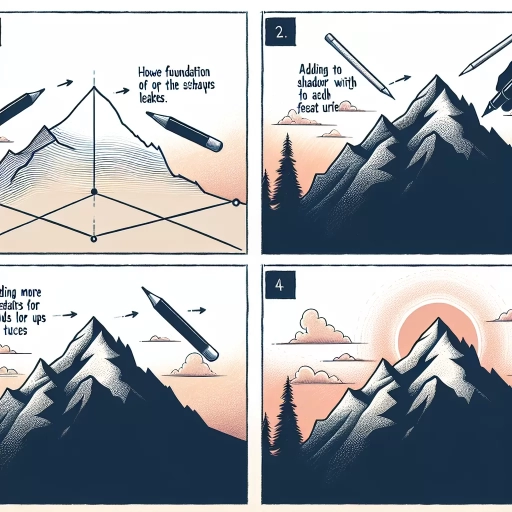
Creating an Accurate Mountain Outline
Before detailing and shading your mountain drawing, creating a precise outline plays a crucial role. Start with a simple line for the mountain base and begin constructing the peak(s) using triangular shapes or jagged lines. Depending upon the scene's perspective, you might need to adjust the mountain's width, height, or angle. Remember, each mountain's silhouette is unique, reflecting its geology, erosion patterns, and age. Therefore, take your time to reproduce these details in your outline.
Realism and the Power of Observation
To draw a convincing mountain, capturing realism and authenticity is essential. Practicing keen observation skills can help you understand the texture, shadow and light play, and various other environmental factors that affect how the mountains look. Pay close attention to rocks' placements, how their edges catch the light, and where the shadows fall. These tiny details can significantly elevate your drawing and infuse a sense of realism.
Polishing Your Mountain Drawing with Techniques and Details
Shading and Highlighting
The mountains' grandeur often lies in their play of light and shadow. Understanding and mastering shading techniques can help create an immersive spatial depth in your mountain drawings. The areas where sunlight hits directly should be left white or lightly shaded, while the facets in the shadow will be darker. Varying your graphite pencil's pressure can provide a beautiful gradient shading effect, blending light and shadow seamlessly.
Texture Representation
Mountains often display a rough, uneven texture due to rocks and geological formations. This peculiarity can be represented in your drawings through meticulous line work and stippling techniques. Using sharp, short lines for the rocky areas and smoother lines for the snow-clad regions can create a contrasting texture effect. Furthermore, don't forget about the vegetation - adding some dispersed dots or squiggly lines can suggest plant life or trees.
Environmental Effect
Mountains never exist in vacuum – they interact with the sky, clouds, fog, rivers, or forests. Including these environmental elements can make your mountain drawings more alive and visually appealing. For instance, you can draw some clouds wrapping around the peak, use an eraser to create the misty mountain base, or depict a river flowing down the mountains. Each of these adds more dynamism and authenticity to your depiction.
Maturing Your Mountain Drawing Skills
Experimentation
Once you've mastered the basics, don't shy away from experiments. Try different drawing styles, play with perspectives, use a variety of shades and lines. Each mountain, each scene is unique, and so should be your drawings. Through experimentation, you can discover your style and take your drawings to the next level. Always remember, every artist was first an amateur, and it's the continuous experiments and learning that shaped their artistry.
From Sketching to Finalizing
Start your journey of drawing mountains with sketches – quick, rough drawings to understand shapes, proportions, and placements. As you polish your skills, move towards detailed drawings, focusing on perfecting the outlines, shading, texture detailing, and other elements. Like any other skill, progressing from sketching to finalizing drawings requires patience, practice, and passion.
Learning from Masters
Lastly, don't underestimate the value of learning from the masters. Look at the works of artists famous for their landscape arts, study how they create the effect of distance, how they detail the rocks, or how sharp or gentle their lines are. This learning can be an incredible source of inspiration and invaluable lessons for your own practice.