How To Draw A Mountain
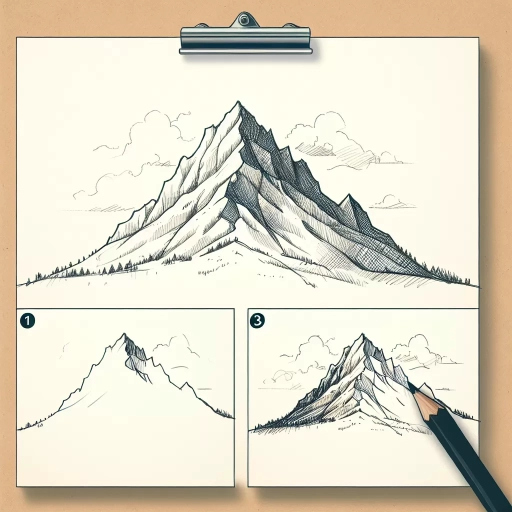 Drawing a mountain, in its elemental majesty and grandeur, can be both a challenging and rewarding artistic endeavor. Unbeknownst to many, it is not just wielding your pencil or paintbrush aimlessly; rather, it is an intricate three-step process that evolves from understanding the fundamental structures, finessing the details, and finally, creating a captivating atmosphere.Like climbing the mountain itself, the first step is 'Understanding the Basics: The Conceptualization of the Mountain'. This forms the bedrock of your masterpiece, providing a structurally sound framework for your drawing. Next, the journey continues with 'Advanced Techniques: Perfecting the Details of Your Mountain Drawing'. At this stage, your drawing becomes more vibrant and lifelike as you skillfully add the finer details. Finally, like reaching the summit, we arrive at 'Creating an Atmosphere: Adding Spectacular Elements to Your Mountain Drawing', where your creation comes to life in its full splendor, thanks to the aura you imbibe. This methodical and exciting process will not only result in a visually appealing piece but also deepen your understanding of the art. So, grab your tools, and let's venture into the wild and ascend our first summit - understanding the mountain's basic structures.
Understanding the Basics: The Conceptualization of the Mountain
Understanding the concept of a mountain is the first step in illustrating its grandeur and imposing presence accurately. This involves familiarizing oneself with its principal features, its variances in form, and its vital role in the ecosystem. Three aspects play instrumental roles in conveying a mountain's essence - Observational skills, Layering techniques, and an understanding of Perspective. The art of observation lays the groundwork for accurate representation. By keenly observing a mountain's features, artists can effectively translate the imposing stature into their artwork. The critical factor here is not drawing what you think a mountain looks like, but what you observe. Following observation is the understanding of drawing in layers. Each mountain has unique features, and by separating them into layers, a more detailed and accurate depiction can be achieved. This technique also allows artists to highlight different parts and appendages of a mountain, emphasizing its robust nature and intriguing geography. Lastly, an artist's emphasis on perspective focuses on the mountain's scale and depth, giving the viewer a sense of the real magnitude of these majestic structures. Employing these techniques leads to a more realistic and visually appealing mountain illustration. As we embark on this artistic journey, let's delve deeper into the pivotal role of observation in mountain drawing.
The Importance of Observation in Mountain Drawing
The importance of observation in mountain drawing cannot be overstated. As you delve deeper into the world of art, developing a keen eye for finer details becomes crucial in accurately conveying the essence of your subject; in this case, the majestic mountain. Through observation, we can interpret the different textures, shapes, forms and dimensions that complement the entire mountain range. At its core, a mountain is not just a static entity - it's a living, ever-changing spectacle of nature. It exudes different moods and hues as light conditions fluctuate throughout the day. It wears a crown of snow, cloaked in a swirling mist at times, or bares its rugged expanses under the brilliant sun. By closely observing these elements, artists can create a true-to-life sketch that radiates the mountain's magnificence. Understanding the significance of observation also means appreciating the mountain's various facets. From jagged rock formations to gentle, rolling slopes, each distinctive feature adds to its character. The play of light and shadow, the pattern of ridges and valleys, and subtleties in color and tone all come into focus when observed carefully. Remember, every pencil stroke in your drawing should aim to mimic these nuances with precision. Moreover, observation aids in perfecting perspective - a key element in the realistic portrayal of mountains. By truly seeing and understanding how distant peaks appear smaller or how the mountain's base gives it solidity and depth, you're able to bring a three-dimensional quality to your two-dimensional sketch. Lastly, observation isn't solely about the visual aspect; it's about connecting with the emotional essence of the scene. The stillness of a serene mountain lake, the sound of whispering wind through high peaks, the grandeur of a mountain crest against the vivid colors of the setting sun — these sensory experiences create an emotional response that can be translated into your art, promoting a profound connection between the artist, the artwork, and the viewer. In essence, the importance of observation in mountain drawing lies in its ability to foster understanding, stimulate perception and cultivate depth, both in artistic expression and viewer engagement. By mastering the art of observation, you allow the mountain to truly come alive on your canvas, creating a symphony of lines, shapes, textures and emotions. Remember, each mountain has a story to tell, and as an artist, it's your privilege to translate that story into a visual narrative. These insights yield not only better drawings but a richer appreciation for the majesty that mountains hold.
Drawing in Layers: Mountain's Different Parts and Features
The beauty of drawing is in its ability to depict not just a simple image on paper but a multifaceted and vivid representation of reality. In creating an intricate masterpiece such as a mountain, drawing in layers brings out a more accurate and visually compelling output. The concept of a mountain is more than just a giant, monolithic figure. It is an interplay of different parts and features, each with a purpose and a role that contributes to the bigger picture. This might seem daunting to incorporate, but the technique of layering makes this endeavor manageable. The first step in layering a mountain drawing is to identify the distinct parts: the foreground, the midground, and the background. Each represents a specific distance from the viewer, setting the perspective and depth. In the foreground, the most intricate details are present as it represents the closest part. Here, you might find rocks, grass, or trails, giving the base of your mountain a realistic touch. The midground is what often showcases the main body of the mountain. This part is critical because it feeds into the viewer's understanding and interpretation of the mountain's structure. Uneven surfaces, weathering patterns, and any sign of life such as vegetation or crossing wildlife contribute to a more genuine display. The background typically highlights the peak of the mountain and the sky. This layer might be subtle, but it sets the mood and ambiance of the piece. For instance, the sky could be a clear blue, suggesting a sunny day, or housing thick clouds to hint at suppressed melancholy. Drawing also involves understanding features unique to the geographical structure. A mountain is not always a smooth terrain; it features crags, crevasses, and ridges. These attributes follow a pattern that reflects the evolvement of the mountain over time due to natural events such as rain, wind, and snow. Features like the line of trees, the snow caps, or the play of shadows at different times of the day offer an opportunity to experiment with texturing techniques. It not only increases the aesthetic appeal but also enhances the overall authenticity of the depiction. Learning to draw a mountain is about understanding these layers and features, combining them to create a cohesive, engaging portrait. It's a journey that begins with grasping the concept of the mountain and its elemental features. Once mastered, this skill can then be used to draw complex landscapes, setting the artist's imagination free to roam and create endless visual stories. Indeed, layering not only simplifies the process but also gives depth and realism to your artwork.
Emphasizing Perspective: Focusing on Scale and Depth
Emphasizing Perspective: Focusing on Scale and Depth The act of perceiving and comprehending the magnitude and depth of a mountain doesn't merely rest upon viewing its peaks. It involves a detailed understanding of its scale and depth – the significant components that provide a mountain's tremendous perspective. Feeling the grandeur of the mountain can be a profoundly moving experience, and transferring this feeling onto paper requires a deep understanding of the mountain's structure and the skilled application of perspective and scale. Understanding and adding depth to your mountain drawings involves a careful study of its physical features and the impact of light and shadow. The physical attributes may include towering ridgelines, jagged cliffs, and sprawling foothills, each of which contributes to the overall scale. In essence, scale implies the representation of these features in accurate proportion related to each other's size. For example, a far-off peak would appear smaller compared to a nearby ridge. Remember that scale and perception also involve the clever concealment of certain details. As elements recede in the background, they become less distinct, a phenomenon known as atmospheric perspective. Layering your landscape by adding more details to the foreground and gradually diminishing the detail towards the horizon creates an illusion of depth, enabling the viewer to grasp the massiveness of the mountain. Light and shadow play a vital role in demonstrating depth. On a mountain, these elements do not play out straightforwardly – sunlit areas can lay near shaded alcoves while the interplay of cloud movement creates dynamic light exposures. Observing these patterns and incorporating them into your drawing can enhance the perception of depth and dimension. In essence, when attempting to capture the scale and depth of mountains, one must remember the art of perspective - the technique that allows a flat surface to depict a three-dimensional world. This knowledge allows you to arrange the mountain's elements in a way that accurately represents its heights and depths, achieving a masterful render of these towering giants of nature. By understanding how to imply scale and depth in your mountain sketches, you can effectively emphasize perspective, bringing your conceptualization of the mountain to life.
Advanced Techniques: Perfecting the Details of Your Mountain Drawing
When it comes to mastering the art of mountain drawing, perfecting the finer details is key to creating an authentic, visually captivating artwork. There are three crucial techniques to consider in this realm. First, you need to understand the intricacies of shading which will allow you to breathe life into your work through realistic textures and surfaces. It's not just about darkening certain areas, but rather about understanding how light interacts with different facets of a mountain landscape. Second, selecting the right tools is instrumental in achieving your vision. The choice of drawing materials can significantly alter the final outcome of an image, each offering unique benefits from bold lines to subtle hints of detail. Lastly, fine-tuning your lines is a meticulous task that emphasizes the appearance of ridgelines and peaks, making them stand out with precision. These strategies, when wielded properly, will propel your artwork from good to downright impeccable. Now, let’s commence our deep dive into the first aspect, mastering the art of shading: crafting realistic textures and surfaces.
Mastering Shading: Creating Realistic Textures and Surfaces
Using the Right Tools: Choosing Appropriate Drawing Materials
Choosing the right drawing tools is a fundamental aspect of mastering advanced drawing techniques, especially when your subject is something as intricate as a mountain. The potential complexity of a mountain - with its many contours, shades, crevices, and potentially even snow-capped peaks - requires a broad selection of tools that can accurately render its details. Firstly, sketching pencils are crucial for initial outlining, rough shading, and capturing the base form of the mountain. A variety of grades like HB for general sketching, B for darker lines, and H for lighter details will give you the flexibility to adapt to the various elements of your mountain sketch. Charcoal, while not as precise as pencils, is excellent for creating soft, smoky effects that can be perfect for depicting shadowy crevices or atmospheric perspectives. It allows you to add depth to your mountain drawing, creating a more immersive and realistic portrayal. Next, consider using graphite, which can produce a wide range of effects, from light, smooth textures to thick, dark lines. It's perfect for drawing rugged mountain surfaces and creating an effective contrast in your piece. Colored pencils or soft pastels can be used to add naturalistic hues to your mountain drawing. The inclusion of color can bring your mountain to life - whether that's the earthy browns and greens of a summer mountain or the stark whites and blues of a snow-capped peak. Quality erasers are also an indispensable part of your drawing toolkit. Kneaded erasers are perfect for lightening specific areas of your work for subtle highlights or for removing misplaced lines, without damaging the rest of your work. An overlooked tool is the blending stump, which seamlessly merges shades together for a smoother look, enhancing the realism in your mountain drawing. It helps soften hard lines, and add the finer details that result in a compelling piece of art. Invest in a quality sketchbook, one with heavyweight paper that can withstand repeated erasing and multiple layers of materials. The right paper will make a significant difference in the presentation of your work. Remember, knowing how to wield these tools is just as important as the tools themselves. Experiment with different techniques and find a method that resonates with you, one that captures not just the appearance of a mountain, but also its spirit, grandeur, and beauty. By selecting the appropriate drawing materials, you are equipping yourself with the necessary tools to perfect and advance your mountain drawing techniques. Although it may seem daunting at first, with practice and patience, you will see a transformation in your work. So pick up those pencils, venture into the realm of sophisticated sketching, and let the mountains come alive on your canvas.
Fine-tuning Lines: Enhancing the Appearance of Ridgelines and Peaks
Artists will tell you that mastering the details has a significant impact on the overall appearance of a drawing. When creating a mountain sketch, the process of accurately capturing its defining lines—in the form of ridges and peaks—cannot be overstated. These natural elements are pivotal in delivering a realistic and visually appealing representation of a mountain landscape. The art of fine-tuning lines begins with a keen understanding of the mountain's structure. Mountains are majestic and rugged, characterized by a jagged skyline of peaks and valleys. These lines are not random but instead follow a defined pattern from the base to the top ridgelines. By understanding these patterns, an artist can begin to mimic the same in their artwork. As you embark on enhancing the appearance of the ridgelines and peaks, start with a light hand. Carefully draw your lines with varying pressures on the pencil to depict depth and distance. The closer the ridge or peak, the more defined the lines should be. Conversely, the more distant elements should be lighter and fainter. In addition, shading plays a crucial role in bringing out the 3D effect in ridgelines and peaks. By using the appropriate shading techniques, you can greatly enhance the sense of height, depth, and solidity. Remember to observe the impacts of light and shadows on the actual mountain and carry this into your artwork for a more realistic depiction. Another essential technique is the usage of texture. The essence of a mountain cannot be captured through lines and shades alone. Adding texture to the lines--the ruggedness, the occasional smooth patches, the mixed rough patches--all bring the drawing to life. Finally, don't forget the refining part of the process--smoothening the lines, erasing unnecessary parts, and finely tuning your mountain peaks and ridges. This will create a more polished and professional appearance to your mountain drawing. In conclusion, fine-tuning lines require patience, precision, and practice. A carefully detailed work centered on enhancing the appearance of ridges and peaks will result in a realistic and visually stunning representation of a mountain that seizes the eye and captivates the imagination.
Creating an Atmosphere: Adding Spectacular Elements to Your Mountain Drawing
Creating an atmospheric mountain drawing requires more than only mastering the ridges and valleys. Just like every story has a setting, your drawing needs its unique atmosphere to capture the viewer's imagination. This involves adding spectacular elements to your mountain scenery which consist of three main steps, paralleling to three guide paragraphs to follow - each providing a unique aspect of creating an authentic and dramatic mountain environment in your art piece. Firstly, the integration of natural elements such as trees, clouds, and water features will add depth, complexity, and a realistic touch to your mountain scenery. Secondly, we'll talk about designing a striking time of day, where we will explore the use of lighting and colors to set a specific mood and atmosphere in your drawing. Lastly, no mountain drawing is complete without an element of weather - be it the brisk wind that shapes the cloud, the snow that caps the peaks, or the sunshine that brightens the scenery. In the following paragraphs, we will delve into the first step to create an impressive mountain landscape - Integrating other natural elements: Adding trees, clouds, and water features.
Integrating Other Natural Elements: Adding Trees, Clouds, and Water Features
Integrating Other Natural Elements: Adding Trees, Clouds, and Water Features One of the most enriching aspects of drawing a mountain is the opportunity to incorporate additional aspects of nature, such as trees, clouds, and water features. These elements not only enhance the visual appeal of your artwork, but also contribute to the creation of a compelling atmosphere that communicates a more profound story. When adding trees to your mountain drawing, consider the specific types reflective of the region you are depicting. Whether it's coniferous pines in cold, high-altitude regions, or deciduous trees in more temperate zones, distinct tree shapes provide a sense of depth and realism. Additionally, a waterfall cascading from a rocky crag or a serene mountain lake can add an enchanting water feature to your artwork. The key is to simulate the water's flow or stillness accurately to create a convincing image and to have enough shadow and light play to evoke a three-dimensional effect. Clouds also play a significant role in setting the overall mood of your mountain drawing. A clear, cloudless sky might suggest a bright, sunny day, while a sky filled with heavy, gray clouds may signify an approaching storm. The contrasting effect clouds have against towering mountain peaks is not only dramatic but also paints a more expressive scenery. Incorporating these natural elements can transform a simple mountain drawing into a vivid landscape filled with texture and life. By layering these elements, not only do you refine your drawing skills, but you also learn to intertwine complex components harmoniously. Mastering this integration pushes the boundaries of your creativity and provides you with a more profound appreciation for the diverse elements of nature. By adding these elements carefully, an artist can create a rich tapestry that doesn't distract the viewer, but instead invites them into a deeper understanding of the beauty and complexity of the mountain environment. The subtle inclusion of trees, clouds, and water features can work together to craft a spectacular and atmospheric mountain scape that resonates with viewers and stands high in paying homage to the majestic beauty that mountains possess.
Designing a Striking Time of Day: Playing with Lighting and Colors
Designing a Striking Time of Day: Playing with Lighting and Colors is a fundamental aspect of generating an enchanting atmosphere in your mountain drawing. It's not just about presenting a skillfully drawn mountain, but also about creating an evocative scene that stimulates viewers' senses and emotions - much like a well-crafted narrative. As onset of the dusk or the break of dawn – the time of the day you choose to depict your drawing can dramatically alter the mood and atmosphere of your piece. Each phase of the day holds a distinctive charm and light that can powerfully influence the spirit of your artwork. For instance, a mountain portrayed at dawn can ooze a sense freshness and anticipation, while the same mountain at twilight might provoke feelings of calm and serenity. An exciting tool to achieve this is playing with colors and lighting. Colors are nature's own storytelling element, communicating the hour, season, and the overall ambiance of the scene. A mountain bathed in the warm hues of the sinking sun tells a different story than one basked in the cool tones of a mid-day sun. Lighting, on the other hand, highlights the structural attributes of your mountain. Allowing shadows to dance on the mountain sides, it adds depth and authenticity to your drawing. How sharp or diffused these shadows are can help ascertain how far or near the light source is, giving perspective to your image. The interplay of colors and lighting is fundamental in creating an atmospheric spectacle. For instance, you could use warm color gradients and soft shadows to create a soothing sunset scene, or a colder color palette with contrasting shadows to depict the stark grandeur of a snow-capped mountain in bright daylight. Therefore, understanding the temporal and visual dynamics of the day, along with the effective manipulation of colors and light, can greatly influence the emotional impact of your drawing. Just like an engaging narrative, your artwork can take your audience on a journey, from the anticipation of dawn to the tranquillity of dusk, all by playing with different lighting conditions and colors.
Incorporating a Weather Element: Depicting Wind, Snow, or Sunshine
Incorporating weather elements into your mountain drawing can transform a simple sketch into a spectacular artwork, injecting life and depth into your creation. For instance, let's examine the impact of wind, snow, or sunshine on your canvas. When it comes to capturing the essence of the wind in mountainous landscapes, primarily focus on the visual cues it leaves behind. Draw bent trees, turbulent skies, and scattered leaves to showcase the wind's unseen but perceivable force. One can even illustrate snow gusts by using short, horizontal lines around the peak, imbuing a sense of stark, biting cold. Pay attention to creating areas of contrasting intensity to effectively mimic wind's unpredictable nature. Now, consider snow. Think about the way the snow melts along the mountain's ridges, revealing glimps-dark crags beneath or how it cascades in an avalanche, churning and boiling like water in a kettle. When drawing snow, less is often more. Applying subtle shades of white and grey, with appropriate shadowing for depth, you create the illusion of a blanket of snow softening the rugged mountain features, adding an element of peaceful tranquility. Lastly, the sunshine, the celestial artist that paints the world every dawn. It can either be a subtle hint glinting off a distant snow-capped peak or a vibrant burst of light roaring over the mountain top. Utilize a mix of vivid yellows, reds, and oranges to show an early sunrise, or cooler blues and purples to depict a gentle, waning twilight. It's important to remember - the sun is not only a source of illumination but also casts shadows, helping form and define objects on your canvas. Each of these weather aspects offers you a unique set of dramatic effects and techniques that can be manipulated to establish the ambient tone of your mountain drawing. Feel the spirit of the elements and interpret this energy onto your drawing, one gust, snowflake or sunbeam at a time.