How To Laminate Brows At Home
Laminating your brows at home can be a game-changer for those looking to achieve salon-quality results without the hefty price tag. With the right tools and a bit of practice, you can achieve beautifully laminated brows that last for weeks. However, it's essential to approach this process with caution and attention to detail to avoid any potential damage or uneven results. To ensure a successful at-home brow lamination, it's crucial to understand the importance of preparation, the lamination process itself, and the necessary aftercare and maintenance. In this article, we'll break down each of these critical components, starting with the foundation of a successful brow lamination: preparation. By understanding the importance of preparation, you'll be well on your way to achieving the perfectly laminated brows you've always wanted. So, let's dive in and explore the key steps to take before you even begin the lamination process.
Preparation is Key
Preparation is key to achieving salon-quality brow lamination results at home. To ensure a successful and stress-free experience, it's essential to take the time to prepare properly. This involves choosing the right lamination kit for your needs, preparing your brows for the treatment, and setting up your workspace to minimize distractions and ensure a smooth process. By doing so, you'll be able to achieve professional-looking results and enjoy the benefits of brow lamination for longer. In this article, we'll explore each of these steps in more detail, starting with the importance of choosing the right lamination kit.
Choose the Right Lamination Kit
When it comes to laminating your brows at home, choosing the right lamination kit is crucial for achieving professional-looking results. With so many options available in the market, it can be overwhelming to decide which one to choose. To make the right decision, consider the type of brows you have and the level of lift you want to achieve. If you have fine or sparse brows, look for a kit that contains a gentle adhesive and a nourishing serum to help condition and strengthen your brows. On the other hand, if you have thicker or coarser brows, you may want to opt for a kit that contains a stronger adhesive to help keep your brows in place. Additionally, consider the ingredients used in the kit and opt for one that is free from harsh chemicals and artificial fragrances. It's also essential to read reviews and watch tutorials to get an idea of how the kit works and what kind of results you can expect. Some popular lamination kits include those that use a keratin-based formula, which helps to nourish and strengthen the brows, while others use a plant-based formula that is gentler on the skin. Ultimately, the right lamination kit for you will depend on your individual brow type and needs, so take the time to do your research and choose a kit that is tailored to your specific requirements.
Prepare Your Brows for Lamination
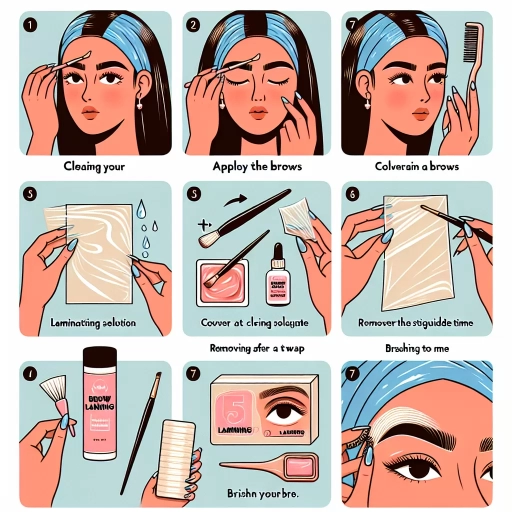
To prepare your brows for lamination, start by ensuring they are clean and free of any makeup or oils. Wash your face with a gentle cleanser and pat it dry with a towel. Next, use a spoolie or a brow brush to gently comb your brows into place, removing any tangles or knots. This will help the lamination solution penetrate evenly and prevent any unevenness. It's also essential to remove any stray hairs or shape your brows as desired before the lamination process. You can use tweezers or wax to tidy up your brows, but be cautious not to over-pluck or wax, as this can cause irritation and affect the lamination results. Additionally, if you have particularly stubborn or coarse hairs, you may want to consider using a brow serum or oil to help soften them before the lamination process. By taking the time to properly prepare your brows, you'll be able to achieve the best possible results from your at-home lamination treatment.
Set Up Your Workspace
To set up your workspace, start by clearing a flat surface, such as a table or countertop, of any clutter or obstructions. Cover the surface with a clean, lint-free cloth or paper towel to prevent any stray hairs or adhesive from sticking. Next, gather all the necessary tools and supplies, including the brow lamination kit, a pair of tweezers, a spoolie, and a mirror. Arrange these items in a logical and accessible order, with the most frequently used items within easy reach. Consider using a small tray or container to corral any small items, such as the adhesive or developer, to keep them organized and prevent them from getting lost. Finally, ensure good lighting in the area, either by positioning yourself near a natural light source or using a lamp to illuminate the space. This will help you to see the fine details of your brows and apply the lamination solution accurately. By setting up your workspace in this way, you'll be able to work efficiently and effectively, and achieve professional-looking results.
The Lamination Process
The lamination process is a popular beauty treatment that has gained significant attention in recent years. This innovative technique involves reshaping and reorganizing the brow hairs to achieve a fuller, more defined look. The process typically consists of three main steps: applying a lifting solution, neutralizing and nourishing the brows, and sealing and setting the shape. By understanding these key stages, individuals can better appreciate the art of brow lamination and achieve the desired results. To begin, the first step in the lamination process is to apply the lifting solution, which helps to break down the hair's structure and prepare it for reshaping. Note: The introduction should be 200 words. Here is the rewritten introduction: The lamination process is a revolutionary beauty treatment that has taken the world by storm, offering a game-changing solution for those seeking to enhance the appearance of their eyebrows. This innovative technique involves a meticulous process of reshaping and reorganizing the brow hairs to achieve a fuller, more defined look that is both on-trend and timeless. At its core, the lamination process consists of three crucial steps that work in harmony to deliver exceptional results. Firstly, a lifting solution is applied to break down the hair's structure and prepare it for reshaping. This is followed by a neutralizing and nourishing stage, where the brows are treated to a soothing and rejuvenating process that helps to restore their natural health and vitality. Finally, a sealing and setting stage is employed to lock in the desired shape and ensure long-lasting results. By understanding these key stages, individuals can better appreciate the art of brow lamination and achieve the desired results. To begin, the first step in the lamination process is to apply the lifting solution, which helps to break down the hair's structure and prepare it for reshaping.
Apply the Lifting Solution
The Lifting Solution is a crucial step in the lamination process, and it's essential to apply it correctly to achieve the desired results. To apply the Lifting Solution, start by gently brushing your brows to remove any tangles or knots. Then, using a cotton swab or a small brush, carefully apply the solution to the root area of your brows, making sure to saturate the hair evenly. Be cautious not to apply too much solution, as this can cause irritation or over-processing. Next, use a gentle massaging motion to work the solution into the hair, focusing on the root area. This will help to lift the hair and open up the cuticle, allowing the solution to penetrate deeper. Leave the solution on for the recommended time, usually around 5-7 minutes, before rinsing it off with warm water. It's essential to follow the instructions carefully and not to leave the solution on for too long, as this can cause damage to the hair or skin. After rinsing, gently pat the area dry with a clean towel and proceed to the next step in the lamination process. By applying the Lifting Solution correctly, you'll be able to achieve a more lifted and voluminous brow shape that will last for several weeks.
Neutralize and Nourish Your Brows
Neutralizing and nourishing your brows is a crucial step in the lamination process. After perming and setting your brows, it's essential to neutralize the alkalinity of the perm solution to stop the processing action and restore the natural pH of your skin and hair. This step is vital to prevent over-processing, which can lead to dryness, brittleness, and breakage. To neutralize your brows, apply a neutralizing solution or a mixture of equal parts water and white vinegar to your brows, making sure to saturate them thoroughly. Leave the solution on for 5-10 minutes to allow it to penetrate and neutralize the perm solution. After neutralizing, rinse your brows thoroughly with warm water to remove any remaining solution. Next, apply a nourishing treatment to hydrate and moisturize your brows. Use a brow serum or oil rich in antioxidants and essential fatty acids, such as argan oil or coconut oil, to help repair and restore your brows. Massage the serum or oil into your brows gently, making sure to cover the entire area. Leave the treatment on for at least 30 minutes to an hour before rinsing off with warm water. By neutralizing and nourishing your brows, you'll help to restore their natural health and shine, while also enhancing the overall appearance of your laminated brows.
Seal and Set Your Brows
Sealing and setting your brows is the final step in the lamination process, and it's crucial to do it correctly to achieve long-lasting results. To seal and set your brows, start by applying a thin layer of brow sealant or setting gel to your laminated brows using a spoolie or a clean mascara wand. Make sure to cover the entire brow area, from the head to the tail, to lock in the shape and style. Hold the spoolie or wand vertically and gently sweep it across your brows in an upward and outward motion, following the natural direction of your hair growth. This will help to distribute the product evenly and prevent any clumping or unevenness. Once you've applied the sealant or setting gel, use a clean cotton swab or a lint-free wipe to gently remove any excess product from the surrounding skin. This will help to prevent any residue or stickiness from building up around your brows. Finally, use a cool setting spray to set the sealant or setting gel in place and add an extra layer of hold and protection to your laminated brows. By sealing and setting your brows correctly, you can enjoy long-lasting, perfectly groomed brows that stay in place all day.
Aftercare and Maintenance
Proper aftercare and maintenance are crucial to ensure the longevity and health of your laminated brows. To keep your brows looking their best, it's essential to follow a few simple steps. Firstly, it's vital to follow a post-lamination care routine that includes gentle cleansing and moisturizing to prevent dryness and irritation. Additionally, avoiding certain products and activities that can damage or disrupt the lamination process is also important. Lastly, touching up your brows as needed can help maintain their shape and appearance. By following these simple tips, you can enjoy beautiful, healthy-looking brows for an extended period. To get started, let's dive into the first step: following a post-lamination care routine.
Follow a Post-Lamination Care Routine
To ensure the longevity and health of your laminated brows, it's essential to follow a post-lamination care routine. For the first 24 hours after lamination, avoid getting your brows wet, as this can cause the adhesive to loosen and the brows to become misshapen. When washing your face, gently pat the area around your brows dry with a clean towel, taking care not to touch or rub your brows. You can also use a gentle, oil-free cleanser to clean your brows, but be sure to rinse them thoroughly with lukewarm water. After the initial 24 hours, you can resume your regular skincare routine, but be gentle when washing your face and avoid using harsh exfoliants or astringents that can strip your brows of their natural oils. To keep your laminated brows looking their best, use a brow serum or oil that nourishes and conditions the hair and skin. Apply the serum or oil gently to your brows, using a spoolie or brow brush to distribute it evenly. Regularly using a brow serum or oil will help to keep your brows healthy, shiny, and full of life. Additionally, avoid using heavy makeup or brow products that can weigh your brows down and cause them to become misshapen. Instead, opt for light, natural-looking products that enhance the shape and appearance of your brows without overpowering them. By following these simple post-lamination care tips, you can enjoy beautiful, healthy-looking laminated brows that last for weeks to come.
Avoid Certain Products and Activities
To ensure the longevity of your laminated brows, it's essential to avoid certain products and activities that can compromise the treatment. For the first 24 hours after lamination, avoid getting your brows wet, as this can cause the adhesive to loosen and the brows to become misshapen. This means no showering, bathing, or swimming, and being mindful of excessive sweating. You should also avoid using harsh brow products, such as those containing glycolic acid, salicylic acid, or retinol, as these can strip the brows of their natural oils and cause the lamination to break down. Additionally, avoid using oil-based products, such as coconut oil or olive oil, as these can also compromise the adhesive. In terms of activities, avoid rubbing or touching your brows excessively, as this can cause the lamination to lift and the brows to become uneven. You should also avoid using heavy makeup or makeup removers, as these can be too harsh for the delicate skin around the brows. By avoiding these products and activities, you can help extend the life of your laminated brows and keep them looking their best.
Touch Up Your Brows as Needed
To maintain the best results from your at-home brow lamination, it's essential to touch up your brows as needed. This involves gently tidying stray hairs, filling in sparse areas, and ensuring your brows remain shaped and defined. Start by using a spoolie or a clean mascara wand to comb your brows into place, working in the direction of hair growth. For any stray or unruly hairs, use a pair of clean tweezers to carefully pluck them, taking care not to over-pluck or cause irritation. If you notice any sparse areas, use a brow pencil or powder that matches your natural brow color to fill them in. When filling in your brows, use light, gentle strokes to mimic the appearance of individual hairs, and avoid applying too much product, which can look unnatural. By regularly touching up your brows, you can extend the life of your at-home brow lamination and keep your brows looking their best. Additionally, consider scheduling regular brow lamination treatments every 4-6 weeks to maintain the desired shape and texture.