How To Draw A Flower Easy
 From Monet's Water Lilies to O'Keeffe's Poppies, the allure of skilfully drawn flowers has captured the hearts of art lovers for centuries. But how can you recreate such beauty on paper? A daunting task, you might think. Fear not, for this is a journey you don't have to take alone. In this comprehensive guide, we aim to enable you to wield your pencil with confidence and imbue your sketches with life. It starts by first understanding the basic elements of flower drawings, a grounding that provides the foundations for your blossoming sketching skills. Next, we hold your hand through the intricate process of drawing a flower, step-by-step, ensuring you grasp the finer details. Finally yet importantly, we educate on how you can polish your skills, progressing from novice to having your floral masterpieces be the envy of the block. So sharpen your pencils and brace yourself for an unforgettable foray into the art world. Now, let's commence with the journey by diving deep into understanding the basic elements of flower drawings.
Understanding the Basic Elements of Flower Drawings
Understanding the basic elements of flower drawings isn't just about technique—it's also about the harmony of shapes, shading, and subtleties found within each petal. Flowers encapsulate a myriad of complexities, each part serving a purpose, each form communicating a statement. The beauty lies in their diverse appearances, there's something mesmerizingly specific about each type of flower. This guide will help you familiarize yourself with the different flower parts, structure your creations starting with simple shapes, and finally, bring your drawings to life by applying basic shading techniques. We'll start by exploring the anatomy of a flower, delving into the unique characteristics of their sepals, petals, the carpel, and stamens. A firm understanding of these elements sets a strong foundation for your flower sketches. This first supporting paragraph will provide an in-depth look at the different flower parts, ensuring you're well-versed with your subject before you even lay your pencil on paper. Remember, nature doesn't produce clones, each flower is unique. Therefore, embrace the whims of your pencil and let your creativity blossom. With this comprehensive approach, you’ll soon have the ability to create stunning flower drawings that are not only technically precise but also imbued with your personal artistic touch.
Familiarize Yourself with the Different Flower Parts
In your pursuit to understand the basic elements of flower drawings, it is paramount to familiarize yourself with the different flower parts. Every flower, though varied in shapes, sizes, and types, features a basic structure that comprises several components, each with its unique function and aesthetic appeal. Starting with the outermost part, the sepal, it provides the initial protection to the flower bud and continues to support the full bloom. Sepals vary in sizes and shapes, and their depiction in your drawing can add a realistic texture. Next is the crown jewel of a flower, the petals. They are colorful, delicate, and act as a magnet for pollinators. While drawing, the shape, arrangement, and details on the petals can be manipulated to make a flowers' form recognizably unique. To the center of the flower, you will find the stamen and the pistil. The stamen represents the male reproductive part of a flower and comprises an anther and filament. Small particles on the anther, known as pollen, can be emphasized in your drawing to create intricate details. The pistil, on the other hand, is the female reproductive part and involves the stigma, style, and ovary. Notably, the pistil's prominence varies among flower types; thus, understanding its role can enhance your representation accuracy. Lastly, let's not forget the stems and leaves. They may seem trivial compared to the vibrant blossoms, but they carry an aesthetic value of their own. Stems provide the structural foundation for your flower drawing, balancing the entire composition. Leaves, with their diverse shapes and vein patterns, can add a dash of complexity and realism to your artwork. In essence, understanding these individual flower parts provides you with a comprehensive approach to flower illustrations. It equips you with the knowledge and confidence to manipulate these features in your artwork, giving your drawing a signature style while maintaining a prolific sense of authenticity. This familiarity will not just embellish your drawing skills but pedal you forward in your artistic journey, truly making your flower drawings an easy yet detailed execution.
Start with Simple Shapes
In delving into the basic elements of flower drawings, starting with simple shapes serves as a foundational bedrock. This principle represents one of the fundamental building blocks of artistic creation - the simplicity within complexity. Regardless of the flower type you're aiming to draw, be it a rose or a sunflower, every floral image begins with basic geometric shapes. These shapes, including circles, ellipses, triangles, and squares, act as the initial guides to build the skeletal structure of your art piece. For instance, if you're drawing a tulip, it begins with the basic shape of an oval for the blossom and a long rectangle for the stem. You then refine these rudimentary outlines, adding further details—petals, leaves, and perhaps a hint of the environment around the flower—to enhance the intricacy of your piece. Using these simple shapes as a starting point will make the drawing process less intimidating, aiding beginners to scale the steep learning curve associated with drawing. In essence, these basic shapes are like the rudimentary lines of code in a complex software algorithm or the simple notes that create a captivating symphony. They are the stepping stones that guide you towards understanding the concept of flower drawing in greater depth. This practice can dramatically improve your ability to visualize and break down complex images into manageable, draw-able components—strengthening your artistic skill set. Moreover, they provide a simplified understanding of the symmetry and proportion inherent in flowers, concepts that are central to botanical illustration. With practice, you'll realise how these simple shapes recur throughout nature, making the process of learning to draw far more accessible, enjoyable and transformational. In summary, starting with simple shapes in floral drawing is more than just a technique—it's a mindset that blends creativity and logic, encouraging the appreciation of the hidden geometric wonders in nature, and offering the possibility of capturing the beauty of flowers with ease and accuracy.
Applying Basic Shading Techniques
Applying Basic Shading Techniques is a fundamental aspect of creating engaging, lifelike flower drawings. It's not merely about mastering the strokes but understanding the value of light and how different tonalities lend depth and volume to your artwork. When you begin, first observe your flower and identify the light source. The areas directly facing the light are the lightest, while the ones away from it, are the darkest. Use a light hand for the former and apply more pressure for the latter to indicate a shadow or darker tone. One quintessential shading technique is the smooth gradient, perfect for the subtle color transitions in petals. Start with a darker tone at the base and gradually lighten it towards the edge. Also, pay attention to the mid-tones, the shades between the darkest darks and the lightest lights, because they often hold the artwork together. The trick is to sketch the shadows lightly using layered strokes, subtly increasing the layers until you achieve the right opacity. Another effective and relatively easy technique is cross-hatching, ideal for stamen or leaf veins. You make a set of parallel lines and then another set crossing over them. The area with the crossed lines appears darker, adding depth and detail. Lastly, but arguably the most important, is understanding ‘cast shadows’. These are shadows cast by the flower onto a surface, or by petals onto each other. Rendering these correctly makes your flower come alive on the canvas. Developing these shading techniques comes with practice. As you experiment, you’ll start observing and translating the light, shades, and shadows onto your canvas more intuitively. The impact of your shading technique will be heightened if you maintain consistency throughout the drawing and remember that every dark or light area you shade guides the viewer's eye around the composition. Shading is a powerful tool in your artistic arsenal; wield it effectively and see your flower drawings blossom.managedType
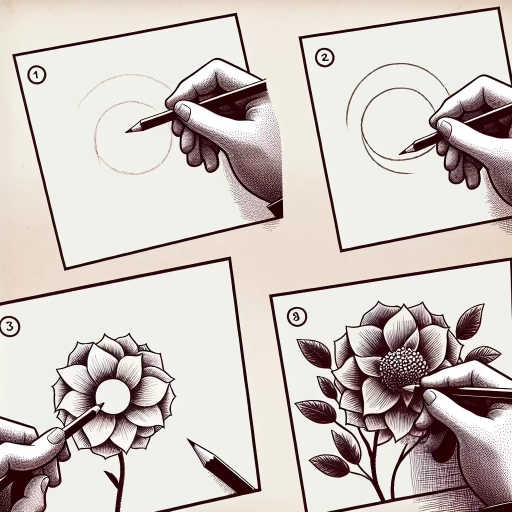
The Step-by-Step Process of Drawing a Flower
Drawing a flower may seem simple, but the step-by-step process can truly bring out the artist in anyone. Our guide breaks down how to accomplish this task into three digestible phases for user convenience and clarity. Firstly, we'll begin "Starting with a Generic Flower Design" to ease you into the creative process, offering a step-by-step overview of the basic star-like blossom that forms the foundation of most floral representations. As your confidence grows and your strokes become more assured, we'll advance to "Moving on to More Complex Flower Shapes". This stage includes a careful rendering of intricate botanic specimens, allow you to revel in the diversity and beauty of natural flora. Finally, we'll dip into "Adding the Details and Final Touches", where you'll learn to refine your work by integrating soft shadings, filmy petal textures, and other minute elements that really make your depiction come alive. Each section intertwines seamlessly, building upon the lessons of the previous one, allowing your artistic abilities to blossom much like the flowers you're learning to draw. With this guidance, let's dive right into "Starting with a Generic Flower Design".
Starting with a Generic Flower Design
Starting with a generic flower design is a fundamental and crucial step to grasp when learning the step-by-step process of drawing a flower easily. It's a point from which all variations and complexities of floral art begin. One of the notable aspects of flowers as subjects of art is their abundance of shapes, colors, and forms. However, the generic flower design provides an excellent baseline from which beginner artists can extrapolate different kinds of flowers. The generic design usually includes the basic structure of a flower - a center known as the 'corolla,' surrounded by petals. This design is versatile and can be manipulated into various flower types. For example, by expanding the distance between the petals, you can create a daisy. On the other hand, reducing that space and increasing the number of petals can give you a rose. Starting with a generic flower design also helps in understanding the scaling and proportion of a flower. A crucial tip is to keep the corolla smaller compared to the petals to create a visually appealing flower. Being aware of the influence of light and shadow on a flower's design is also essential to represent depth and dimensions accurately. Lastly, when starting with a basic flower design, it is important to remember that flowers are not perfect. Each flower has its own unique flaws and characteristics that make it stand out. So don't be afraid to experiment and add your own personal touch to your flower designs. Whether that means adding more petals, adjusting their sizes, or even altering their shapes – the world of flower design is indeed filled with endless possibilities. Creating a generic flower design is an interesting journey of exploring your art style and understanding the essence of floral art. It is indeed an easy but effective trick for beginners to dip their toes in the vast ocean of flower drawing. Through this process, you don't merely learn how to draw a flower - you open the doors to understanding the intricacies of nature's most beautiful creations in an artistic light.
Moving on to More Complex Flower Shapes
Moving on to more intricate floral forms may seem like a daunting task, but with the right understanding and approach, it can be achieved effortlessly. The beauty of floral drawings majorly comprises complex flower shapes rather than simplistic ones. This complexity introduces a level of uniqueness that typical circular sketches cannot rival. Exploring these complex figures entails getting acquainted with the details that make up their overall appearance. These intricacies may include the petal structure, the alignment of the stamens, the placement of the pistil, and many other minuscule facets that contribute to the four-dimensional aspect of the flower you are skilfully creating. When we delve into the process of evolving from simple to complex flower shapes, we should view it as a linear progression; it's an adventure that requires a step-by-step approach. Begin by mastering the rudimentary flower formats and gradually assembled them together to form a more elaborate illustration. For instance, learning to draw a petal is fundamental. Once you have that down pat, drawing an entire peony, which is nothing more than a collection of diverse petals put together, becomes a much less intimidating endeavor. Remember that the secret to success lies in studying a real flower. This interaction offers an authentic representation of the shape, texture, and proportions you'll need to replicate in your drawings. The small details and patterns that your observation unravels will be your vanguard, helping to elevate your illustrations from mere sketches to lifelike replicas. Generally, an upper hand in intricate floral drawings can be achieved through practice and perseverance accompanied by an understanding eye. Over time, you’ll find yourself implicitly adding additional elements such as light and shadow, gradients, and minute details to accentuate realism. You’ll also be able to experiment with different drawing materials, like colored pencils, watercolor, or charcoal to achieve different visual effects. In conclusion, complex flower shapes are merely an elevated form of simple shapes, which, when observed, understood, and practiced well, bring magnificent and satisfying results. Moving on to these complex structures will provide you with a much fuller, vivacious and spectacular sketch portfolio. It all begins by starting small and aiming big, gradually shaping and layering until one day, drawing a complex flower shape will be as easy as the simple ones. So, pick up your pencils, be patient, and let your passion drive your progress as you embark on the captivating journey of drawing more complicated floral illustrations.
Adding the Details and Final Touches
Adding details and final touches is often the most rewarding part of drawing a flower—it's when your creation truly comes to life. In this pivotal step, our focus shifts from basic shapes and outlines to the intricate patterns that give a flower its unique beauty. To begin, you'll need to pay attention to the base of the petals. Ensure you've adequately represented their structure: the smooth or ridged edges, the creases, the gradients of color. Depending on the type of flower you're drawing, you may want to add a texture or pattern. For instance, a rose petal often has delicate veins that gently ripple across its surface, while a sunflower petal sports a vibrant, solid hue. Next, concentrate on the flower's core. A calla lily's spadix, a sunflower's mass of tiny flowers—whatever forms the heart of your flower should be rendered with care, striking a balance between detail and simplicity. Try not to indiscriminately add lines; instead, think about how each detail emphasizes the flower's three-dimensionality. This is not just about accuracy—it's about capturing the essence of the flower and giving it depth and life. Transparency and contrast also play significant roles in finalizing your flower sketch. Shadows and highlights drastically alter a drawing. A wisely placed shadow can provide a sense of depth, while a soft highlight can suggest a texture or a light source. Experiment with these elements to heighten the realism of your work. Finally, consider the environment. If your flower isn't the entire focus of your drawing, don't neglect the surrounding elements—leaves, stems, or even a complex backdrop like a floral carpet or garden scene. These details can provide context for your flower and even enhance its attractiveness. Adding details and final touches may seem challenging, but it is crucial in producing a realistic and engaging drawing. It allows you to move beyond lines and shapes to create something lifelike and compelling. As you meticulously add these final flourishes, you're not just drawing a flower—you're creating a work of art.
Improving Your Flower Drawing Skills
Are you looking to put the petal to the metal and truly blossom in your flower drawing skills? Through meticulous practice, you can turn over a new leaf and create floral masterpieces that are visually captivating. There are three core areas to focus on in this pursuit – experimenting with different art materials, studying real flowers and regularly practicing, along with welcoming feedback and making consistent improvements. The palette of art materials is as diverse as a wildflower meadow, and picking the right tools can change everything. From the soft blend of pastels to the fine details achievable with graphite, the choice of material can drastically enhance the richness and depth of your artwork. By studying real flowers, you learn to capture their natural grace and elaborate designs from Mother Nature's hand. And just like a seed sprouting from the earth, regular practice germinates your skills, making them strong and deep-rooted. Finally, feedback helps prune the unnecessary, compliments the beautiful, and fertilizes improvement. Now, let's wade into the vibrant world of art materials and discover which ones can best capture your floral vision.
Experimenting with Different Art Materials
In any art form, such as enhancing your flower drawing skills, experimenting with different materials is essential. This practice is a gateway to exploring diverse aesthetic expressions, discovering new techniques, and uncovering your unique artistic voice. It's not only about breaking the monotony of using a single art supply but also about allowing each different material to add a unique flavor to your masterpiece. Pencils may be a reliable starting point, but remember, your options aren't limited. Watercolors, for instance, can give rise to soft, dreamy artwork, characterized by a fusion of colors and a fluid, natural appearance. If you want to draw attention to the intricate details of your flowers, then pen and ink could be your avenue. Detailed lines and intense contrasts will serve to emphasize the fine lines and petal patterns of your floral sketches, making them an entirely different form of beauty altogether. Colored pencils, pastels, and markers too can produce varying effects and offer an expansive palette for the creative-mind. They can imitate the natural vibrancy of flowers and emit expressiveness that could add life to your drawings. Acrylics and oils, though typically used for painting, can create impactful, textured, and three-dimensional renderings of your flower drawings. Experimentation also means playing with the texture and the substance of your drawing base. Try swapping regular drawing paper with watercolor paper, canvas, or even a digital screen, to see how different surfaces can dramatically alter the final look and feel of your artwork. As you push the boundaries and learn how to draw a flower in a variety of mediums, you will find yourself growing as an artist, learning new skills, and refining old ones. It is a process of exploration, advancement, and self-discovery. In the art world, where creativity knows no bounds, experimenting with different art materials is a thrilling adventure that each artist should embark on. Remember, there is no right or wrong in art — only creation, expression, and endless possibilities. In conclusion, experimenting with various art materials is not merely an exercise; it's the artist's journey. Each media has its unique interaction with the flower you are drawing and can transform the final piece in ways you might not have imagined. As artists, let us continue to experiment, explore, and elevate our artwork. Drawing a flower is easy; making it your own is the artistry.
Studying Real Flowers & Practicing Regularly
Studying Real Flowers and Practicing Regularly is an integral part of honing your flower drawing skills. As an artist, one should strive relentlessly to capture the authentic essence of the subject, and this is especially true when drawing nature, like flowers. By observing real flowers directly, you get the opportunity to understand the intricate patterns, the subtlety of the curves, and the exact hues, which cannot be wholly grasped from photographs or second-hand references. A tulip is more than just a bulbous shape with petal-like structures; it has a unique structure, texture, and color scheme that distinguishes it from other flowers—an essential aspect brought out by close observation. Furthermore, regular practice goes hand-in-hand with studying. The saying 'practice makes perfect' couldn't be truer when it comes to drawing. Regular practice helps in getting used to the different shades, shapes, and textures of flowers. It allows you to experiment with various perspectives and styles until you find one that best embodies your artistic voice. Each failed attempt brings you one step closer to perfection. Therefore, even if your initial attempts don't pan out as you would like, persistence can form the bridge between failure and success in capturing the beauty of flowers on paper. All your efforts contribute toward better SEO optimization. Search engines like Google recognize the value of fresh, unique content. By continually practicing and studying, you'll generate original content consistently—an essential element for higher search engine rankings. Plus, vivid descriptions and continuous learning resonate with your audience, driving engagement and fostering a community around your works. So, studying real flowers and practicing regularly serves a dual purpose—it sharpens your drawing skills while boosting your website's SERP performance.
Get Feedback and Constantly Improve
Learning to draw a flower should be a delightful, immersive experience. However, it is essential to remember that improvement only comes with consistent practice and constructive feedback. "Get Feedback and Constantly Improve" is not merely a sentence but a stepping stone on your journey towards mastering the art of flower drawing. It's a proactive approach that involves seeking recommendations from more experienced artists, embracing your mistakes, and consistently working towards bettering your craft. Constructive criticism provides you with valuable insights into areas needing enhancement and those already shining bright. Whether it's the symmetry of petals, the detailing of the stem or the shading of leaves - every element counts. And more importantly, every element provides an opportunity for improvement. Incorporating feedback doesn't mean that every suggestion must be followed. Instead, you use it as a guide, a sounding board against which you evaluate your work - incorporating what suits your style, and learning from the rest. Continual improvement, on the other hand, is a conscious process. This implies you're not simply drawing for the sake of it, but doing so with the intent to get better. You're analysing your work, identifying the areas where you could do better, and then striving to make it happen. This may involve reviewing and refining your drawing techniques, exploring different styles, or experimenting with various tools and mediums. Remember that progress is often gradual - one petal at a time, one layer at a time. As the Japanese proverb goes, "Even dust amassed will grow into a mountain." Every skill you hone and every bit of feedback you embrace, leads you a step closer to perfecting your flower drawing skills. The convergence of criticism and consistent effort results in a tapestry of strokes that bring your blossoms to life like never before. In the end, understanding that art is a personal journey, and that every artist has their unique style, will enrich your experience. By accepting feedback and continually striving for improvement, you're not only refining your flower drawing skills but also nurturing the artist within you. So, keep your pencils poised and your spirit open as you venture forth on this fulfilling path to artistic mastery.