How To Make A Paper Crown
Here is the introduction paragraph: Making a paper crown is a fun and creative activity that can be enjoyed by people of all ages. Whether you're looking to add a touch of royalty to a costume, create a unique accessory for a special occasion, or simply want to explore your artistic side, a paper crown is a great way to do so. In this article, we'll take you through the process of making a paper crown, from gathering the necessary materials and tools to following step-by-step instructions and adding your own personal touches. To get started, let's take a look at the materials and tools you'll need to make your very own paper crown.
Materials and Tools Needed
When it comes to creating beautiful and unique handmade cards, the right materials and tools are essential. To get started, you'll need to choose the right paper type, which can make all the difference in the overall look and feel of your card. But that's not all - you'll also need a range of essential crafting tools to help you cut, shape, and assemble your design. And to add that extra special touch, you may want to consider additional embellishments such as ribbons, buttons, or other decorative elements. In this article, we'll take a closer look at the materials and tools you'll need to get started with handmade card making, beginning with the importance of choosing the right paper type.
Choosing the Right Paper Type
Choosing the right paper type is crucial when it comes to making a paper crown. The type of paper you choose will affect the overall look, feel, and durability of your crown. There are several factors to consider when selecting the right paper type, including the desired texture, color, and weight. For a more rustic and earthy look, consider using kraft paper or brown paper. These papers have a natural, textured look that can add a charming, homespun feel to your crown. If you're looking for a more elegant and sophisticated look, consider using white or colored cardstock. These papers are smooth and sturdy, making them perfect for creating intricate designs and patterns. You can also use patterned paper, such as glitter paper or metallic paper, to add an extra touch of glamour to your crown. Additionally, consider the weight of the paper, as heavier papers will be more durable and less prone to tearing. Ultimately, the right paper type will depend on your personal preference and the desired look of your crown. By choosing the right paper type, you can create a beautiful and unique paper crown that reflects your personality and style.
Essential Crafting Tools
Here is the paragraphy: When it comes to crafting, having the right tools can make all the difference in the quality and enjoyment of your project. Essential crafting tools are those that are versatile, reliable, and easy to use, allowing you to focus on the creative process rather than struggling with subpar equipment. A good pair of scissors is a must-have for any crafter, as they are used for cutting a variety of materials, from paper and fabric to yarn and ribbon. A craft knife or X-Acto knife is also a valuable tool, perfect for precision cutting and trimming. A cutting mat or other protective surface is also a must, as it helps prevent damage to your work surface and makes cleanup a breeze. A ruler or straightedge is also essential, allowing you to measure and cut straight lines with ease. A pencil or marker is also a must-have, as it allows you to mark your materials and plan out your design. A glue stick or other adhesive is also a must, as it allows you to bond your materials together securely. A tape measure or other measuring tool is also useful, allowing you to measure your materials and ensure that your project is the right size. A craft box or other storage container is also a must, as it helps keep your tools and materials organized and within reach. By investing in these essential crafting tools, you'll be well on your way to creating beautiful and professional-looking projects that you'll be proud to show off.
Additional Embellishments
Additional embellishments can elevate your paper crown from a simple craft project to a stunning work of art. Consider adding some sparkle with glitter, rhinestones, or sequins. You can also use beads, buttons, or other small objects to create intricate designs and patterns. If you want to add some texture, try using fabric, felt, or even natural materials like leaves or flowers. For a more dramatic look, you can use feathers, lace, or ribbons to add volume and movement to your crown. Don't be afraid to experiment and combine different materials to create a unique and eye-catching design. With a little creativity, your paper crown can become a truly regal and show-stopping accessory.
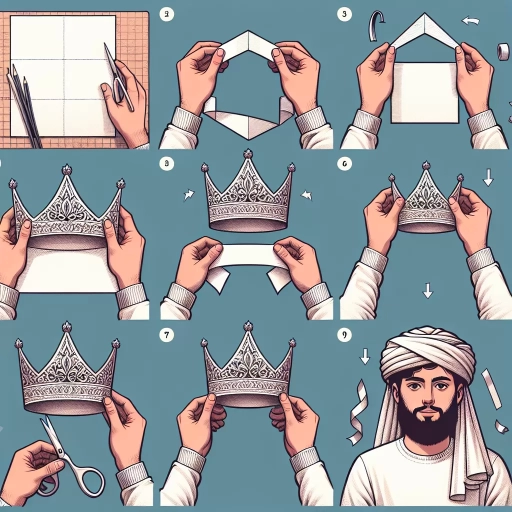
Step-by-Step Instructions
Creating a beautiful paper crown is a fun and creative activity that can be enjoyed by people of all ages. With a few simple materials and some basic crafting skills, you can create a stunning crown that's perfect for special occasions or everyday wear. In this article, we'll take you through the step-by-step process of making a paper crown, from measuring and cutting the paper strips to assembling the crown base and adding decorative elements. By following these instructions, you'll be able to create a unique and eye-catching crown that showcases your personal style. To get started, let's begin with the first step: measuring and cutting the paper strips.
Measuring and Cutting the Paper Strips
To accurately measure and cut the paper strips for your paper crown, start by determining the desired width of your strips. A good starting point is to cut strips that are about 1-2 inches wide, depending on the thickness of your paper and the desired texture of your crown. Next, measure the length of your strips, taking into account the circumference of your head and the desired height of your crown. A good rule of thumb is to cut strips that are at least 2-3 times the circumference of your head. For example, if your head measures 22 inches around, cut strips that are at least 44-66 inches long. Once you have determined the width and length of your strips, use a ruler or straightedge to draw a line along the length of your paper, and then use scissors or a craft knife to carefully cut along the line. To ensure accuracy and prevent mistakes, it's a good idea to cut a few test strips before cutting all of your paper. This will help you get a feel for the paper and ensure that your strips are the correct width and length. Additionally, consider using a paper cutter or trimmer to cut your strips, as these tools can help you achieve clean, straight cuts and prevent fraying or tearing. By taking the time to accurately measure and cut your paper strips, you'll be able to create a sturdy and durable paper crown that will hold its shape and look great.
Assembling the Crown Base
Assembling the Crown Base: To create the foundation of your paper crown, start by taking the rectangular strip of paper and folding it in half lengthwise, creating a crease in the middle. Unfold the paper and then fold the top and bottom edges towards the middle crease, making sure the edges are even and symmetrical. Next, fold the left and right edges towards the middle crease, ensuring they are even and symmetrical as well. This will create a compact rectangular shape with four flaps. Take the top flap and fold it back, creating a triangle shape, and then tuck the triangle under the layer below, securing it in place. Repeat this process with the remaining three flaps, making sure to tuck each one under the layer below, creating a sturdy base for your crown. As you assemble the base, make sure to keep the edges aligned and the corners crisp, as this will affect the overall shape and stability of your crown. By following these steps, you'll have a solid foundation to build upon, allowing you to add the decorative elements and create a stunning paper crown.
Adding Decorative Elements
Adding decorative elements is a crucial step in making a paper crown, as it elevates the overall aesthetic and makes the crown more visually appealing. To add decorative elements, start by gathering a variety of materials such as glitter, rhinestones, stickers, and colored markers. You can also use natural materials like flowers, leaves, and feathers to add a more organic touch. Once you have your materials, begin by applying a small amount of glue or adhesive to the area where you want to add the decoration. Then, carefully place the decorative element onto the glue, making sure it is centered and secure. For more intricate designs, you can use a hot glue gun to attach the elements, but be careful not to burn yourself. If you're using glitter or rhinestones, you can also use a spray adhesive to attach them to the crown. To add a more personalized touch, you can also write or draw on the crown using colored markers or paint. Finally, to add a finishing touch, you can apply a clear coat of varnish or sealant to protect the decorative elements and make the crown more durable. By adding decorative elements, you can transform a simple paper crown into a stunning and unique piece of art that reflects your personality and style.
Tips and Variations
When it comes to creating a unique and personalized crown, there are several tips and variations to consider. One of the most effective ways to make your crown stand out is to customize its design. This can be achieved by experimenting with different shapes, sizes, and materials. Additionally, using various folding techniques can add an extra layer of complexity and visual interest to your crown. Furthermore, adding a personal touch, such as incorporating meaningful symbols or colors, can make your crown truly one-of-a-kind. By exploring these different approaches, you can create a crown that not only reflects your personality but also showcases your creativity and skill. In this article, we will delve into these tips and variations, starting with customizing the crown's design.
Customizing the Crown's Design
Customizing the Crown's Design. To make your paper crown truly unique, consider customizing its design. You can add personalized touches such as the wearer's name, initials, or a special message. Use a marker or a paint pen to add the text, or cut out letters from colored paper to create a more elaborate design. You can also experiment with different shapes and patterns, such as chevrons, polka dots, or stripes. If you're making a crown for a themed party or event, incorporate elements that match the theme, such as glitter, rhinestones, or other embellishments. Additionally, you can use different colors or textures of paper to create a one-of-a-kind look. For example, you can use metallic paper, glitter paper, or even newspaper to add an extra layer of interest to your design. By customizing the crown's design, you can make it truly special and reflective of the wearer's personality.
Using Different Folding Techniques
Using different folding techniques can elevate your paper crown-making skills and add unique textures and dimensions to your design. One technique to try is the accordion fold, which involves folding the paper in a zig-zag pattern to create a 3D effect. This fold is particularly useful for creating layered, ruffled, or gathered details on your crown. Another technique is the origami fold, which involves folding the paper in a series of precise, angular folds to create intricate shapes and patterns. This fold is ideal for creating delicate, lace-like details or geometric patterns on your crown. You can also experiment with the quilling fold, which involves rolling and shaping narrow strips of paper into intricate designs. This fold is great for creating detailed, swirling patterns or floral motifs on your crown. Additionally, you can try the pleat fold, which involves folding the paper in a series of small, uniform folds to create a textured, fabric-like effect. This fold is perfect for creating a more rustic, earthy look on your crown. By incorporating different folding techniques into your design, you can add depth, visual interest, and personality to your paper crown.
Adding a Personal Touch
Adding a personal touch to your paper crown can make it truly unique and special. Consider incorporating personal symbols, motifs, or colors that hold meaning to you or the occasion. For example, if you're making a crown for a wedding, you could add a small paper flower in the bride's favorite color or a delicate paper cutout of a love bird. If you're making a crown for a birthday party, you could add a paper number or a small paper shape that represents the birthday person's interests. You could also add a personal message or the recipient's name to the crown using a marker or a small paper tag. Another idea is to use paper with a special texture or pattern that resonates with the occasion, such as glitter paper for a festive celebration or a natural fiber paper for a more rustic or earthy theme. By adding a personal touch, you can make your paper crown a one-of-a-kind creation that shows you care and pay attention to details.