How To Install Artificial Grass On Soil
Installing artificial grass on soil can be a fantastic way to achieve a lush, green lawn without the hassle of regular maintenance. Not only does it save time and water, but it also provides a safe and durable surface for outdoor activities. However, to ensure a successful installation, it's essential to follow a well-planned process. In this article, we'll guide you through the three crucial stages of installing artificial grass on soil: preparation, installation, and finishing touches. First, we'll emphasize the importance of preparation, highlighting the key steps to take before laying the artificial grass. Then, we'll walk you through the step-by-step installation process, covering everything from measuring and marking the area to securing the grass in place. Finally, we'll provide tips on adding the finishing touches and maintaining your new artificial lawn. To get started, let's begin with the foundation of a successful installation: preparation is key.
Preparation is Key
Preparation is key to a successful artificial grass installation. Before the installation process begins, it is essential to prepare the area properly to ensure a smooth and efficient process. This involves assessing the soil condition, clearing the area of debris and vegetation, and marking out the area for artificial grass installation. By doing so, you can avoid potential problems and ensure that your artificial grass looks great and lasts for a long time. In this article, we will discuss the importance of preparation in artificial grass installation and provide a step-by-step guide on how to prepare the area. First, let's start with the first step: assessing the soil condition.
Assess the Soil Condition
Here is the paragraphy: Before installing artificial grass, it's essential to assess the soil condition to ensure a stable and even base. Start by clearing the area of any debris, vegetation, or obstructions. Next, check the soil type and its composition. If the soil is heavy clay, sandy, or prone to waterlogging, it may require additional preparation, such as installing a drainage system or adding organic matter to improve its structure. Test the soil pH level, as most artificial grass products prefer a slightly acidic to neutral soil pH (between 6.0 and 7.0). Also, check for any underground utilities, such as electric or gas lines, and mark their locations to avoid damaging them during the installation process. Additionally, inspect the soil for any signs of settlement or subsidence, which could affect the artificial grass's stability and longevity. By assessing the soil condition, you can identify potential issues and take corrective measures to create a solid foundation for your artificial grass installation.
Clear the Area of Debris and Vegetation
When installing artificial grass on soil, it's essential to clear the area of debris and vegetation to ensure a smooth and even surface. Start by removing any loose debris, such as rocks, twigs, and leaves, from the area. This will prevent any obstacles from interfering with the installation process. Next, use a shovel or garden fork to remove any existing grass, weeds, or other vegetation from the area. Be sure to dig deep enough to remove the entire root system to prevent any regrowth. If you're dealing with a large area, consider renting a sod cutter or hiring a professional to help with the removal process. Once the area is clear, use a rake to level the ground and remove any remaining debris. This will provide a stable base for your artificial grass installation. Additionally, consider applying a weed barrier to prevent any future growth and ensure a long-lasting installation. By taking the time to clear the area of debris and vegetation, you'll be able to achieve a professional-looking installation that will last for years to come.
Mark Out the Area for Artificial Grass Installation
Marking out the area for artificial grass installation is a crucial step that requires attention to detail. To start, use a rope or hose to outline the perimeter of the area where you want to install the artificial grass. This will give you a clear visual representation of the space and help you identify any obstacles or challenges. Next, use a measuring tape to measure the length and width of the area, taking note of any irregularities or curves. Use a marker or spray paint to mark the boundaries of the area, making sure to account for any necessary cuts or adjustments. It's also essential to check for any underground utilities, such as electric or gas lines, and mark their locations to avoid any potential hazards. Additionally, consider the direction of the artificial grass fibers and mark the area accordingly, as this will affect the overall appearance and performance of the installation. By carefully marking out the area, you'll be able to ensure a precise and professional-looking installation that meets your needs and expectations.
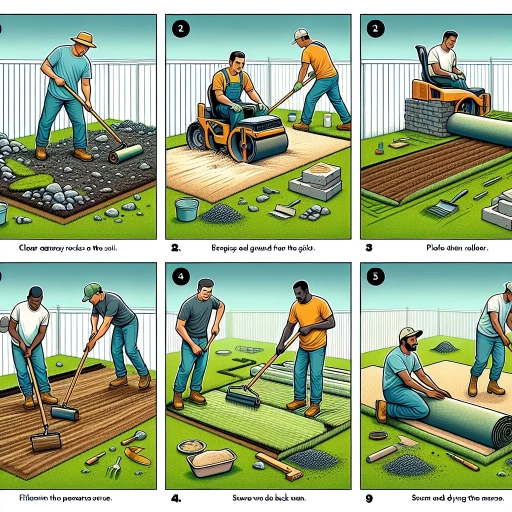
Step-by-Step Installation Process
Installing artificial grass is a fantastic way to achieve a lush, green lawn without the hassle of regular maintenance. To ensure a successful installation, it's essential to follow a step-by-step process. First, laying down a weed barrier is crucial to prevent weed growth and ensure the artificial grass remains weed-free. Next, installing a layer of compact gravel provides excellent drainage, preventing water from accumulating and damaging the artificial grass. Finally, rolling out the artificial grass and securing it with sand or glue completes the installation process. By following these steps, homeowners can enjoy a beautiful, low-maintenance lawn for years to come. With a solid foundation in place, the first step in the installation process is to lay down a weed barrier to prevent weed growth.
Lay Down a Weed Barrier to Prevent Weed Growth
Lay down a weed barrier to prevent weed growth. This is an essential step in the installation process, as it will prevent weeds from growing up through your artificial grass. The barrier should be laid down in the entire area where you plan to install the artificial grass, overlapping the edges by at least 6 inches. This will ensure that no weeds can grow through the seams. You can use a landscape fabric or a specialized weed barrier, both of which are available at most gardening stores. Once the barrier is in place, use landscape pins to secure it to the ground. Make sure to space the pins about 12 inches apart to ensure the barrier is tightly secured. This will prevent weeds from growing underneath the artificial grass and make maintenance easier. Additionally, the weed barrier will also help to prevent the artificial grass from shifting or becoming uneven over time. By laying down a weed barrier, you will be able to enjoy your artificial grass for years to come without the hassle of constant weed growth.
Install a Layer of Compact Gravel for Drainage
To ensure proper drainage and prevent water accumulation, installing a layer of compact gravel is a crucial step in the artificial grass installation process. This layer serves as a stable base that allows water to percolate through, reducing the risk of puddles and erosion. Begin by spreading a 2-3 inch layer of compact gravel, also known as decomposed granite or crushed stone, evenly across the entire area. Use a rake or a spreader to achieve a uniform thickness, making sure to cover the entire surface. Next, use a hand tamper, plate compactor, or a lawn roller to compact the gravel layer, applying even pressure to prevent settling or shifting. This process helps to create a solid base that will support the artificial grass and facilitate efficient drainage. It's essential to note that the compact gravel layer should be level and even, as any unevenness can affect the overall appearance and performance of the artificial grass. By installing a compact gravel layer, you'll be able to enjoy a stable, well-draining, and long-lasting artificial grass surface.
Roll Out the Artificial Grass and Secure with Sand or Glue
Roll out the artificial grass over the prepared base, ensuring it is aligned with the surrounding area. Use a spirit level and a straight edge to check the grass is properly aligned. Once in place, use landscape pins to secure the grass to the ground, spacing them about 6-8 inches apart. Next, apply a layer of silica sand or kiln-dried sand to the surface of the grass, spreading it evenly to weigh down the grass and prevent it from wrinkling or creasing. Alternatively, you can use a specialized adhesive to secure the grass to the ground, following the manufacturer's instructions for application and drying times. It's essential to ensure the sand or adhesive is evenly distributed to prevent any unevenness or lumps in the grass. Finally, use a brush or a broom to groom the grass, working it in the direction of the fibers to create a natural appearance. This step is crucial in achieving a realistic look and feel, as it helps to settle the fibers and prevent them from standing upright. By following these steps, you'll be able to create a beautiful, lush, and long-lasting artificial grass surface that will enhance your outdoor space.
Finishing Touches and Maintenance
The installation of artificial grass is a significant investment, and to ensure it remains in pristine condition, it's essential to focus on the finishing touches and maintenance. This involves a series of steps that not only enhance the appearance of the artificial grass but also prolong its lifespan. Three crucial aspects of artificial grass maintenance include brushing the artificial grass to give it a natural look, applying infill materials to enhance stability and appearance, and regularly inspecting and cleaning the artificial grass to prevent damage and wear. By incorporating these steps into your maintenance routine, you can enjoy a lush, green, and inviting outdoor space for years to come. To start, let's take a closer look at the importance of brushing the artificial grass to give it a natural look.
Brush the Artificial Grass to Give it a Natural Look
Here is the paragraphy: Brushing the artificial grass is an essential step to give it a natural look. This process involves using a stiff-bristled brush or a power brush to lift the fibers and remove any debris or dirt that may have accumulated during the installation process. Brushing the grass also helps to redistribute the infill material evenly, which is crucial for maintaining the grass's stability and preventing it from becoming uneven. Additionally, brushing the grass helps to prevent matting and tangling of the fibers, which can give the grass an unnatural appearance. By brushing the grass regularly, you can keep it looking its best and ensure that it remains a beautiful and functional addition to your outdoor space. It is recommended to brush the grass at least once a week, or more often if it is subjected to heavy foot traffic or extreme weather conditions. Regular brushing will also help to extend the lifespan of the artificial grass, making it a worthwhile investment for any homeowner.
Apply Infill Materials to Enhance Stability and Appearance
When it comes to installing artificial grass on soil, applying infill materials is a crucial step to enhance stability and appearance. Infill materials, such as silica sand or rubber, are spread evenly throughout the artificial grass to provide a stable base and prevent the grass from shifting or wrinkling. This not only ensures a smooth and even surface but also helps to prevent the growth of weeds and reduces the risk of erosion. Furthermore, infill materials can also improve the overall appearance of the artificial grass by giving it a more natural look and feel. For instance, silica sand can help to weigh down the grass and prevent it from becoming too fluffy or uneven, while rubber infill can provide a softer and more cushioned surface. Additionally, infill materials can also help to reduce the amount of maintenance required, as they can help to prevent the growth of weeds and reduce the need for frequent cleaning. Overall, applying infill materials is an essential step in installing artificial grass on soil, and can make a significant difference in the overall stability and appearance of the final product.
Regularly Inspect and Clean the Artificial Grass to Prolong its Lifespan
Regularly inspecting and cleaning the artificial grass is crucial to prolong its lifespan. It's recommended to inspect the turf at least once a week, looking for any debris, dirt, or stains that may have accumulated. Remove any loose debris such as leaves or twigs by hand or with a leaf blower. For more stubborn dirt and stains, use a mild detergent and warm water to clean the area. Avoid using harsh chemicals or abrasive cleaners, as they can damage the turf. It's also essential to rinse the turf thoroughly to prevent any soap residue from building up. Additionally, consider using a turf cleaner or a mixture of equal parts water and white vinegar to sanitize and deodorize the turf. Regular cleaning will not only keep the turf looking its best but also prevent the growth of bacteria and mildew, which can lead to unpleasant odors and damage to the turf. By incorporating regular inspections and cleaning into your maintenance routine, you can extend the lifespan of your artificial grass and ensure it remains a beautiful and functional addition to your outdoor space.